Give ChatGPT your own tools: connect a custom MCP server
Until recently, giving ChatGPT a tool you built yourself meant enabling Developer Mode, creating a draft app, and hoping the steps in a six-month-old guide still matched the settings page. OpenAI has since moved custom MCP servers into Plugins: you add a server by URL, ChatGPT scans its tools, and you @-mention it in a chat. This guide builds a real one — a reading-list server with three tools — proves it works, puts it on the public internet, and connects it to ChatGPT.
- What: A custom MCP server for ChatGPT — a reading-list server (
add_note,search_notes,list_notes) built with FastMCP, connected through ChatGPT's Plugins flow. - Plans: Full MCP on ChatGPT web for Business and Enterprise/Edu; Pro can connect custom servers with read/fetch permissions only. Web only — no mobile.
- Verified: November 9, 2026 — OpenAI's help-center article on connecting custom MCP servers, read the same day; FastMCP 4.1.6 on Python 3.12.3; server, client test, and raw protocol check all ran; cloudflared 2026.10.7.
- Requirement: Python 3.10+, a ChatGPT Business or Enterprise/Edu workspace (Pro works for read-only tools), about 30 minutes, $0 for the server and the tunnel.

ChatGPT already knows a lot. What it does not know is yours: your reading list, your CRM, your internal docs, the database only your team can see. The Model Context Protocol (MCP) is the open standard that closes that gap. Your code exposes tools — small functions with names, descriptions, and typed inputs — and any MCP client can call them. ChatGPT is now one of those clients.
That last part changed recently, and it is the reason most existing guides are wrong. OpenAI's Developer Mode was the old route: flip a toggle in settings, create a draft app, test it privately. That flow is gone. The Developer Mode documentation page no longer exists, and the help center now says, plainly, that you do not need to turn on Developer Mode first. Custom MCP servers moved into Plugins, with a risk warning to acknowledge instead of a toggle to flip. If a guide tells you to open Settings → Apps → Developer mode, it is describing a product that no longer ships. This tutorial follows the flow that exists today, verified against OpenAI's current help-center article on November 9, 2026.
The server you will build is deliberately small and genuinely useful: a reading list. Three tools — save a link, search your saved links, list the most recent ones — backed by a plain JSON file. No database, no auth, no framework beyond FastMCP. The point is the wiring, not the app: once ChatGPT can call these three tools, it can call any tool you write the same way.
What you'll need#
Everything below is free except the ChatGPT plan itself, and the server costs nothing to run.
- Python 3.10 or newer. Verified on Python 3.12.3 with FastMCP 4.1.6.
- A ChatGPT workspace on the right plan. This is the one hard requirement, and it is worth checking before you build anything:
| ChatGPT plan | Custom MCP servers on the web |
|---|---|
| Business | Full support — admins and owners create and publish plugins |
| Enterprise / Edu | Full support — plus RBAC to grant creation rights to selected members |
| Pro | Read/fetch only — your server's read tools work, write tools do not |
| Free, Go, Plus | No custom-server flow on the web |
OpenAI's help center lists Business and Enterprise/Edu for full MCP and Pro for read/fetch; Free, Go, and Plus get no custom-server option. Workspace admins can further control who may create connections (the Create plugins with MCPs permission) and who may use each published app. Custom servers work on ChatGPT web only — not on mobile.
- cloudflared, the Cloudflare Tunnel client. Free, no account needed for a quick tunnel. You will use it to give your laptop a public HTTPS address for the ten minutes it takes to connect the server.
- About 30 minutes. Most of it is the build and the testing; the ChatGPT connection itself takes about two minutes.
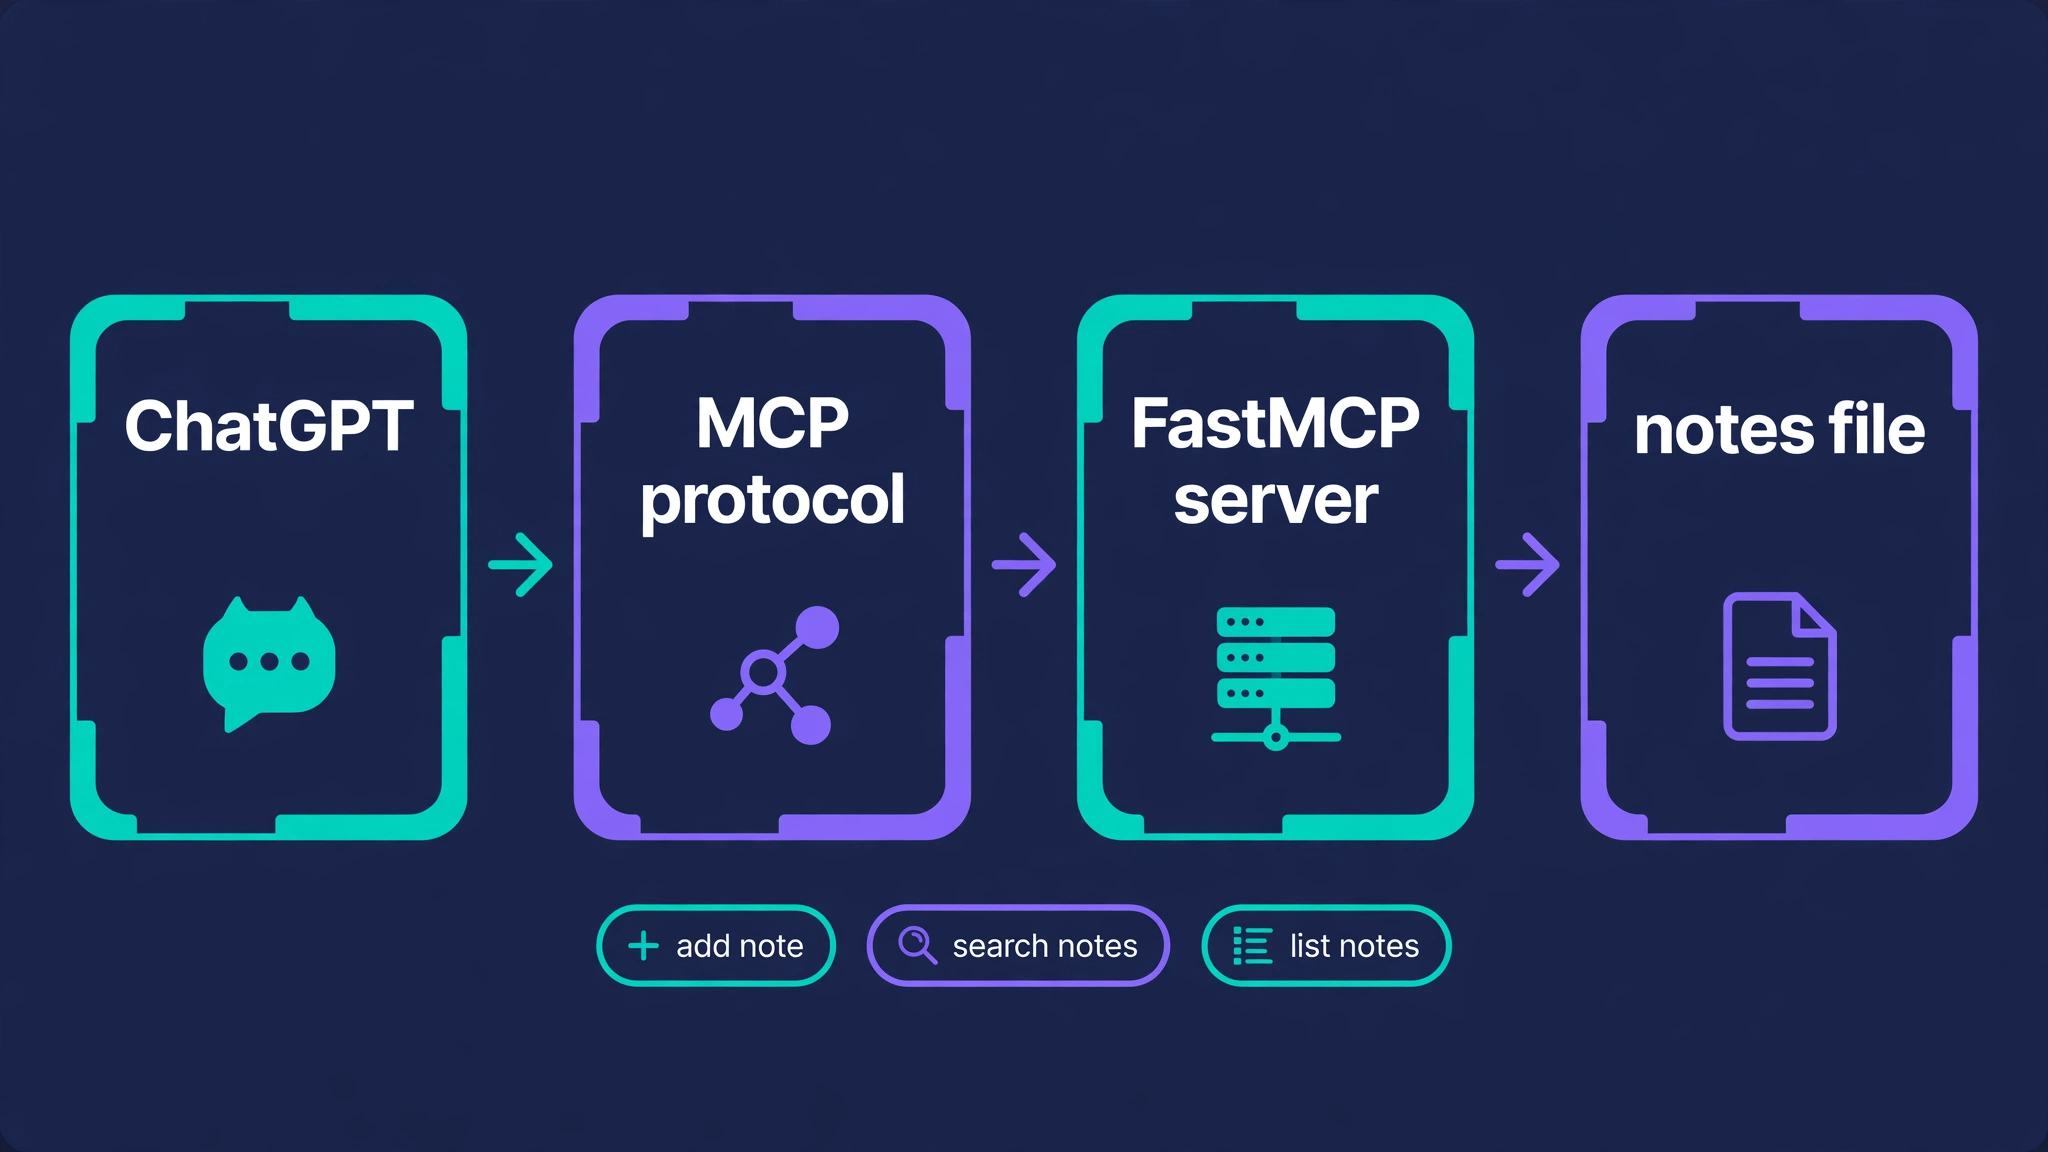
Here is how the pieces fit together. Your FastMCP server exposes three tools over HTTP. A tunnel gives that server a public address. ChatGPT connects to the public address, discovers the tools, and calls them from your chats — reading and writing your notes.json file through your code.
Step 1 — Build the server with FastMCP#
FastMCP is the Python framework for MCP servers: a FastMCP class, a @mcp.tool decorator, and a run() method that serves the server over stdio or HTTP. Create a project folder and install it:
mkdir chatgpt-notes-server && cd chatgpt-notes-server
python3 -m venv .venv
source .venv/bin/activate
pip install fastmcp
The install lands FastMCP 4.1.6 (verified November 9, 2026). Now write the server. Save this as notes_server.py:
"""Reading-list MCP server: save links you want to read later and search them.

Tools:
  - add_note(title, url, note="")  -> save a link
  - search_notes(query)            -> keyword search over saved notes
  - list_notes(limit=10)           -> most recent notes, newest first

Notes are stored in notes.json next to this file.

Run it:
  fastmcp run notes_server.py --transport http --port 8000
  # or: python notes_server.py
"""

import json
from datetime import datetime, timezone
from pathlib import Path

from fastmcp import FastMCP

mcp = FastMCP("reading-list")

NOTES_FILE = Path(__file__).with_name("notes.json")


def _load_notes() -> list[dict]:
    if not NOTES_FILE.exists():
        return []
    return json.loads(NOTES_FILE.read_text(encoding="utf-8"))


def _save_notes(notes: list[dict]) -> None:
    NOTES_FILE.write_text(json.dumps(notes, indent=2), encoding="utf-8")


def _format(note: dict) -> str:
    lines = [f"- {note['title']} ({note['url']})"]
    if note.get("note"):
        lines.append(f"  Note: {note['note']}")
    lines.append(f"  Saved: {note['saved_at']}")
    return "\n".join(lines)


@mcp.tool
def add_note(title: str, url: str, note: str = "") -> str:
    """Save a link to your reading list."""
    notes = _load_notes()
    notes.append(
        {
            "title": title,
            "url": url,
            "note": note,
            "saved_at": datetime.now(timezone.utc).isoformat(),
        }
    )
    _save_notes(notes)
    return f"Saved '{title}'. You now have {len(notes)} note(s) in your reading list."


@mcp.tool
def search_notes(query: str) -> str:
    """Search your saved notes by keyword (matches title, URL, or note text)."""
    q = query.lower()
    matches = [
        n
        for n in _load_notes()
        if q in n["title"].lower()
        or q in n["url"].lower()
        or q in n.get("note", "").lower()
    ]
    if not matches:
        return "No matching notes."
    return "\n".join(_format(n) for n in matches)


@mcp.tool
def list_notes(limit: int = 10) -> str:
    """List your most recent saved notes, newest first."""
    notes = _load_notes()
    if not notes:
        return "No notes saved yet."
    recent = notes[::-1][:limit]
    return "\n".join(_format(n) for n in recent)


if __name__ == "__main__":
    mcp.run(transport="http", host="127.0.0.1", port=8000)
Three things in this file do the real work. First, @mcp.tool turns an ordinary function into an MCP tool: the function's name becomes the tool name, its type annotations become the tool's input schema, and its docstring becomes the description ChatGPT sees when it decides which tool to call. Write docstrings as if you were explaining the tool to the model, because that is exactly what happens — the protocol check in Step 2 shows the descriptions arriving verbatim. Second, the tools are deliberately boring: plain functions over a JSON file, no framework magic. That is the whole point of MCP — your business logic stays ordinary code. Third, the __main__ block serves the server over HTTP on 127.0.0.1:8000. ChatGPT speaks the Streamable HTTP transport, so HTTP is the transport you want; the MCP endpoint will be http://127.0.0.1:8000/mcp.
Step 2 — Run it and prove the tools work#
Start the server:
python notes_server.pyYou should see FastMCP's startup banner, then these two lines:
Starting MCP server 'reading-list' with transport 'http' on http://127.0.0.1:8000/mcp
INFO:     Uvicorn running on http://127.0.0.1:8000
A quick smoke test: curl -s -o /dev/null -w "%{http_code}" http://127.0.0.1:8000/mcp returns 400. That is the server telling you a bare GET is not a valid MCP call — it is not a failure. The real test is a client that speaks the protocol. Save this as test_client.py and run it while the server is up:
"""Smoke test for notes_server.py using FastMCP's own Client.

Expects the server already running at http://127.0.0.1:8000/mcp
(either `python notes_server.py` or `fastmcp run notes_server.py`).

Run: python test_client.py
"""

import asyncio

from fastmcp import Client


def _text(result) -> str:
    """Extract the plain-text payload from a CallToolResult."""
    if hasattr(result, "content") and result.content:
        return "\n".join(block.text for block in result.content if hasattr(block, "text"))
    return str(result)


async def main() -> None:
    async with Client("http://127.0.0.1:8000/mcp") as client:
        tools = await client.list_tools()
        print("TOOLS:", [t.name for t in tools])

        r1 = await client.call_tool(
            "add_note",
            {
                "title": "FastMCP docs",
                "url": "https://gofastmcp.com",
                "note": "Official FastMCP documentation",
            },
        )
        print("ADD 1:", _text(r1))

        r2 = await client.call_tool(
            "add_note",
            {
                "title": "MCP specification",
                "url": "https://modelcontextprotocol.io",
                "note": "The open protocol spec",
            },
        )
        print("ADD 2:", _text(r2))

        r3 = await client.call_tool("search_notes", {"query": "fastmcp"})
        print("SEARCH 'fastmcp':\n" + _text(r3))

        r4 = await client.call_tool("search_notes", {"query": "zzz-no-such-word"})
        print("SEARCH 'zzz-no-such-word':", _text(r4))

        r5 = await client.call_tool("list_notes", {"limit": 10})
        print("LIST (limit 10):\n" + _text(r5))

        r6 = await client.call_tool("list_notes", {"limit": 1})
        print("LIST (limit 1):\n" + _text(r6))

    print("CLIENT TEST DONE")


if __name__ == "__main__":
    asyncio.run(main())
Run it:
python test_client.pyThis is the exact output from the verification run on November 9, 2026:
TOOLS: ['add_note', 'search_notes', 'list_notes']
ADD 1: Saved 'FastMCP docs'. You now have 1 note(s) in your reading list.
ADD 2: Saved 'MCP specification'. You now have 2 note(s) in your reading list.
SEARCH 'fastmcp':
- FastMCP docs (https://gofastmcp.com)
  Note: Official FastMCP documentation
  Saved: 2026-11-09T17:27:47.895250+00:00
SEARCH 'zzz-no-such-word': No matching notes.
LIST (limit 10):
- MCP specification (https://modelcontextprotocol.io)
  Note: The open protocol spec
  Saved: 2026-11-09T17:27:47.995526+00:00
- FastMCP docs (https://gofastmcp.com)
  Note: Official FastMCP documentation
  Saved: 2026-11-09T17:27:47.895250+00:00
LIST (limit 1):
- MCP specification (https://modelcontextprotocol.io)
  Note: The open protocol spec
  Saved: 2026-11-09T17:27:47.995526+00:00
CLIENT TEST DONE
Every behavior you need is in that output: the tool list is exactly the three tools, the count climbs 1 → 2, search finds a match and reports a miss cleanly, and list_notes returns newest first and honors limit=1. Check notes.json on disk — both notes are there with ISO timestamps. The same test passes unchanged if you launch the server through the CLI instead (fastmcp run notes_server.py --transport http --port 8000); note that the CLI imports your server object and does not execute the __main__ block, so the transport and port must come from the command line.
One more check, below the client library, proves the server speaks the protocol rather than just FastMCP's dialect. A raw HTTP check with only the standard library — POST /mcp with an initialize request — returns HTTP 200, a Mcp-Session-Id header, and protocol version 2025-03-26 with serverInfo naming reading-list 4.1.6. A follow-up tools/list call returns all three tools with correct input schemas (title and url required for add_note, note defaulting to "", limit an integer defaulting to 10). Two details matter if you ever debug the raw protocol: every call after initialize must carry the Mcp-Session-Id header, and each tool's outputSchema is wrapped as {"result": {"type": "string"}} — clients still receive plain text, so nothing changes for the reader. One gotcha to file away: after installing FastMCP 4.1.6, import httpx fails — the HTTP library ships as httpx2 (import name httpx2). Use FastMCP's Client or the standard library for HTTP checks, as this guide does.
Step 3 — Check it with MCP Inspector#
The client test proves the tools work. The Inspector proves a human can see them — and it is the same check OpenAI's own developer docs tell you to run before connecting a server to ChatGPT. With the server still running, launch it:
npx @modelcontextprotocol/inspector@latestThe command prints a local URL (on port 6274 by default). Open it in your browser and the Inspector's web UI appears. Set Transport Type to Streamable HTTP, enter http://127.0.0.1:8000/mcp as the URL, and click Connect. Then open List Tools: you should see add_note, search_notes, and list_notes, each with the description from its docstring and its input schema. Pick add_note, fill in a title and URL, and call it — the result comes back in the UI, and the note lands in notes.json. If the Inspector cannot connect, the server is not actually reachable at that URL — fix that now, because ChatGPT will hit the same wall in Step 5. The Inspector version verified for this guide is 2.14.0 (--version), run through npx with no global install.
Step 4 — Put it on the public internet#
ChatGPT cannot reach your laptop. Its help center is explicit: a local MCP server cannot be connected directly, and custom servers must live at a public HTTPS endpoint. The fastest way to get one is a Cloudflare Tunnel — a single command that gives localhost:8000 a public address, no account and no DNS changes required.
Install cloudflared, the tunnel client. On Linux, the download below fetches the latest release binary (version 2026.10.7 was verified for this guide):
curl -sL -o /tmp/cloudflared https://github.com/cloudflare/cloudflared/releases/latest/download/cloudflared-linux-amd64
chmod +x /tmp/cloudflared
/tmp/cloudflared --version
# cloudflared version 2026.10.7 (built 2026-10-30-17:05 UTC)
On macOS, install it with Homebrew (brew install cloudflared); on Windows, use the installer from Cloudflare's download page. Then, with your server still running on port 8000, start the tunnel:
cloudflared tunnel --url http://localhost:8000Cloudflared prints a URL like https://abcdef-1234.trycloudflare.com — that is your server's public address. Your MCP endpoint is that URL with /mcp appended: https://abcdef-1234.trycloudflare.com/mcp. Keep both the server and the tunnel running; when either stops, the public address stops answering. Two things to know before you rely on this address: a quick tunnel is for experimenting — Cloudflare says so itself when the tunnel starts, and it offers no uptime guarantee — and the address is random and temporary. For anything permanent, create a named tunnel (cloudflared tunnel login, then create and route dns), which gives you a stable hostname on your own domain.
If your server must never touch the public internet — it sits on a company network, for example — OpenAI's alternative is the Secure MCP Tunnel: it connects a private server to ChatGPT without exposing it publicly. In the Plugins flow in Step 5, choose Tunnel instead of entering a URL, then select an available tunnel or enter its tunnel ID. The setup lives in OpenAI's Secure MCP Tunnel guide; the rest of this tutorial is the same either way, because ChatGPT sees the same tools either way.
Step 5 — Connect it in ChatGPT#
This is the part the old guides get wrong, so follow the current flow exactly. It was verified against OpenAI's help-center article "Connecting custom MCP servers in ChatGPT" on November 9, 2026. You do not need to turn on Developer Mode first.
- Open ChatGPT on the web and go to Plugins.
- Select the plus button, then Add custom MCP server.
- Enter a name —
Reading List— and optionally a description. - Under Connection, enter your server's public HTTPS MCP endpoint URL:
https://abcdef-1234.trycloudflare.com/mcp(your own tunnel address, with/mcpon the end). Or select Tunnel and enter a Secure MCP Tunnel ID. - Configure authentication. This server has none, so leave it as no-authentication.
- Review the risk warning and select the I understand and want to continue checkbox.
- Select Create as a plugin, then review the discovered tools and metadata. You should see
add_note,search_notes, andlist_notes— the same three tools from Step 2.
That is the whole connection. If you are a workspace admin or owner, the plugin is now a draft you can publish for the workspace from the Admin Console (Plugins → Manage Legacy Apps → Drafts → Publish); Enterprise and Edu admins can also use role-based access control to decide who may create connections and who may use each app. On a Business workspace, only admins and owners can create and publish these plugins at all — if the option is missing, that is the first thing to check.
Step 6 — Use it in a real conversation#
Install the plugin, start a new conversation, type @ in the prompt box, and select Reading List. App selection applies to the message where you use it, not the whole conversation — @-mention the plugin again whenever a follow-up needs a fresh tool call. Try these, in order:
Save this to my reading list: "The Model Context Protocol" at https://modelcontextprotocol.io, note "the open protocol spec"ChatGPT should call add_note — and pause to ask for your confirmation first. Write actions get a confirmation prompt based on the app's permissions and the action's context; that is expected, not an error. Confirm it, then check notes.json: the note is there. Now try the read side:
What have I saved about FastMCP?ChatGPT calls search_notes with fastmcp and answers from your file, not from its training data. Finally:
List my five most recent saved notes.That is list_notes with limit=5. You have just given ChatGPT a memory it did not have — one that lives in a file on your machine, under your control, through an interface any MCP client can use. The same three-step shape (build a tool, verify it, connect it) scales to the interesting version of this idea: a server that wraps your CRM, your docs, your database. The protocol does not care what the tool does; it only cares that the tool is honest about its inputs.
Which approach should you use?#
ChatGPT reaches MCP servers more than one way now. Pick by where you work and who the server is for:
| Route | Best for | What to know |
|---|---|---|
| Web plugin (this guide) | Teams and individuals on Business / Enterprise / Edu who want the server in every chat | Public HTTPS URL required; admins publish for the workspace; web only |
| Developer Mode (legacy) | Nobody, now — it was the old toggle path | The docs page no longer exists; the Plugins flow replaced it. Do not follow old guides |
| ChatGPT desktop app | People who live in the macOS / Windows app | The app can connect MCP servers, including ones running locally; check Settings in the app for the current flow |
| Responses API | Developers building their own apps and agents | Pass the MCP server as a tool to the API instead of connecting it to ChatGPT's chat UI |
| Secure MCP Tunnel | Servers on private or company networks | No public exposure; pick Tunnel in the Plugins flow and enter the tunnel ID |
If you only need this for yourself, the web plugin route is the right default: it is the flow OpenAI documents, it works from any browser, and the tunnel keeps your server private except for the one endpoint ChatGPT calls. Reach for the Responses API when you are building a product rather than chatting — our hands-on guide to GPT-6.1 Terra with the Responses API covers that side.
Troubleshooting#
- ChatGPT does not see a tool you just added. After an admin first approves a connection, ChatGPT uses a frozen snapshot of the server's tools — later changes are not applied automatically. An admin must refresh the tool list from the workspace app settings. New actions arrive disabled by default and need to be enabled, and a tool whose definition changed incompatibly can error until the snapshot is refreshed.
- Connection failed, or the server is unreachable. The URL must be a public HTTPS endpoint.
localhostwill never work from ChatGPT's side, and a quick tunnel stops answering the momentcloudflaredexits. Confirm the tunnel process is still running and the URL still loads. - Only the read tools work. Pro plans connect custom servers with read/fetch permissions only. Write tools such as
add_noteneed a Business or Enterprise/Edu workspace. - The option to add a server is missing. Check two things: your plan, and your workspace permissions. Creating connections requires the
Create plugins with MCPspermission; on Business workspaces only admins and owners hold it by default. Custom servers are web-only, so the option will not appear on mobile. - ChatGPT loses access after a while. If your server uses OAuth, confirm the provider issues refresh tokens — for OpenID Connect, include the
offline_accessscope and verify it is advertised in the provider's discovery endpoints. Without refresh tokens, ChatGPT can lose access when the original authorization expires and users must reauthenticate. - ChatGPT asks for confirmation on every write. That is by design. Confirmation depends on the app's permissions, the action's context, and its potential impact, and especially risky actions may be blocked rather than offered for approval. Enterprise admins can configure which actions an app may take, before and after publishing.
- Should you connect a server someone else built? Only one you trust, and only after vetting it. OpenAI's warning is blunt: connecting to unsafe or untrusted MCP servers may increase exposure to security risks, including prompt injection — a server can return tool output crafted to steer the model. You are responsible for verifying that any app is safe and appropriate before you publish its connection.
The takeaway#
The durable skill in this guide is not FastMCP and not the tunnel — it is the shape of the workflow. Build a small server that does one honest thing, prove it works with a real client and a raw protocol check, give it a public address, and connect it through the flow OpenAI documents today. Everything after that is just more tools on the same server. And if you take one thing from the current state of the docs, let it be this: the Developer Mode guides are history. The next time a setup post tells you to flip a toggle that no longer exists, check the date — then check the help center.
Verification note#
Verified November 9, 2026: FastMCP 4.1.6 on Python 3.12.3; the server in Step 1 ran and every tool was called through FastMCP's Client with the output shown in Step 2; a raw HTTP protocol check confirmed initialize (HTTP 200, protocol 2025-03-26) and tools/list returning all three tools; the fastmcp run CLI launch was tested the same way; MCP Inspector 2.14.0 was run through npx; cloudflared 2026.10.7 was installed from the release binary and its tunnel --url flag verified from its own help output. The ChatGPT connection steps follow OpenAI's help-center article read the same day; the final @-mention test runs in your own workspace, and minting a live tunnel URL needs an unproxied network connection.
Sources#
- OpenAI help center — Connecting custom MCP servers in ChatGPT — the Plugins flow, plan rules, Secure MCP Tunnel, frozen tool snapshots, OAuth refresh tokens, and the statement that Developer Mode is not required; read November 9, 2026.
- FastMCP quickstart — the
FastMCPclass,@mcp.tool,run()transports, thefastmcp runCLI, and HTTP deployment; read November 9, 2026. - OpenAI developer documentation — Developer Mode guide — returns 404 as of November 9, 2026 and is absent from OpenAI's documentation indexes; the current guidance is the help-center article above. Confirmed by a live-browser read the same day.
- Cloudflare Tunnel — cloudflared 2026.10.7,
cloudflared tunnel --helpoutput and quick-tunnel log, run November 9, 2026.