One API for every LLM: run LiteLLM as your AI gateway
Stop hardcoding model providers into your app. Stand up LiteLLM's OpenAI-compatible proxy, wire in multiple models, and prove failover, retries, load balancing, and caching against live traffic — no API keys required.
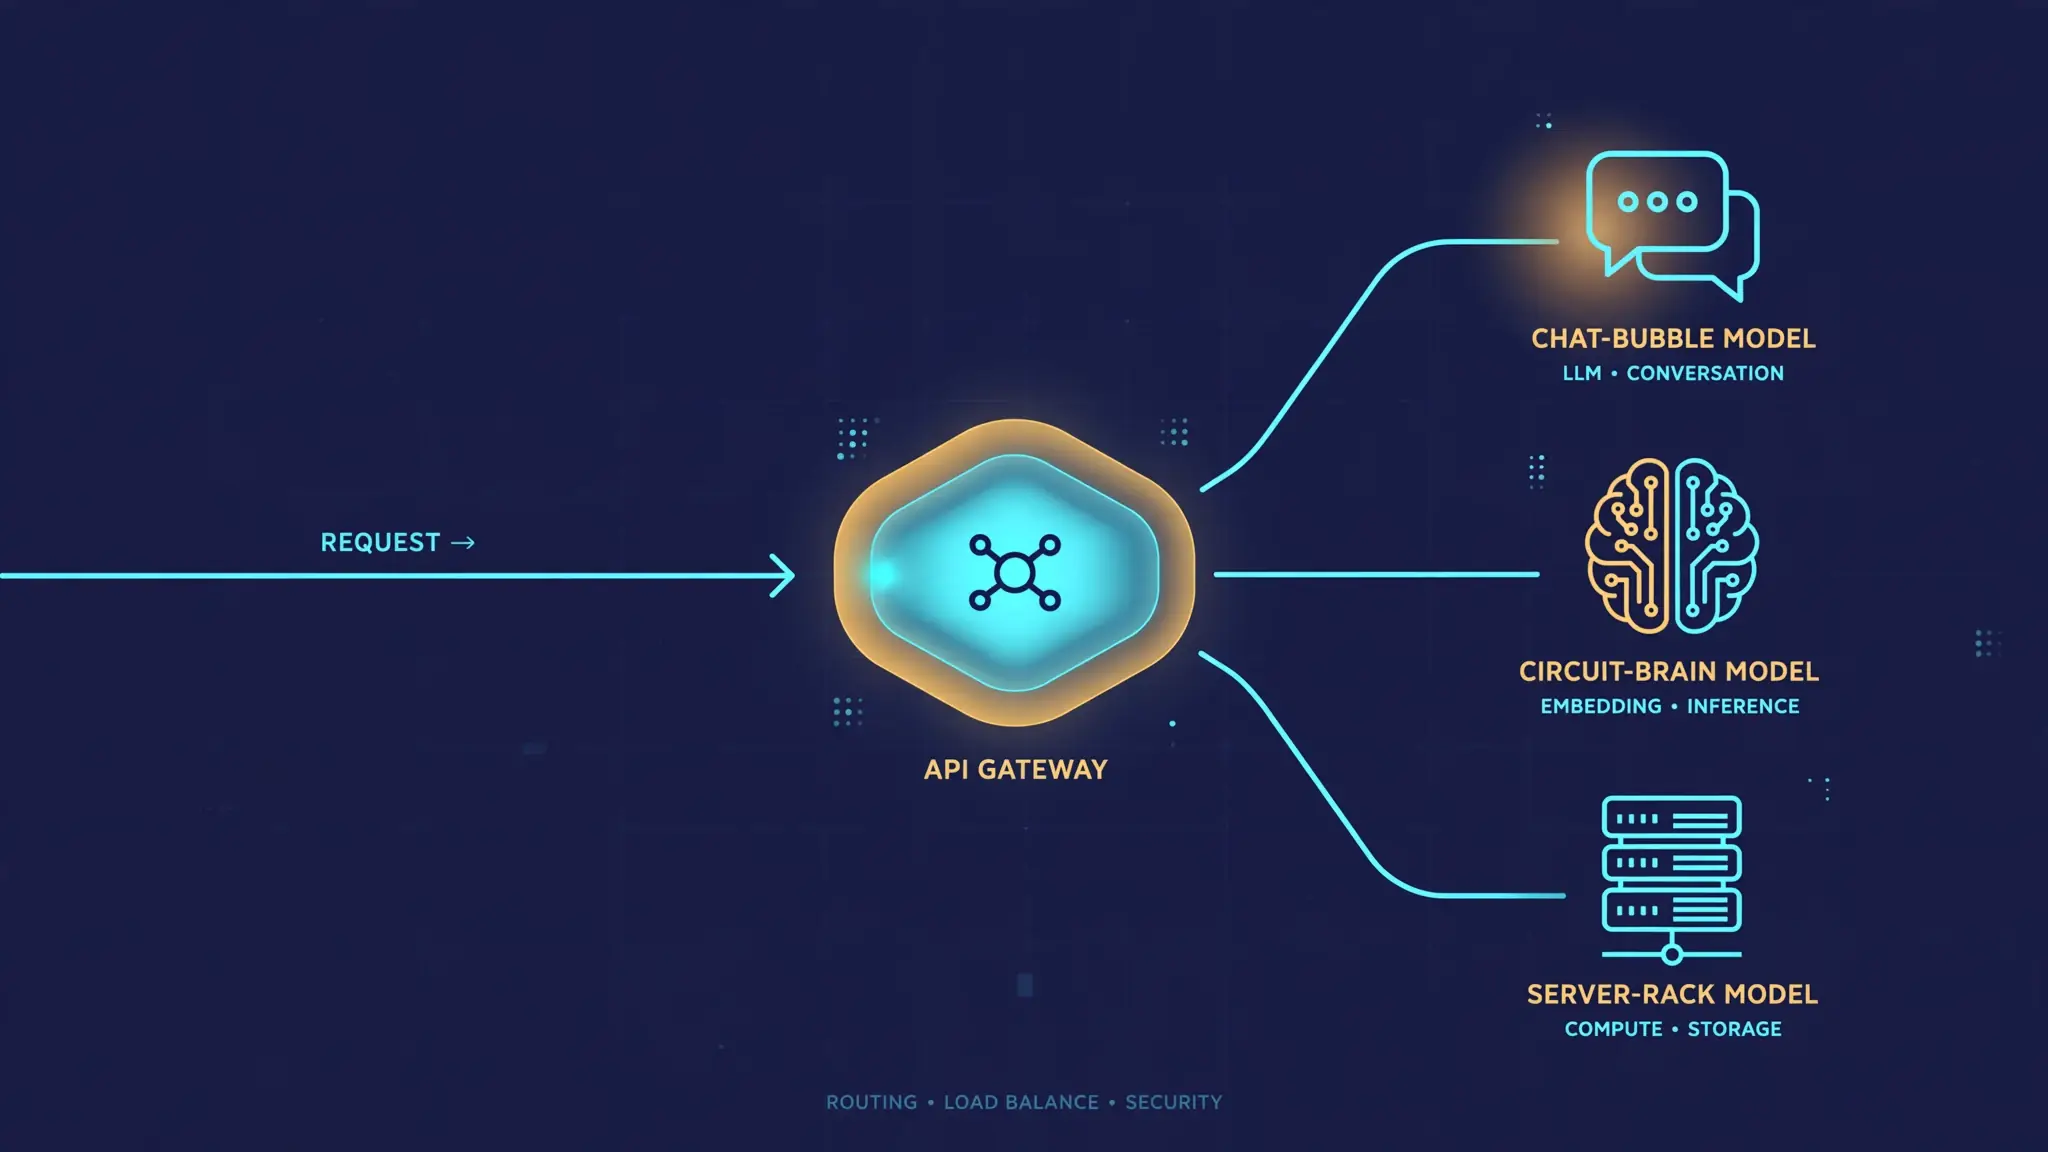
Every production LLM app eventually hits the same wall: your code is married to one provider's API. The moment that provider has an outage, rate-limits you at the worst possible hour, or changes its pricing, you are editing call sites at 2 a.m. Meanwhile your traffic keeps growing, your team keeps adding features, and every new model release forces the same question — how do we even try the new thing without rewriting the integration?
The fix is a gateway: one stable API surface between your app and every model provider. LiteLLM's proxy is the open-source standard for exactly this — a single OpenAI-compatible endpoint that routes to 100+ backends (OpenAI, Anthropic, Bedrock, Azure, Ollama, vLLM, Together, and the rest), with retries, failover, load balancing, caching, and spend tracking built in. Your app stops caring which provider serves a request. The gateway decides, and it decides per request.
In this tutorial you will stand up that gateway from scratch, register your first model alias, prove failover and caching work against live traffic, and learn when each feature earns its place. Every command below was run and verified against LiteLLM 1.103.0 — no API keys required, because the whole thing works on mock responses until you are ready for real traffic.
What you'll need#
- Python 3.10 or newer. LiteLLM 1.84+ requires it — the docs call this out explicitly, and
pipon an older interpreter will silently install a stale 1.83.x release. - A terminal and about 20 minutes. Everything runs on
localhost; nothing is deployed anywhere. - No API keys, no accounts, no cloud. Steps 1–6 use
mock_responseconfigs so every behavior is testable for free. I will show exactly where real keys go when you graduate to production.
Step 1: Install and launch the gateway#
Install the proxy bundle. The official docs recommend uv:
uv tool install 'litellm[proxy]'Plain pip works too — that is what I used for testing:
pip install 'litellm[proxy]'
litellm --version
The gateway is driven by a single YAML config. Create config.yaml with one model alias:
model_list:
  - model_name: smart-chat          # the alias your app will use
    litellm_params:
      model: openai/gpt-4o-mini     # provider/model in LiteLLM's format
      api_key: os.environ/OPENAI_API_KEY
Two concepts to lock in now, because everything else builds on them. model_name is the user-facing alias — it is the only name your application ever sees. litellm_params holds everything LiteLLM's completion() accepts: the real provider model, keys, base URLs, timeouts. Secrets go in environment variables (os.environ/...), never in the file you commit.
For this tutorial, swap the real key for a mock so nothing leaves your machine:
      api_key: sk-test-key
      mock_response: "Mock reply from the gateway — no provider was called."
Start the proxy and confirm it is healthy:
litellm --config config.yaml
# new terminal:
curl -s http://localhost:4000/health/liveliness -o /dev/null -w "%{http_code}\n"
# 200
The gateway serves on port 4000 by default. Now send your first chat request:
curl http://localhost:4000/chat/completions \
  -H "Content-Type: application/json" \
  -d '{"model":"smart-chat",
       "messages":[{"role":"user","content":"What is 17 * 23?"}]}'
You get back a standard OpenAI-shaped response whose content is your mock string — the gateway, the alias, and the endpoint all work. Check what the gateway knows about:
curl -s http://localhost:4000/models | python3 -c \
  "import json,sys; print([m['id'] for m in json.load(sys.stdin)['data']])"
# ['smart-chat']
Step 2: Point your app at the gateway — the one-line change#
This is the entire migration for existing OpenAI SDK code. Change the base URL; keep everything else:
from openai import OpenAI

client = OpenAI(
    base_url="http://localhost:4000",  # was: default OpenAI endpoint
    api_key="sk-anything",              # placeholder until you set a master key
)
resp = client.chat.completions.create(
    model="smart-chat",                 # your gateway alias, not a provider model
    messages=[{"role": "user", "content": "Summarize this changelog in one line."}],
)
print(resp.choices[0].message.content)
That is the whole contract: any OpenAI-compatible client — the OpenAI SDK, LangChain, LlamaIndex, the Anthropic and Mistral SDKs — talks to the gateway, and the gateway translates to whatever the backend needs. Swap the alias in config.yaml from openai/gpt-4o-mini to anthropic/claude-sonnet-4-5 and your app code does not change at all. This is the single highest-leverage property of the architecture: provider changes become config changes.
A note on auth: with no master key configured, the gateway accepts requests without a token — fine for local development. In production, set a master key and mint per-team virtual keys with POST /key/generate; that also unlocks per-key spend tracking and budgets.
Step 3: Spread load across deployments#
Give the same alias two deployments — two list entries, one model_name. The gateway load-balances between them automatically:
model_list:
  - model_name: balanced-chat
    litellm_params:
      model: openai/gpt-4o-mini
      api_key: sk-test-key
      mock_response: "Reply from deployment A"
    model_info:
      id: dep-a
  - model_name: balanced-chat
    litellm_params:
      model: openai/gpt-4o-mini
      api_key: sk-test-key
      mock_response: "Reply from deployment B"
    model_info:
      id: dep-b
Every response carries an x-litellm-model-id header naming the deployment that served it. Eight requests against this config split across both deployments — proof the router is distributing, not pinning:
for n in 1 2 3 4 5 6 7 8; do
  curl -s -D - http://localhost:4000/chat/completions \
    -H "Content-Type: application/json" \
    -d "{\"model\":\"balanced-chat\",
         \"messages\":[{\"role\":\"user\",\"content\":\"probe number $n\"}]}" \
    -o /dev/null | grep -i "x-litellm-model-id"
done
# x-litellm-model-id: dep-b
# x-litellm-model-id: dep-a
# ... split across both
Use this pattern whenever you have two of anything: two API keys against the same provider (doubles your effective rate limit), a primary region plus a backup region, or a big model and a small model you are A/B testing. The alias stays constant; the fleet behind it changes.
Step 4: Survive a provider outage with failover#
Outages are a matter of when. Simulate one honestly: point the primary deployment at an endpoint where nothing listens, and give the group a healthy backup.
model_list:
  - model_name: resilient-chat
    litellm_params:
      model: openai/gpt-4o-mini
      api_base: http://127.0.0.1:9/v1   # dead: simulates a provider outage
      api_key: sk-test-key
      timeout: 3
    model_info:
      id: primary-dead
  - model_name: resilient-chat
    litellm_params:
      model: openai/gpt-4o-mini
      api_key: sk-test-key
      mock_response: "Served by the backup deployment — the primary was down."
    model_info:
      id: backup-alive

litellm_settings:
  num_retries: 1
Send a request. The gateway tries the primary, watches it fail, and serves from the backup — your app sees one clean 200:
curl -s -D - http://localhost:4000/chat/completions \
  -H "Content-Type: application/json" \
  -d '{"model":"resilient-chat",
       "messages":[{"role":"user","content":"hello failover test"}]}' \
  | grep -iE "x-litellm-model-id|x-litellm-attempted"
# x-litellm-model-id: backup-alive
# x-litellm-attempted-retries: 1
The headers are your audit trail: which deployment served, how many retries were attempted. That is intra-group failover — it happens automatically whenever a group has more than one deployment.
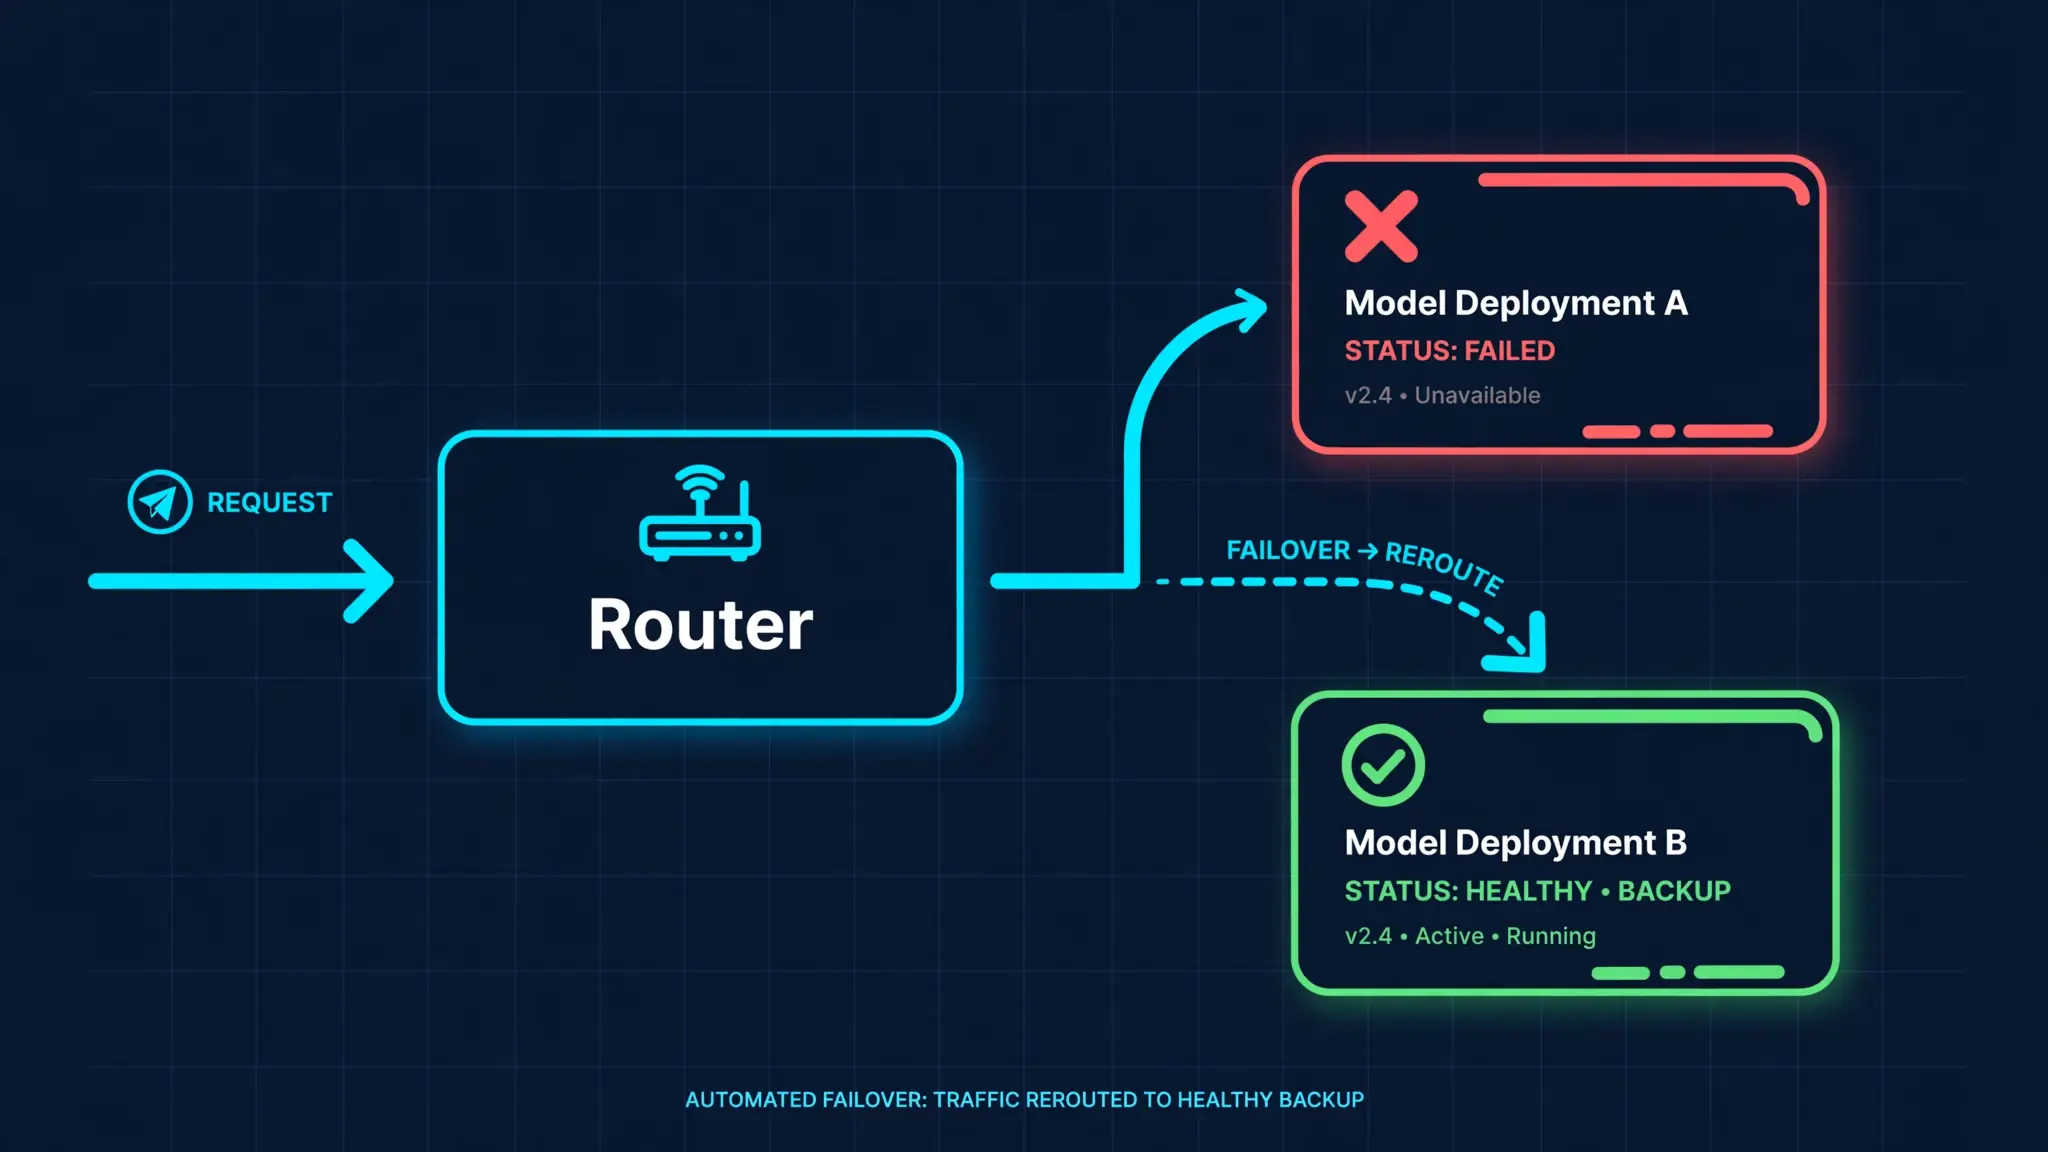
For the harder case — every deployment in the group is down — add a cross-group fallback in litellm_settings:
litellm_settings:
  num_retries: 1
  fallbacks: [{"resilient-chat": ["cheap-chat"]}]
With both resilient-chat deployments pointed at the dead endpoint, the same request now lands on the fallback group:
# x-litellm-model-group: cheap-chat
# x-litellm-attempted-fallbacks: 1
The response content comes from cheap-chat, but the headers record that the client asked for resilient-chat and one fallback was attempted. LiteLLM distinguishes three fallback flavors: fallbacks for general errors (429s, 500s, connection failures), content_policy_fallbacks for provider content-filter rejections, and context_window_fallbacks for over-long prompts (pair the last with enable_pre_call_checks: true in router_settings so the gateway checks length before calling the provider). A practical tip from the docs: trigger each fallback type deliberately in a non-production environment before you trust it in production.
Step 5: Stop paying for the same answer twice#
Enable exact-match caching — two lines in litellm_settings:
litellm_settings:
  cache: True
  cache_params:
    type: local
Send the identical request twice and watch the headers:
PAYLOAD='{"model":"balanced-chat",
  "messages":[{"role":"user","content":"what is the cache key behavior"}]}'
curl -s -D - http://localhost:4000/chat/completions \
  -H "Content-Type: application/json" -d "$PAYLOAD" -o /dev/null \
  | grep -ci "x-litellm-cache-key"   # 0 — first request, cache miss
curl -s -D - http://localhost:4000/chat/completions \
  -H "Content-Type: application/json" -d "$PAYLOAD" -o /dev/null \
  | grep -i "x-litellm-cache-key"    # present — served from cache
The second response carries x-litellm-cache-key: no provider was called, no tokens were billed, latency was near zero. Exact-match caches key on a hash of the whole request, so any change to the conversation is a miss — perfect for repeated system prompts, classification calls, and eval harnesses.
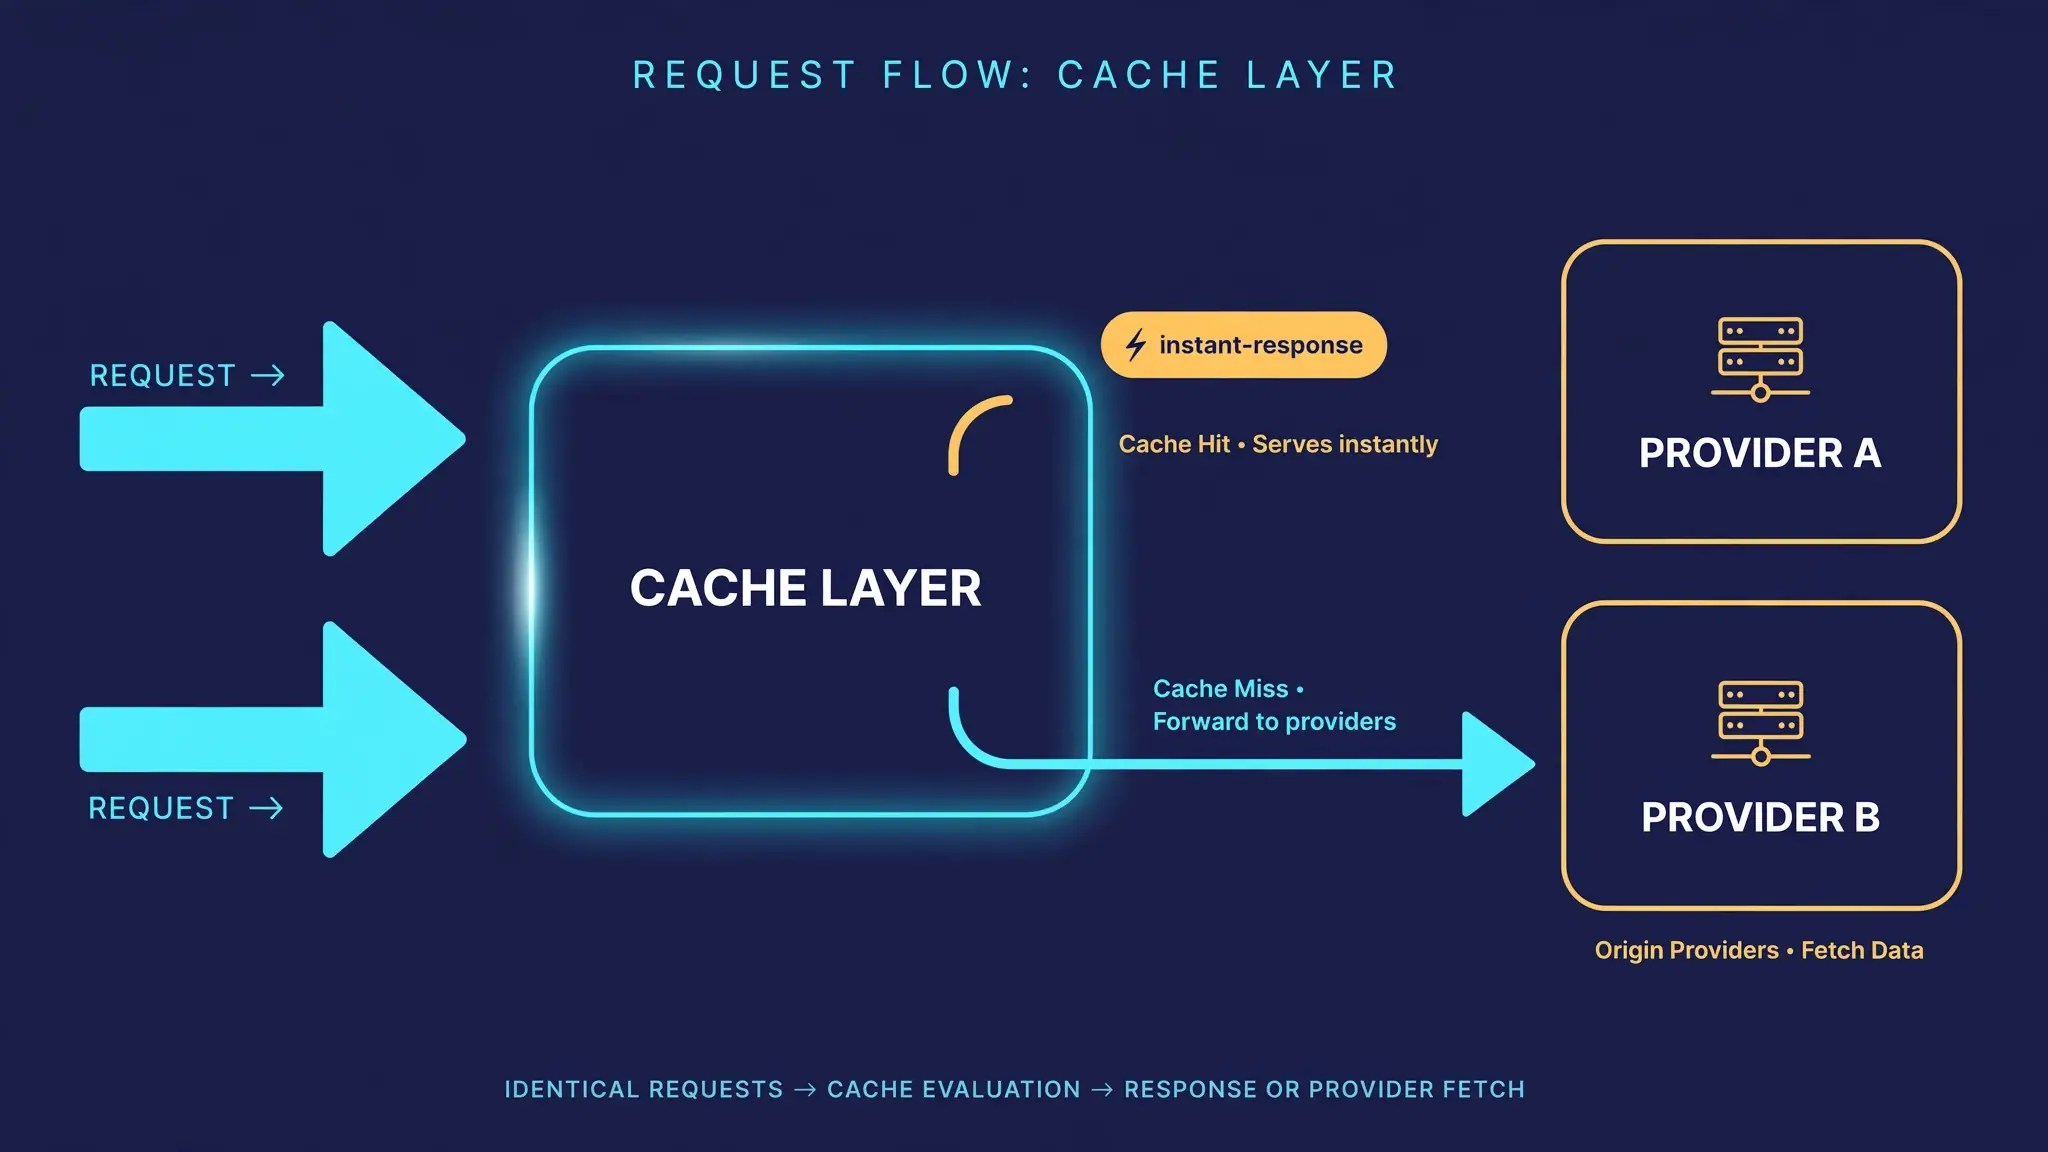
Two things to know before production. First, type: local is an in-memory cache — one per worker process — so use it for development only; the right default past a single worker is type: redis with REDIS_URL set, and curl http://localhost:4000/cache/ping tells you whether the cache is healthy. Second, LiteLLM also offers semantic caching, which serves the nearest previous answer above a similarity threshold. The docs themselves warn this suits single-shot prompts and goes badly wrong on agentic traffic — do not turn it on for multi-turn conversations.
Which approach should you use?#
| Goal | Reach for |
|---|---|
| One stable endpoint for many providers | model_list aliases (Steps 1–2). App code never names a provider again. |
| Survive an outage or rate limit | num_retries plus fallbacks to a cheaper group (Step 4). Test each fallback type deliberately. |
| Spread load or A/B two deployments | Multiple deployments under one model_name (Step 3); watch x-litellm-model-id. |
| Cut spend on repeated prompts | Exact-match cache (Step 5). Redis in production; semantic cache only for single-shot prompts. |
| Teams, budgets, per-key limits | Master key + POST /key/generate virtual keys; spend logs record every request. |
| Block PII or prompt injections | guardrails section (e.g. Presidio pre_call PII masking) — config-driven, runs before the provider is called. |
A word on testing: keep a mock-backed config like the one in this tutorial in your repo. It lets CI exercise your whole gateway path — aliases, fallbacks, caching — without spending a cent or depending on provider uptime. Promote the same config shape to staging with real keys when you are ready.
The takeaway#
A gateway turns provider integration from code into configuration. One OpenAI-compatible endpoint, aliases instead of provider names, failover that your app never notices, and caching that cuts your bill on repeated work. The setup above runs on your laptop in minutes, and the config file you tested with mocks is the same shape you will ship with real keys — plus a master key, Redis, and virtual keys when teams arrive. Stop hardcoding providers; let the gateway absorb the chaos.