Pi: the 110,000-star open-source coding agent you can point at any model
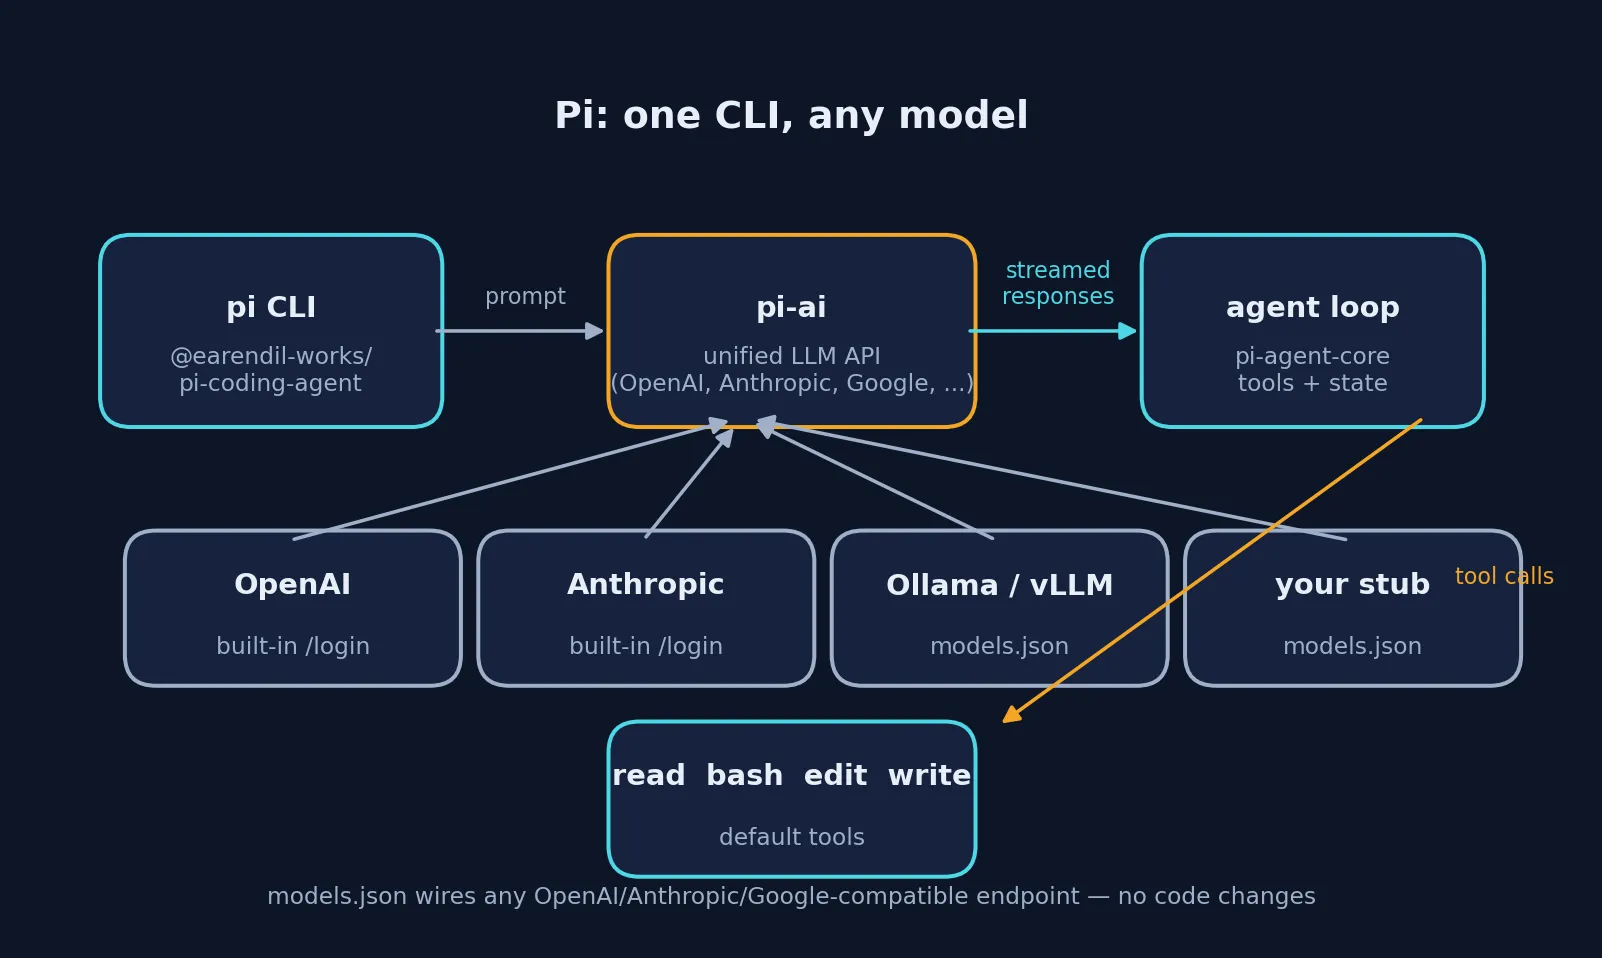
Pi is the MIT-licensed coding agent that rocketed to GitHub trending: a terminal UI, a scriptable one-shot mode, a unified API across OpenAI, Anthropic, and Google, and a models.json file that aims it at any OpenAI-compatible endpoint. We installed version 0.99.2, wired it to a fake endpoint, and watched a real agent loop write a file, read it back, and answer — in 3.7 seconds, for $0. Every command below ran exactly as shown.

Why this is blowing up now
Every few months a new coding agent lands and the developer internet has a week of opinions. Pi (earendil-works/pi) is this season's: at the time of writing it sits at 110,901 GitHub stars and was on GitHub's daily trending page. The npm package @earendil-works/pi-coding-agent first published on September 11, 2026; version 0.99.2 landed September 30. The repository is a TypeScript monorepo of 16 published packages — the CLI, a reusable agent runtime, a terminal UI kit, a unified multi-provider LLM API — all MIT licensed.
It comes from Earendil Works — the project the libGDX creator Mario Zechner (badlogicgames) has been teasing for months — and it reads like a deliberate answer to the two things that annoy engineers about every other coding agent: being locked to one vendor's models, and having no clean way to script the agent instead of babysitting a chat. Pi ships both. You define models in a plain JSON file (a local stub server qualifies), and you run the whole loop headless with pi --print — stdin, stdout, exit codes, done. That combination is exactly what makes it worth a hands-on tutorial rather than a hype post.
What you'll need
- Node.js 22.19 or newer — check with
node --version. This is a hard requirement from the package itself, not a suggestion. - A terminal and about ten minutes. That's it: every experiment in this tutorial runs against a fake model endpoint I built in Python, so the cost is literally $0 and there is nothing to sign up for. When you're done you'll know exactly how to point Pi at your real keys instead.
- Optional, for the later sections: an Ollama or vLLM server, or API keys for a provider Pi supports natively (OpenAI, Anthropic, Google, and others).
Step 1 — Install Pi
Pi ships on npm as a scoped package. Install it globally (or into a project directory the way I did for this tutorial, to keep my system clean):
npm install @earendil-works/pi-coding-agent
pi --version
I got 0.99.2 — the release from the day before this article. The install is quick and self-contained; the CLI, agent runtime, and TUI all come from the same monorepo, so there's no second package to chase.
Step 2 — Point Pi at your own endpoint
This is the feature that separates Pi from the pack. Model configuration lives in a plain JSON file inside your agent directory — ~/.pi/agent/models.json by default. A provider entry gives a baseUrl, an api dialect (openai-completions, openai-responses, anthropic-messages, google-generative-ai, or Anthropic's API directly), an apiKey (with $NAME environment-variable interpolation), and a list of model IDs.
For this tutorial I ran a tiny Python stub that speaks enough of the OpenAI chat-completions protocol to drive the full agent loop — returning tool calls on the first two turns and final text on the third. Pi asks for stream: true, so the stub replies with Server-Sent Events; a plain JSON body makes Pi complain that the stream ended without a finish reason. Here's the whole model config I used (a real one you'd paste is shown further down):
{
  "providers": {
    "local-stub": {
      "baseUrl": "http://127.0.0.1:8899/v1",
      "api": "openai-completions",
      "apiKey": "stub",
      "models": [
        { "id": "stub-agent" },
        { "id": "stub-agent-fast", "name": "Stub (fast lane)" }
      ]
    }
  }
}
Two environment variables matter here. PI_CODING_AGENT_DIR overrides the agent directory — handy when you want a throwaway config that doesn't touch your real setup — and PI_OFFLINE=1 keeps Pi from phoning home for updates during the experiment. Nothing below sends traffic to any third party.
Step 3 — Verify the connection
Before running anything, ask Pi whether the provider is actually reachable:
pi auth check --provider local-stub --jsonPi answered, in parsed JSON:
{"status":"ready","provider":"local-stub","authType":"api_key"}That single line is worth more than it looks. It means the endpoint answered a real request over the wire and the API key was accepted. If you typo the base URL or the server is down, this is where you find out — not three turns into a broken agent loop.
Step 4 — Run a real agent loop in print mode
Now the moment of truth. --print (a.k.a. -p) runs one full agent session headless: prompt on the command line, answer on stdout, exit code when it settles. No TUI, no interactive babysitting. I asked it to write a file and read it back — forcing at least two tool turns before the final answer:
pi --provider local-stub \
   --model local-stub/stub-agent \
   --print "Write hello-pi.txt with the text 'Pi was here', then read it back." \
   < /dev/null
(The < /dev/null matters in scripts: if stdin is an open pipe, Pi waits on it and looks hung. Redirect it.)
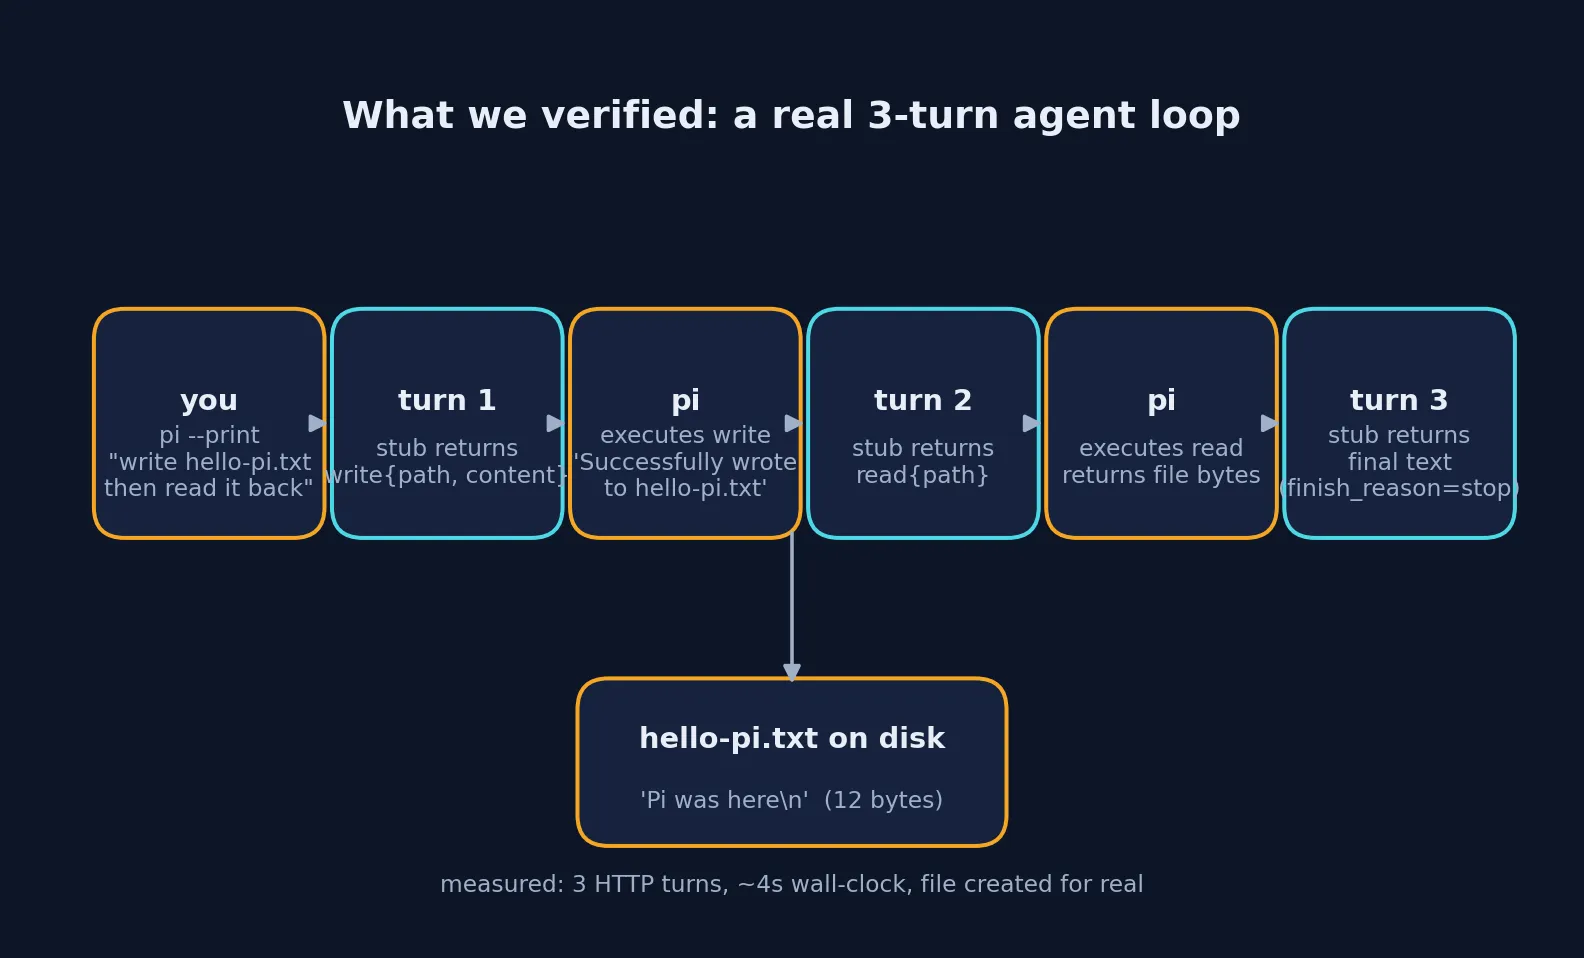
Result: exit code 0, final answer on stdout, and a real file on disk. My stub logged three HTTP turns — 3.7 seconds wall-clock, start to settled:
- Turn 1: the model returned a
writetool call; Pi executed it —Successfully wrote to hello-pi.txt. - Turn 2: the model returned a
readtool call; Pi executed it and returned the file's bytes to the loop. - Turn 3: the model returned plain text with
finish_reason: stop; Pi printed it and exited.
And the file really existed — Pi was here plus a newline, 12 bytes, confirmed on disk. That's a genuine agent loop — think, act, observe, think again — not a chatbot demo. The sequence is exactly what the diagram below shows:
Step 5 — Gate the tools
A coding agent that can run shell commands is a loaded gun, and Pi's answer to that is blunt: --tools takes an allowlist, and the default is read, bash, edit, write. Anything not on the list doesn't reach the filesystem. I re-ran the same prompt with only write enabled to watch the gating happen:
pi --provider local-stub --model local-stub/stub-agent \
   --tools write \
   --print "Write hello-pi.txt with the text 'Pi was here', then read it back." \
   < /dev/null
The write executed as before — the file landed on disk. But when the loop tried read on the next turn, Pi rejected it at the agent level. Digging into the session's JSON event stream showed exactly what the model was told:
{
  "role": "toolResult",
  "toolCallId": "call_2",
  "toolName": "read",
  "content": [{ "type": "text", "text": "Tool read not found" }],
  "isError": true
}
That's a clean, honest gating primitive: no fake success, no hallucinated file contents — the loop gets an error it can reason about, and your filesystem stays untouched. This is the flag you'll reach for whenever you let Pi loose in CI or on a shared box.
Step 6 — Switch models with one flag
Remember the two models in the config from Step 2? Pi lists them exactly as declared:
$ pi --list-models
provider    model            context  max-out  thinking  images
local-stub  stub-agent       128K     16.4K    no        no
local-stub  stub-agent-fast  128K     16.4K    no        no
Selecting one is just --model local-stub/stub-agent-fast (or /model inside the interactive TUI). The model name is namespaced by provider, so a fleet that spans Anthropic, a local Ollama box, and a corporate vLLM cluster stays unambiguous. There's also --thinking for reasoning effort and --reasoning-format, for models that support it.
Step 7 — Watch the loop's internals with JSON mode
For pipelines, --mode json turns the whole run into machine-readable JSONL on stdout — one event per line, from agent_start through turn_start, message_start/message_update/message_end, tool_execution_start/tool_execution_end, to agent_settled and agent_end. It's the observability hook you'd grep in CI logs or feed into your own telemetry.
One detail worth knowing if you parse these events: tool calls surface inside message_end as a content block of type toolCall, with stopReason: "toolUse" and the raw provider reason tool_calls. That's the shape every OpenAI-compatible endpoint uses, so your parser will work unchanged against a real model.
Step 8 — Sessions are plain JSONL on disk
Add --session-dir ./sessions and Pi persists the full session — messages, tool results, the lot — as a timestamped .jsonl file. Mine landed as 2026-10-01T12-08-10-939Z_01a0f75d-<uuid>.jsonl, 68 KB including the system prompt. Sessions can be resumed with --continue or --resume, and shared with pi share (which uploads to the project's Hugging Face space — handy for bug reports, think before you share anything sensitive).
Going further: aim Pi at a real model
Everything above ran against a fake endpoint; swapping in something real is a config edit, not a code change. The official docs ship an Ollama example — for instance, a local Llama served by Ollama is just another models.json provider with baseUrl: "http://localhost:11434/v1", api: "openai-completions", and the model ID you pulled. (I didn't have a local GPU handy to run that leg live, so treat this as documented-by-the-project rather than verified-by-me.)
For the managed providers, Pi offers an interactive browser login: pi auth login walks you through OAuth for whichever provider you pick, storing the credential for later runs. Note that it needs a real terminal — it doesn't work in --print mode, which is by design: headless runs should use API keys from the environment.
Beyond models, Pi's extensibility story is familiar territory: MCP servers are declared in mcp.json (pi mcp list confirmed mine was empty by default), and there's a skills system — reusable instruction bundles the agent picks up automatically. Both are worth an article of their own once you've internalized the loop itself.
One warning before you hand it your shell
The documentation is refreshingly blunt here: Pi has no built-in permission system — it runs with the permissions of the user and process that launched it. That's why Step 5's --tools flag matters, and why you should take the docs' containerization guidance seriously for anything beyond your own laptop: the official containerization docs name NVIDIA's OpenShell as a sandbox pattern for running Pi with real boundaries.
Practical rules: use --tools to narrow what an autonomous run can touch, keep your agent directory (~/.pi/agent) and its keys out of shared repos, and remember that apiKey entries support $ENV_VAR interpolation — so there's no excuse for committing secrets into models.json.
The takeaway
Pi earns its stars on engineering taste, not hype. The unified provider API means your automation outlives any single vendor's pricing page; models.json means a local or corporate endpoint is a first-class citizen, not a hack; --print plus --mode json means the agent loop is a Unix citizen you can grep, pipe, and gate with --tools. In under four seconds and zero dollars, I watched it run a real three-turn tool loop against an endpoint I wrote in an afternoon — and every seam I probed (auth checks, tool gating, session persistence, the event stream) behaved exactly as documented.
If you run agents in CI, on shared infrastructure, or anywhere the model behind the agent might need to change next quarter, Pi is the one to learn this month. The repository is earendil-works/pi; start with the docs folder inside the npm package you already installed — it's the most honest README-to-behavior match I've tested this year.