Audit your Android phone for leaks: hands-on with NOIR over adb
NOIR (Verlintas/NOIR, MIT, 1,831 GitHub stars at the 4 November 2026 check) audits your own Android phone over adb — permissions, APK endpoints and data flows — with no root, no account and no uploads. This guide installs v0.2.5, scans read-only, reads the report and its three domain lists, and applies only reversible fixes.
noir doctor, scan read-only, and apply only the reversible app-ops plan it writes next to the report — a high score is static evidence of capability, not proof a transfer happened.- Who: NOIR, by Verlintas (
Verlintas/NOIRon GitHub). MIT licence. - What: A desktop Android leak audit over adb: app inventory, on-device APK endpoint extraction, permission-to-host data-flow correlation, risk scores, a reversible app-ops plan, and an optional jadx DeepScan.
- When: Repository created 31 October 2026; latest release v0.2.5 published 2 November 2026. At the check on 4 November 2026: 1,831 GitHub stars, 140 forks.
- Needs: macOS, Windows, or Debian/Ubuntu Linux; your own Android phone with USB debugging; adb. The portable build bundles its runtime and needs no JDK; building from source needs JDK 17+. DeepScan needs jadx.
- Outputs:
noir-out/report.json,report.md, three tiered domain lists,plan.txtandrollback.txt; DeepScan addsdeepscan.mdanddeepscan.tsv. - Limits: Read-only by default. Static evidence only — capability plus endpoint, not proof of a transfer. Android only; no root, so system apps are restricted for the current user, never physically removed.
Your phone knows where you have been, who you message, and what you type. The question NOIR answers is narrower and more useful than “is my phone spying on me?”: which installed apps can reach sensitive data, and which network endpoints sit inside their code? It answers that question on your own computer, from your own phone, without root, without an account, and without uploading anything anywhere.
NOIR (Verlintas/NOIR, MIT licence) is a desktop audit tool that talks to an Android phone over adb. It inventories every app holding internet access plus a sensitive permission, pulls the network endpoints out of each APK, joins permissions to the data they expose and the hosts they could reach, and scores the result. The default run changes nothing; when it does act, it changes only app-ops settings, writes the reversal next to the report, and leaves uninstalling to an explicit second decision by you. This guide follows the project's README, changelog, release notes and website: install v0.2.5, prove the environment, connect your own phone, scan read-only, read the report, and only then act.
Why this matters now
Android's permission screen tells you what an app asked for. It does not tell you where the app's code could send it. An app can hold location permission and a telemetry endpoint in the same package and the permission screen will never join those two facts. NOIR joins them: each permission is mapped to the data it exposes — location, contacts, SMS, calls, microphone, camera, screen, app list, device identity, files, calendar, accounts — and paired with the upload hosts found in the APK, so the report reads as “this kind of data could reach this kind of host”, app by app.
Endpoints are extracted on the device itself, with unzip and strings over the dex files inside each APK, so only a few kilobytes come back instead of hundreds of whole APKs. If a device cannot extract on-device, NOIR falls back to pulling the APK and parsing it on your computer. Results are cached by package name and APK path, so a repeat scan is usually fast. Because the evidence is static, NOIR is honest about what it cannot prove — more on that at the end of this guide, which you should read before you act on any score.
One boundary first, because it shapes the whole tutorial: audit your own phone, or a phone you have explicit permission to audit. NOIR's own disclaimer says exactly that, and the same own-device rule that applies to running ARTEX in your own pentest lab applies here. Do not point it at someone else's device.
What you’ll need
- A computer running macOS, Windows, or Debian/Ubuntu Linux. The portable builds bundle their own runtime, so they need no Java installed. Building from source needs JDK 17 or newer.
- Your own Android phone, a USB cable that carries data (many cables only charge — if no device appears, try another cable first), and a few minutes to enable Developer mode and USB debugging on the phone.
- Android platform-tools (
adb). NOIR will offer to download it for you on first run if it cannot find it. The optional DeepScan step also needsjadx. - No account, no API key, and no network access for the audit itself. NOIR reports no telemetry, no version check, and no crash reports. The only downloads are
adbandjadx, and only when you say yes. - Patience for the first scan. The first run extracts endpoints app by app; later runs reuse the cache.
Step 1: Install it — portable download, or build from source
Do not copy the asset names from the README. The README still shows the v0.1.1 filenames; the current release at the time of writing is v0.2.5, published 2 November 2026, and the changelog since then fixed vendor attribution and split the domain export into three tiers. Go to the project's Releases page, download the portable zip for your operating system plus SHA256SUMS.txt, and check the checksum before you unzip anything. The v0.2.5 assets are:
noir-v0.2.5-macOS-portable.zip
noir-v0.2.5-Windows-portable.zip
noir-v0.2.5-Linux-portable.zip
SHA256SUMS.txt
Unzip, then start it with the launcher for your system: Start NOIR.command on macOS, Start NOIR.bat on Windows, Start-NOIR.sh on Linux. The launchers open a terminal and run the guided first-run wizard. The first launch may ask once through Gatekeeper or SmartScreen, because the builds are unsigned — expected, not a fault in your download. To run commands directly, the binary inside the extracted folder is ./NOIR.app/Contents/MacOS/NOIR on macOS, NOIR\NOIR.exe on Windows, and ./NOIR/bin/NOIR on Linux. The examples below use noir for that binary; run them from the extracted folder, or put the folder on your PATH.
The other way in is from source. Clone the repository, build the CLI distribution, and run the installed binary's about screen:
git clone https://github.com/Verlintas/NOIR
cd NOIR
./gradlew :cli:installDist
./cli/build/install/noir/bin/noir --about
That path needs JDK 17 or newer. For most readers the portable zip is the honest recommendation: the same tool, runtime included, nothing to compile.
Step 2: Prove the environment — doctor, setup, devices
Before you plug a phone in, prove the tooling. noir doctor reports the platform, the Java version it found, the adb it will use and its version, the connected device, and jadx if present. The README's example shows the shape of the output — your paths, versions and device id will differ:
noir doctorIf adb or jadx is missing, noir setup fetches what is absent into ~/.noir/tools. Add --yes only when you want it to proceed without asking, for example in a script. You can also install the dependencies with your system package manager — the README gives these three:
# macOS
brew install --cask android-platform-tools jadx

# Debian / Ubuntu
sudo apt install adb
# jadx: https://github.com/skylot/jadx/releases

# Windows (scoop)
scoop install adb jadx
Then confirm NOIR can see a device at all:
noir devicesIf that lists nothing, do not go on to the scan. Fix the connection first, in the next step. A scan with no device is not a clean bill of health; it is a scan that never started.
Step 3: Connect your own phone — USB debugging, then authorise
Running bare noir with no arguments starts the guided wizard. It checks for adb, offers to download it if missing, and if no device is found it prints the Developer mode and USB debugging steps for your phone and waits up to 180 seconds for you to plug in. The steps are the standard Android ones: enable Developer options (on Xiaomi/HyperOS, tap the MIUI version entry seven times in Settings), turn on USB debugging, plug in with a data cable, and on the phone tap Allow when it asks whether to allow USB debugging — tick “always allow” only on your own computer.
Two failure modes are worth knowing first. A phone that has never authorised this computer shows up as unauthorised: NOIR has a dedicated message for that, and the fix is to revoke USB debugging authorisations on the phone and plug in again. A cable that only charges will never show a device, however often you replug it. It is the same plumbing Mika's Android agent setup over adb depends on: if adb cannot see the phone, no tool on top of it can either.
Once the wizard sees the device it asks whether to start the scan, and later whether to execute the plan it produces. Answering no to the second question is the right default on a first run: scan first, read the report, decide later. Everything up to that point is read-only.
Step 4: Scan read-only — the dashboard, then the files
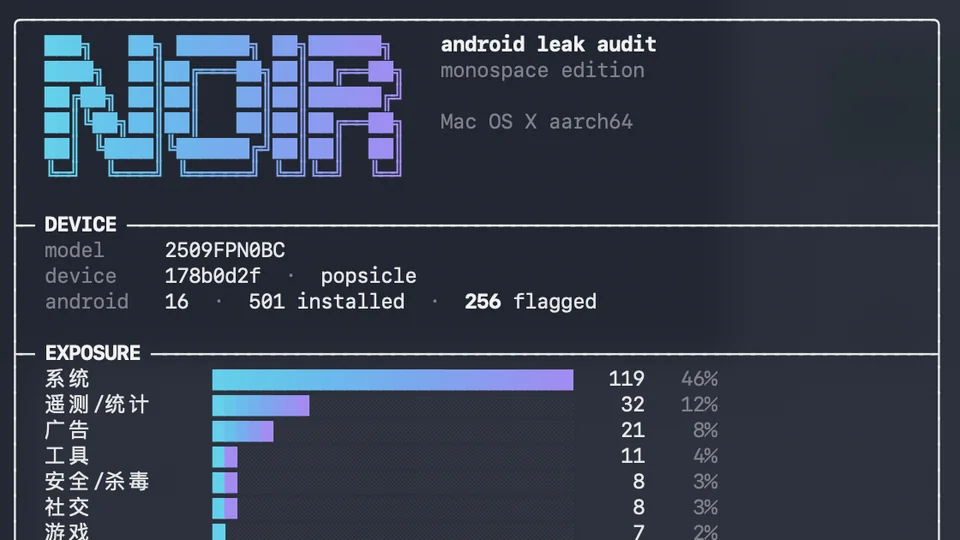
The full scan inventories every app holding internet access plus a sensitive permission, extracts endpoints, classifies each app by vendor and category (telemetry, advertising, location, input method, security, and others), and computes a risk score from permissions, endpoints, and whether the app is a system or privileged app. Run it and let it finish:
noir scanFor the live view, noir ui renders the same results as a terminal dashboard: device details, exposure by category, top findings ranked by score, and the plan summary. It adapts to the terminal — --ascii for plain borders, --no-color to turn colour off, --quiet to keep only the dashboard, --no-clear to stop it clearing the screen. The dashboard is the quick read; the files are the record.
By default the report lands in noir-out/. Use --out to put it somewhere else, --serial when more than one device is connected, --only with a package-name pattern to scope a run, and --limit or --min to narrow the output to the highest scores. For example, to scan only one vendor's packages into a named folder:
noir scan --out noir-out-first-run --only 'com\.miui\.'Read the dashboard top-down: which categories dominate, which packages top the findings list, and whether the top is system packages you did not install. A high score on a system package is common and is not, on its own, evidence of wrongdoing. The report shows you where to look; it does not convict an app.
Step 5: Read the report and the three domain lists
Open the human-readable report first, then the structured data:
noir-out/
├── report.json               # structured results: apps, permissions, endpoints, advice
├── report.md                 # human-readable report
├── domains-trackers.txt      # statistics / advertising / crash reporting: safe to block
├── domains-other.txt         # unclear purpose: judge each line before blocking
├── domains-functional.txt    # push / login / update / payment / store / cloud sync: do not block
├── domains.txt               # trackers only, for compatibility with older scripts
├── plan.txt                  # executable app-ops actions
└── rollback.txt              # reversal commands
Three things deserve slow reading. First, the data-type correlation: which data types each app's permissions expose, joined to the hosts found in its code. Second, the manifest audit added in v0.2.0: exported components without a permission, cleartext traffic, backup allowed, debuggable builds, and target SDK. Third, the shared-UID section: packages sharing one Linux user id, such as android.uid.system, hold the union of each other's permissions, so NOIR merges those grants back onto each package.
The domain lists are where most readers overreact, so read their tiers literally. Trackers can be imported as a blocklist. The “other” tier needs line-by-line judgement — its purpose is unclear, and blocking blindly can break things. The functional tier must not be blocked: push, login, updates, payments, app stores and cloud sync live there. Bare IPs, localhost, and test/staging hosts are dropped from the export. NOIR exports these lists; it does not change your DNS itself. If you use a list, import it into a DNS filter you already trust, and keep the functional tier out. Evidence first, action second — the same discipline as turning a coding agent into a security auditor: findings are not yet fixes.
Finally, look at the plan before you run it. noir auto scans, classifies, and writes a plan without applying anything. plan.txt lists the app-ops actions it proposes, and rollback.txt lists the reversal for each one. If the plan proposes something you do not understand, that is the moment to stop and look the package up — not after you have applied it.
Step 6: Act reversibly — or dig deeper with DeepScan
When you have read the plan and you agree with it, apply only the safe tier. noir auto --apply executes the safe app-ops actions and writes the rollback file next to the report. Adding --aggressive additionally uninstalls flagged user apps — that is a different decision, for a different day, and it needs the flag to be spelled out. In a non-interactive run (piped input, CI), --apply refuses to execute unless --yes is also passed; that guard was added in v0.2.3 after DeepScan's apply path skipped the confirmation off a terminal. Treat that as the project's own warning: never script --apply --yes against a phone you care about until you have run the dry-run plan by hand and read it.
noir auto                 # dry-run: scan, classify, write the plan
noir auto --apply         # execute the safe app-ops actions, with rollback written
noir auto --apply --aggressive   # additionally uninstall flagged user apps
For a single app, noir block prints the neutralisation commands first, with the restore command alongside, and only applies them with --apply:
noir block com.example.app        # print the commands (example package name)
noir block com.example.app --apply
If one app's score still puzzles you, DeepScan is the deeper look. It pulls the riskiest APKs, decompiles them with jadx in parallel, and scores code-level signals — Runtime.exec, dynamic dex loading, disabling other apps, accessibility rewriting, screen capture, device-id reads, WebView bridges, and known SDKs — then parses the manifest for exposure. Start narrow:
noir deep com.example.app    # one app: pull, decompile, search for red-flag calls
noir deepscan                # riskiest 15 apps
noir deepscan --top 30       # more apps, slower, more disk
noir deepscan --apply        # analyse, then execute safe app-ops
noir deepscan --apply --purge  # then confirm uninstalls, one app at a time
Deepscan writes deepscan.md and deepscan.tsv, caching decompilation by package and APK path. Its --purge path confirms each uninstall individually. DeepScan is triage, not proof: code signals show what an app is built to do, not what it did on your phone yesterday.
What you built, and where it stops
You built a repeatable audit for a phone you own: a verified install of NOIR v0.2.5, a device visible over adb, a read-only scan with a dashboard and filed report, three tiered domain lists, and a reversible plan with its rollback written down. Re-run noir scan after app updates — the cache is keyed to the APK path, so updated apps are re-extracted.
Its limits are stated by the project itself, and they bound every conclusion in this guide. The evidence is static: it proves an app has a capability and an endpoint in its code, not that a particular transfer happened. Pair it with network or DNS logs if you need to prove a transfer. It scans the base APK, so code shipped in split APKs is a known lower bound. It needs no root, so system apps are disabled or restricted for the current user rather than physically removed, and a factory reset brings them back. It is Android only. And vendor attribution is heuristic — v0.2.5 fixed a bug that labelled hundreds of apps as Google's by making the package name authoritative and ignoring infrastructure hosts — so treat vendor labels as a starting point for checking, not as a verdict. An audit that knows its own limits is the only kind worth running twice.
Frequently asked questions
Do I need root, or an account, to audit my phone with NOIR?
No. NOIR runs on your computer and talks to the phone over adb, after you enable USB debugging and authorise the computer on the phone. It needs no root, no account, and no API key, and it uploads nothing. Without root, system apps can only be disabled or restricted for the current user, never physically removed.
Does a high risk score prove an app sent my data somewhere?
No. NOIR's evidence is static: it proves an app holds a permission and that an endpoint exists in its code, not that a particular transfer happened. It also scans the base APK, so code in split APKs is a lower bound. Pair the report with DNS or network logs if you need to prove a transfer.
What happens if I apply a fix and regret it?
The default scan is read-only, and noir auto only writes a plan until you add --apply. Applying changes app-ops settings only, each reversible to its default, and rollback.txt is written next to the report. Uninstalling is a separate, explicit step, and DeepScan's purge path confirms each uninstall one app at a time.