Find, validate, and fix vulnerabilities with OpenAI's Codex Security CLI — hands-on
OpenAI's Codex Security CLI is sitting at number two on GitHub Trending today for a simple reason: it does not stop at finding vulnerabilities. It validates each one against your source, drafts the patch, verifies the fix, and exports the evidence — and you can run the entire loop in under a minute without signing in to anything.
--mock (12 synthetic findings, a real report and SARIF file), then sign in with ChatGPT or an API key for a real scan capped at $5.- The project:
openai/codex-security— 12,106 stars, 957 forks, 2,044 commits, 55 releases; number two on GitHub Trending on November 12, 2026; Apache 2.0. - The install:
npm install --global @openai/[email protected]; needs Node 22.13+ and Python 3.10+; pulls a ~438 MB platform binary as an optional dependency. - The free path: dry-run, mock scan, findings import, and policy dry-run need no sign-in. The mock scan ran in 0.7 seconds, cost $0, and produced a real
report.md,findings.json, and SARIF file. - The real scan: default model
gpt-5.6-solat maximum reasoning effort; sign in with ChatGPT or setOPENAI_API_KEY; cap the cost with--max-cost 5. - The limit: a completed scan is not a clean bill of health — exclusions and deferred work are recorded in the report, and mock findings are synthetic fixtures. Never file them.
Most security scanners give you a list and walk away. OpenAI's Codex Security does the whole job in one place: it scans a repository, validates each finding against the source, drafts the patch, verifies the fix, and exports the results as SARIF, JSON, or CSV. It is a CLI first, with a TypeScript SDK and a GitHub Action alongside it, and it is the reason the project is sitting at number two on GitHub Trending today — 12,106 stars, 957 forks, and 2,044 commits since July, all under an Apache 2.0 licence.
The idea is not new — agentic code review has been tried before — but the packaging is what is driving the attention. One command scans. The same tool checks its own findings, so you get fewer of the confident false positives that make teams ignore scanner output. And everything it produces lands in a saved scan history you can re-open, re-run, or export, instead of vanishing when the terminal closes.
This tutorial runs the whole loop end to end. You will install the CLI, prove the setup with a dry run, run a complete scan without signing in to anything, read the report it writes, import findings from another tool, and wire the same commands into CI. Every command in Steps 1–6 and 8–9 was executed while writing this article, and the outputs shown are the real ones. Step 7 — the live model scan — needs a ChatGPT login or an API key, which this sandbox does not have; those commands are quoted from the official CLI reference and marked as such.
What you'll need#
- Node.js 22.13 or newer in the 22.x line, or Node 24.x / 26.x — check with
node --version. This tutorial used Node v24.22.1. - Python 3.10 or newer — the CLI uses it for some export and plugin work. This tutorial used Python 3.12.3.
- A terminal on macOS or Linux. Windows users can follow along in WSL.
- About 30 minutes. The install takes under a minute; the mock scan takes under a second.
- No account and no API key for Steps 1–6. The mock scan, the dry run, and the import flow need no sign-in at all. A real scan (Step 7) needs a ChatGPT login or an OpenAI API key.
Step 1: Install the CLI#
Install version 0.10.0 globally from npm. Pin the version: the project is moving fast — 55 releases since July — and the commands in this tutorial were verified against 0.10.0.
npm install --global @openai/[email protected]Verify the install:
cs --version
cs info --json
The first command prints 0.10.0. The second prints the resolved configuration: SDK version 0.10.0, bundled plugin 0.1.95, bundled Codex 0.167.1, default model gpt-5.6-sol, and default reasoning effort xhigh. If you prefer not to install globally, npx @openai/codex-security runs the same CLI; cs and codex-security are the same command, so use whichever is shorter on your keyboard.
One gotcha, worth knowing before you blame your machine: the install pulls a platform-specific Codex binary as an optional dependency — about 438 MB unpacked for @openai/codex-linux-x64. If that download fails, npm treats it as a warning and finishes anyway, and the CLI will install cleanly but refuse to do anything that needs Codex, with this error:
The bundled Codex executable could not be resolved from @openai/codex-linux-x64.
Reinstall @openai/codex with optional dependencies enabled, or set CODEX_CLI_PATH
to an installed Codex executable.
That is exactly what happened in the sandbox used for this article — a disk-quota error interrupted the optional download and npm sailed on. The fix on a normal machine is to reinstall with optional dependencies enabled; on a machine where that is not possible, CODEX_CLI_PATH lets you point the CLI at a Codex executable you installed another way.
Step 2: Check your sign-in — or skip it#
Before scanning anything, check what the CLI thinks your credentials are:
cs login status --jsonWith no sign-in saved, this prints {"authenticated": false, "method": "stored_credentials"} and exits with code 1, alongside a plain Not logged in. That is the expected state for Steps 3–6: the dry run, the mock scan, and the import flow all work without credentials, and the status check itself is an offline operation.
When you are ready for a real scan, there are two ways in. Interactive use signs in with ChatGPT:
cs login
cs scan .
CI and headless machines use an API key instead — either saved once, or passed in the environment for a single command:
printenv OPENAI_API_KEY | cs login --with-api-key
OPENAI_API_KEY="sk-..." cs scan .
CODEX_API_KEY works the same way. Non-interactive commands prefer OPENAI_API_KEY, then CODEX_API_KEY, then stored credentials; --auth chatgpt or --auth api-key forces the choice. The CLI also supports other providers — OpenRouter, Fireworks, Cheaper Inference, and Amazon Bedrock — each with its own API key and a --provider flag, so an OpenAI account is not the only route to a real scan.
Step 3: Dry-run the preflight#
Build a small target first. The demo app below is a deliberately vulnerable Express service: SQL string interpolation, a reflected cross-site scripting hole, and a hard-coded admin token. Create it in a scratch directory — it exists only to be scanned, never to be run.
// server.js — deliberately vulnerable. Do not use as a template for real code.
const express = require("express");
const sqlite3 = require("sqlite3");
const app = express();
app.use(express.json());

const db = new sqlite3.Database(":memory:");
db.serialize(() => {
  db.run("CREATE TABLE users (id INTEGER PRIMARY KEY, name TEXT, email TEXT)");
  db.run("INSERT INTO users (name, email) VALUES ('ada', '[email protected]')");
});

// FLAW 1: SQL string interpolation — user input lands directly in the query.
app.get("/users", (req, res) => {
  const q = `SELECT * FROM users WHERE name = '${req.query.name || ""}'`;
  db.all(q, (err, rows) => (err ? res.status(500).send(err.message) : res.json(rows)));
});

// FLAW 2: reflected XSS — unsanitised input written straight into HTML.
app.get("/hello", (req, res) => {
  res.send(`<h1>Hello ${req.query.name || "guest"}</h1>`);
});

// FLAW 3: hard-coded secret.
const ADMIN_TOKEN = "sk-demo-hardcoded-9f2c41";
app.get("/admin", (req, res) => {
  if (req.headers["x-admin-token"] !== ADMIN_TOKEN) return res.status(403).send("nope");
  res.json({ users: "all rows" });
});

app.listen(3000, () => console.log("demo listening on :3000"));
Now validate the scan setup without starting a scan:
cs scan demo-app --dry-run --jsonThe output is the resolved scan plan, and it is worth reading in full the first time:
{
  "dryRun": true,
  "repository": "/home/hatch/.../demo-app",
  "target": { "kind": "repository", "paths": [] },
  "mode": "standard",
  "stateDirectory": "/tmp/cs-verify/state",
  "authentication": { "method": "stored_credentials", "verified": false },
  "model": "gpt-5.6-sol",
  "reasoningEffort": "xhigh"
}
Exit code 0, and Preflight complete on stderr. The dry run confirms the target resolves, the model and effort are what you expect, and authentication is unverified — which is fine, because the next step needs none. One operational note: if you override the state directory with CODEX_SECURITY_STATE_DIR, its parent must not be group- or world-writable without the sticky bit, or the CLI refuses with Scan output parent must not be group- or world-writable. The default state directory avoids this entirely.
Step 4: Run a mock scan end to end#
The CLI ships a --mock mode that runs the full scan pipeline — report, findings file, SARIF export, saved history — with synthetic results and no model calls or authentication. It exists for testing, but it is also the fastest way to learn the tool: every artifact a real scan produces, in under a second, for free.
cs scan demo-app --mock --headless --output-dir /tmp/cs-verify/out-mock --jsonThe output directory must be empty and outside the scanned directory and its enclosing git worktree. The scan finished in under a second, exited 0, and cost exactly $0 with 0 tokens. Its summary line reads:
Scan ea91ee32-5c59-4d97-a40f-1b5529476c45 · complete · started 2026-11-12T13:22:46Z
Inspect: codex-security scans show ea91ee32-5c59-4d97-a40f-1b5529476c45
The output directory holds four artifacts:
report.md— the readable summary: scope, severity mix, and one section per finding.findings.json— the canonical findings document (codex-security.findings), 12 findings.scan-manifest.json— the sealed record of the scan: target snapshot digest, scope, status, timestamps.exports/results.sarif— a SARIF 2.1.0 export with all 12 results, tool name “Codex Security”, ready to upload to GitHub code scanning or any SARIF consumer.
Read the severity mix first — it is the shape of a real report:
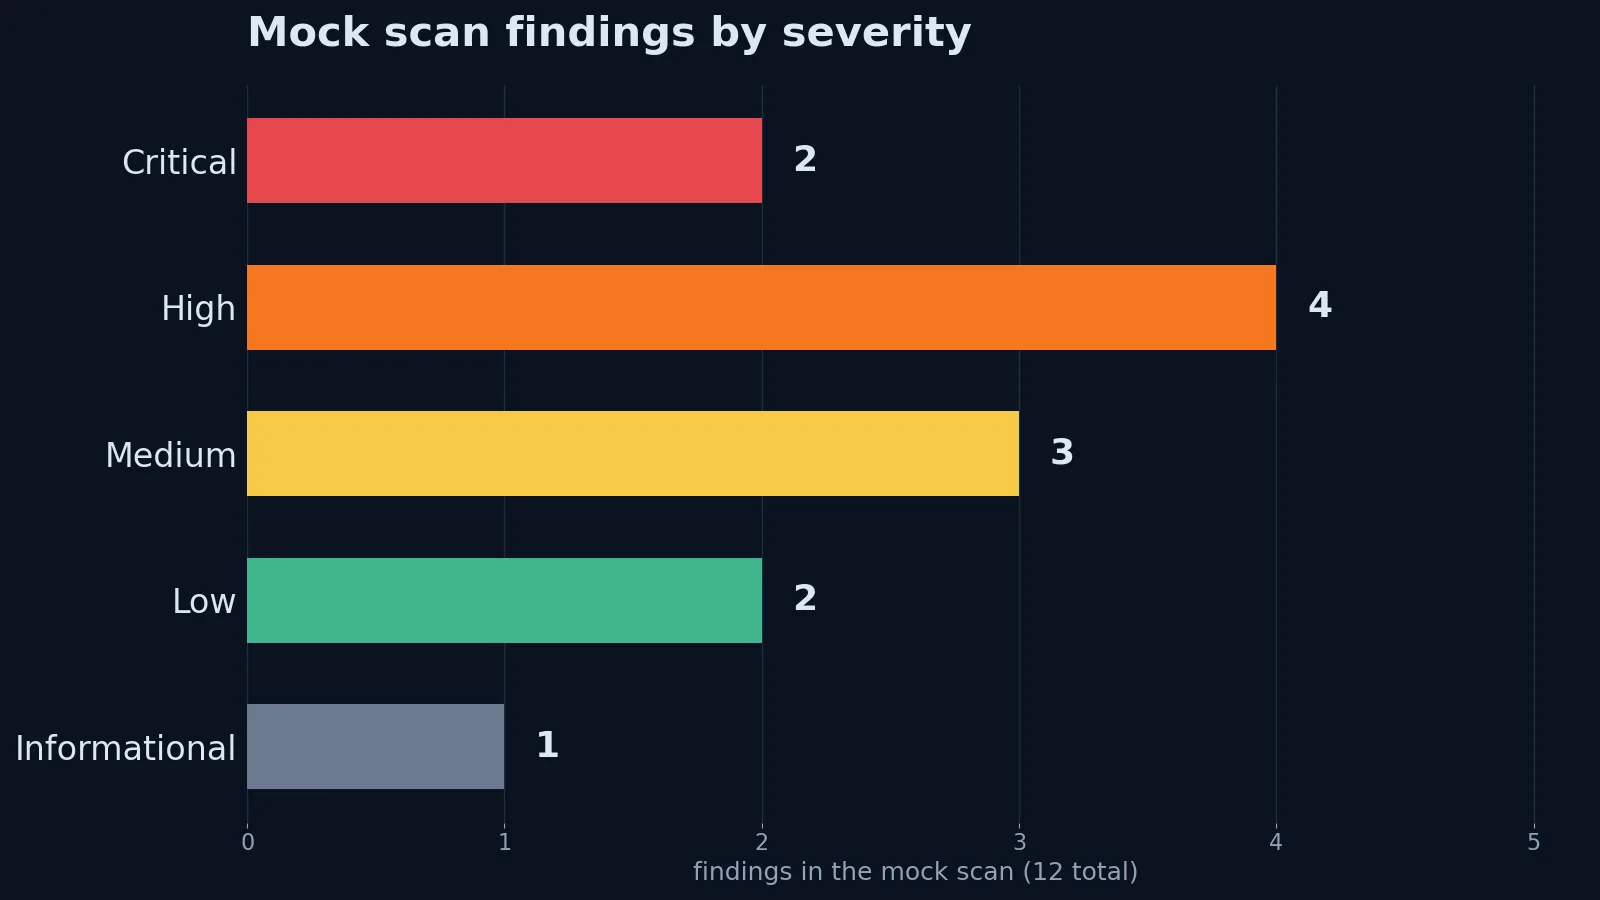
Two critical, four high, three medium, two low, one informational. The report itself counts 11 reportable findings: it omits the informational one from the findings table and says so. The twelve titles show what the fixture set is designed to exercise:
| Finding | Severity |
|---|---|
| [Mock] Shell metacharacters in the export name execute commands | critical |
| [Mock] Export filename reaches a shell command | critical |
| [Mock] Search term is concatenated into a SQL query | high |
| [Mock] Archive entry escapes the extraction directory | high |
| [Mock] Parent-directory archive names overwrite files outside extraction | high |
| [Mock] Document download omits the ownership check | high |
| [Mock] Image proxy fetches arbitrary destinations | medium |
| [Mock] Sign-in callback accepts an external redirect | medium |
| [Mock] Comment preview renders stored HTML | medium |
| [Mock] Session cookie omits HttpOnly | low |
| [Mock] Error response exposes an internal stack trace | low |
| [Mock] Response header advertises the framework version | informational |
Read the labels carefully: every title starts with [Mock], the file paths are fictional mock/*.ts files, and the scan manifest states the limitation in plain language — “Synthetic mock scan for testing. No LLM calls or security analysis were performed.” These are fixtures for testing the pipeline, not vulnerabilities in the demo app. Do not file them, do not paste them into a security report, and do not be surprised that none of them matches the three flaws in server.js. The mock scan proves the machinery works; only a real scan judges your code.
Step 5: Read the report and export it#
Everything the scan saved is reviewable from the CLI, and everything is scoped to a repository — run these from inside the target repo, or they will report nothing. Re-open the scan you just ran:
cs scans show ea91ee32-5c59-4d97-a40f-1b5529476c45 --jsonThat returns the scan's artifact paths, cost (0 tokens, $0 estimated), model, and status. List what is in history and what it found:
cs scans list --json
cs findings list --json
Export the findings in the format your workflow consumes. CSV is the most portable:
cs export /tmp/cs-verify/out-mock --export-format csv --output findings.csvThe CSV has one row per finding plus a header — 13 lines for this scan — with columns occurrence_id, finding_id, title, summary, severity, confidence, status, close_reason, note, remediation, path, start_line, end_line. The remediation column is genuinely useful: for the shell-metacharacter finding it reads “Pass the filename as a separate argument to a process API that does not invoke a shell.” JSON and SARIF exports use the same command with --export-format json or sarif; a threat model exports with --artifact threat-model.
Finally, confirm the exit-code contract, because CI depends on it. A completed scan exits 0 by default. Add a severity gate and it exits 1 when findings meet the threshold:
cs scan demo-app --mock --headless --fail-on-severity high \
  --output-dir /tmp/cs-verify/out-mock2 --json
echo $?
Output: 1. The scan still completes and saves everything — the exit code is a policy verdict, not a crash. Execution failures (bad target, broken output directory) exit 2 instead, so a pipeline can tell “found something” apart from “something broke”.
Step 6: Import findings from another scanner#
Codex Security does not insist on finding everything itself. It can save findings from other tools as a completed scan in its own history — no model calls, no authentication. This is how you fold a Semgrep or Snyk report into the same review flow, and it is also the quickest way to test the import path: feed it the CSV you just exported.
cs scan import findings.csv --dry-run --jsonThe dry run validates without saving: {"dryRun": true, "format": "csv", "findingCount": 12}. Run it for real:
cs scan import findings.csv --output-dir /tmp/cs-verify/out-import --jsonThe output confirms it: Imported 12 findings as scan 8d596a6b-d2c4-4a5a-85c3-0039346e932b, and the new scan directory holds its own findings.json plus the retained input under artifacts/import/source.csv. The manifest records the import explicitly — extensions.import with format and finding count — so nobody mistakes an import for an analysis. JSON input works the same way, either as a complete codex-security.findings document or as {"findings": [...]}. The CLI also has dedicated import commands for GitHub, Semgrep, Snyk, and Sonar findings; the CSV/JSON path above is the generic one.
Step 7: Run a real scan#
Everything so far ran with no credentials. A real scan is the same command minus --mock — but it calls the model, so sign in first (Step 2) and set a cost limit before you start. The commands in this section are quoted from the official CLI reference; they were not executed in the sandbox, which has no ChatGPT login or API key.
cs login
cs scan . --max-cost 5 --show-cost
The --max-cost 5 flag caps the scan at an estimated $5 — the same figure the official GitHub Action example uses per scan — and --show-cost prints the running estimate. Requests already in progress can exceed the limit, so treat it as a tripwire, not a hard wall. For pricing context, the tool's own cost table (as of September 14, 2026) prices its default model, gpt-5.6-sol, at $4 per million input tokens, $0.40 cache read, $5 cache write, and $20 output in short context, roughly doubling for long context.
Scope the scan to what changed, or to the part you care about:
cs scan . --path src --path tests
cs scan . --diff origin/main
cs scan . --working-tree
Whole repositories, selected paths, committed diffs, and working-tree changes are all supported; diff and working-tree scans need git. For a deeper pass, Deep Scan repeats Standard scans in batches of workers until several consecutive runs find nothing new:
cs scan . --mode deep --workers 2 --max-time 90Defaults are 4 workers, 3 subagents each, stop after 4 runs with no new findings, and at most 40 discovery runs. --max-time is advisory in Standard mode and an enforced discovery limit in Deep mode (maximum 96 hours). Then close the loop on what it finds. Validation re-checks each finding against source evidence only, with read-only filesystem access and no network:
cs scan . --validate
cs validate findings.json
Patching applies fixes for the findings you select and verifies them, and --create-pr opens a draft pull request with the result:
cs patch --scan latest --severity high
cs verify-fix --scan latest
verify-fix checks fixes you already made, without changing the repository. Two honest limits from the docs: validation cannot be combined with --max-cost, --dry-run, or --mock, because its extra model calls are not cost-tracked; and a completed scan is not a clean bill of health — the report records exclusions, deferred work, and open questions, and absence of findings in a stopped run is inconclusive. Some cybersecurity requests also need a Daybreak access program; if a refusal or safety block aborts a scan, the run fails even with --fail-on-severity none, and a failed scan does not mean the repository has no vulnerabilities.
Step 8: Put it in CI#
The same scan runs weekly in GitHub Actions. The official example workflow — verified against the repository's Action README — is short enough to read in full:
name: Codex Security repository
on:
  workflow_dispatch:
  schedule:
    - cron: "23 7 * * 1" # Mondays at 07:23 UTC
permissions:
  contents: read
jobs:
  security:
    runs-on: ubuntu-24.04
    timeout-minutes: 120
    steps:
      - uses: actions/checkout@3d3c42e5aac5ba805825da76410c181273ba90b1 # v7.0.1
        with:
          persist-credentials: false
      - name: Scan the repository
        id: security
        uses: openai/codex-security@REPLACE_WITH_REVIEWED_COMMIT
        with:
          scope: repository
          model: gpt-5.6-sol
          effort: high
          max-cost: "5"
          fail-on-severity: none
        env:
          OPENAI_API_KEY: ${{ secrets.CODEX_SECURITY_API_KEY }}
Three details matter. First, add your API key as a repository secret named CODEX_SECURITY_API_KEY. Second, replace REPLACE_WITH_REVIEWED_COMMIT with the full distribution commit SHA from an action-vX.Y.Z release you have reviewed — the distribution commit contains the Action bundles and the CLI dependency lock, and the pin-by-SHA is deliberate. Third, fail-on-severity: none makes the run report-only: findings never fail the job, but scanner errors still do. The workflow runs Mondays at 07:23 UTC, or on demand from the Actions tab.
For project-level defaults, generate a starter configuration file in the repo:
cs init
codex-security scan . -c codex-security.yaml --dry-run
cs init writes codex-security.yaml with the defaults commented out — model, effort, scope paths, knowledge-base files, a per-scan cost limit, and a severity gate — and the dry run confirms the file parses before any scan uses it. Treat the file as trusted operator configuration: it can start processes and choose model destinations, so keep it out of untrusted checkouts. The CLI also ships cs install-hook, which installs a pre-commit hook that scans staged and unstaged changes and blocks on errors or findings at your chosen severity.
Step 9: Drive it from TypeScript#
The same tool is a library. Install it as a dependency and run a scan from code — the snippet below is the README's own example:
npm install @openai/codex-securityimport { CodexSecurity } from "@openai/codex-security";
const security = new CodexSecurity();
try {
const result = await security.run("/path/to/repository");
console.log(result.reportPath);
} finally {
await security.close();
}The SDK was executed in the sandbox with the mock flag — security.run("./demo-app", { mock: true }) — and it returned a result object carrying reportPath, scanDir, sarifPath, findings, and cost, with the report written under the scan state directory. The SDK guide covers deep-scan configuration, validation, severity classification, and owner suggestions from there, and the CLI's scan --schema --format json documents the full input and output shapes. Policy generation follows the same pattern: cs policy . drafts a SECURITY.md for review, and cs policy . --dry-run --json — executed here, exit 0 — checks the inputs without calling the model.
When to use this vs alternatives#
Codex Security is an agentic reviewer, not a rules engine. That decides where it fits.
| Tool | Use it for | Strengths | Watch out for |
|---|---|---|---|
| Codex Security | Whole-repo security review with evidence, validation, patching, and verification in one loop | Findings carry source evidence and a root cause; validation and patching are built in; SARIF/CSV/JSON export; GitHub Action and SDK | Needs a model and credentials for real scans; per-scan cost; a completed scan is not a guarantee — exclusions and deferred work are recorded, not resolved |
| Semgrep / CodeQL | Deterministic, repeatable rules in CI on every push | Free; fast; no model calls; same input always gives the same output | Pattern-bound — it finds what its rules describe and nothing else; no patching loop |
| Gitleaks / TruffleHog | Secrets in code and history | Fast, specialised detectors; TruffleHog verifies credentials against live APIs | Secrets only — they say nothing about injection, authz, or logic flaws |
| Cloudflare security-audit-skill | Audits driven inside Claude Code as a skill | Lives where you already code; multi-phase audit with verified findings | Tied to the Claude Code workflow; findings stay in the session unless you export them |
The practical setup is layered, not either-or: keep the deterministic scanner in CI for every push, run Codex Security on a weekly schedule or before releases for the review a rules engine cannot do, and keep a secrets scanner on history. The import command exists precisely so those layers can share one findings history instead of three inboxes.
The takeaway#
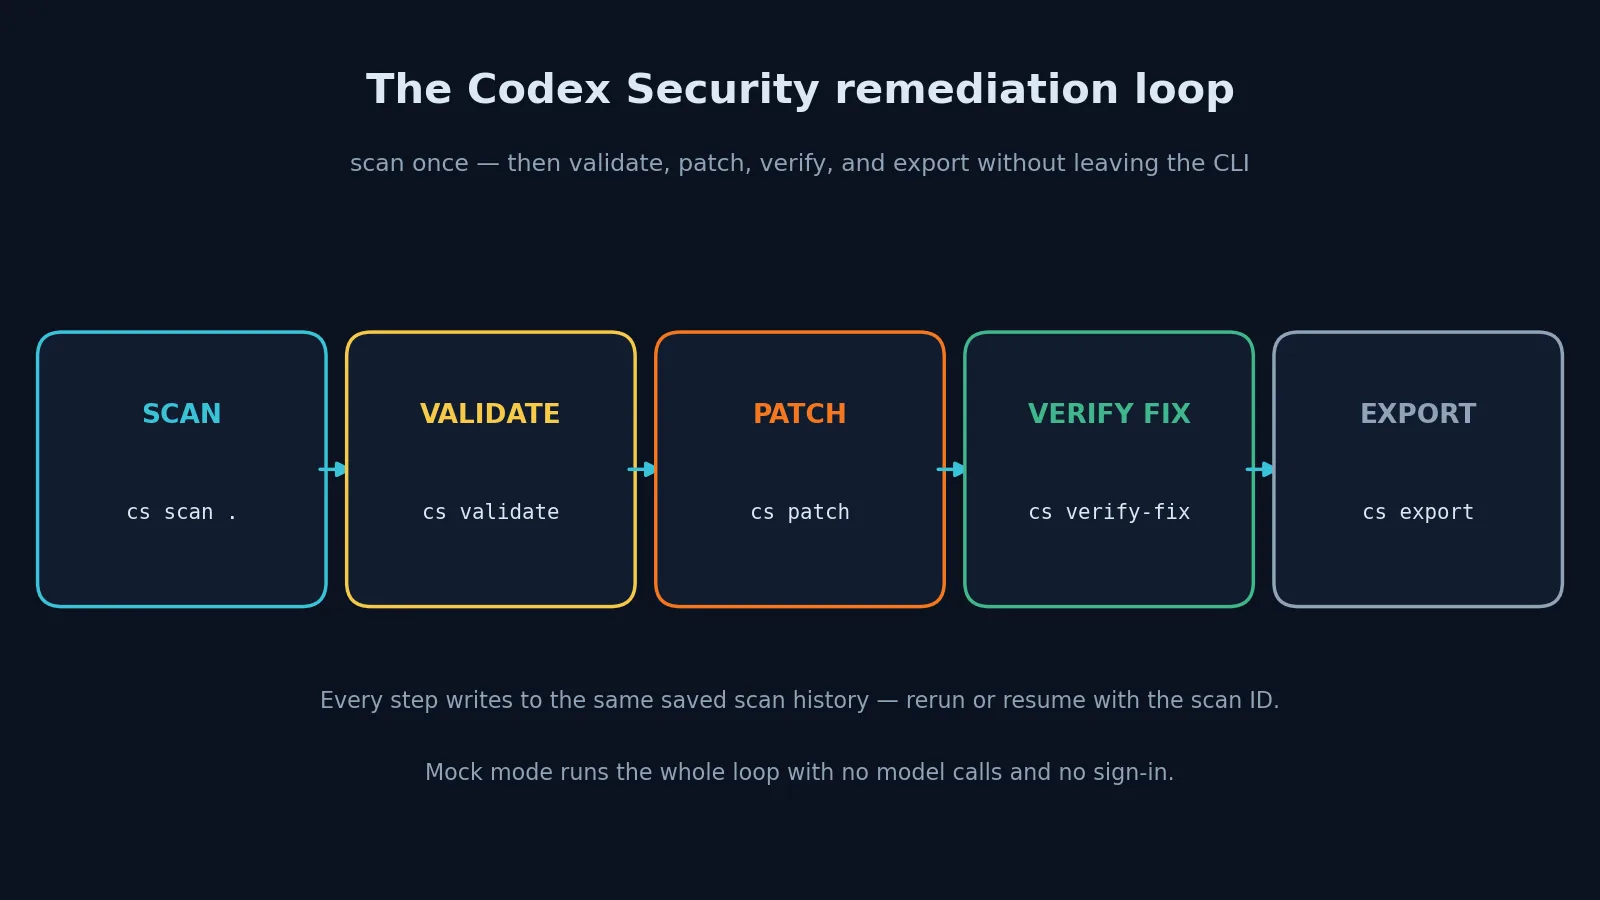
The reason Codex Security is trending is not that it finds vulnerabilities — plenty of tools do that — but that it finishes the job: scan, validate, patch, verify, export, all from one CLI, with every step recorded in a history you can re-open. The mock mode makes that loop free to learn: install the CLI, run cs scan . --mock, and you will hold a real report, a real SARIF file, and a real findings database within a minute, no account required.
From there the honest path is short. Point it at a repository you own, set a $5 cost cap, and read the first real report with the same scepticism you would give any reviewer — check the evidence, run validation, and patch the findings that survive it. The tool's own docs say a completed scan does not mean every file was examined; treat the report as a prioritised starting point, not a verdict. Used that way, it is the fastest route from “we should really audit this” to a reviewed, patched, and exported result.