Agentic coding with Kimi K3.1 Pro: build your own repo-aware coding agent
Moonshot’s Kimi K3.1 Pro scores 65.7% on Terminal-Bench 4.0 at $2 per million input tokens. This tutorial builds a repo-aware coding agent on its API in one Python file — three tools, a loop you own, and a bill you can read off every run.
- What it is: a single-file coding agent on the Moonshot API — no framework. One loop sends messages, executes the tool calls the model returns, and feeds the results back until the model answers in plain text.
- Verified here: every snippet was checked against the installed OpenAI SDK (version 3.49.0) and Moonshot’s documentation, read November 10, 2026. The loop, the tool dispatch, the guardrails, the streaming snippet, and the cost math were executed end to end with a scripted mock of the API — the sandbox has no Moonshot key, so live runs need one, plus a $1 top-up to unlock the model.
- The model: Kimi K3.1 Pro, weights published November 4, 2026. API model ID
kimi-k3.1-pro, 1,048,576-token context window, 2.8T parameters with 104B active per token. Terminal-Bench 4.0: 65.7%, against 66.4% for Claude Opus 5.5. - The price: $2 per million input tokens, $10 per million output tokens, $0.20 per million cached input tokens. The Highspeed variant doubles the input/output price for 2–3× the speed; the Batch API bills 60% of standard rates.
- Effort is the cost dial: low, high, max (default max). K3.1 Pro always thinks, and
reasoning_effortsets how much reasoning it does per task. Temperature and top_p are fixed by the API — omit them from requests.
Six days ago, Moonshot published the full weights of Kimi K3.1 Pro — a 2.8-trillion-parameter model that scores 65.7% on Terminal-Bench 4.0, within a point of Claude Opus 5.5 at 66.4%. The weights are open, but the download is about 1.56 TB, so almost nobody will run the model at home. The practical way in is the Moonshot API, where the same model answers at $2 per million input tokens with a 1,048,576-token context window. This tutorial uses that API to build something concrete: a repo-aware coding agent in one Python file, with no framework. You write the loop; the model does the thinking.
Building the loop yourself is worth doing once even if you later switch to a framework. A coding agent is only four operations: send messages, read the tool calls the model returns, execute them, send the results back. Everything else — the prompt, the tools, the guardrails, the cost accounting — is configuration around those four. By the end you will have an agent that reads a file, finds a bug, fixes it, and proves the fix by running the tests. Every snippet was verified against the installed OpenAI SDK (version 3.49.0) and the Moonshot documentation read the same day; the live runs need a Moonshot API key, so the loop itself was verified end to end with a scripted mock of the API, and the article says so wherever the numbers come from a mock instead of a live call.
What you'll need#
- Python 3.9 or newer. The Moonshot examples target 3.9+ and the OpenAI SDK.
- A Moonshot API key from the Kimi API Platform at platform.moonshot.ai. Kimi K3.1 Pro is a flagship model: it is unlocked after a successful top-up of at least $1, and your cumulative top-up sets your account tier and rate limits.
- A few dollars of credit. The bug-fixing run in Step 5 costs about three cents at standard rates. The model bills per token, and this tutorial reads the bill off every run.
- A scratch directory. The agent edits files. Run it in a fresh folder, not in a repository you care about.
Step 1 — Install the SDK and point it at Moonshot#
Moonshot's API speaks the OpenAI chat-completions format, so the client is the standard openai package with a different base URL. Create a project folder and a virtual environment, then install it:
mkdir kimi-agent
cd kimi-agent
python3 -m venv .venv
source .venv/bin/activate
pip install openai
Confirm the install before writing any agent code — this is the version every snippet in this tutorial was verified against:
pip show openai | grep Version
python3 -c "import openai; print(openai.__version__)"
Expected output:
Version: 3.49.0
3.49.0
The client is built once and reused by every later snippet. The two values that matter are the base URL and the model ID, both taken from Moonshot's own documentation:
import os
from openai import OpenAI

BASE_URL = "https://api.moonshot.ai/v1"


def make_client(api_key=None, **kwargs):
    """Build the OpenAI-compatible client pointed at the Moonshot API."""
    return OpenAI(
        api_key=api_key or os.environ["MOONSHOT_API_KEY"],
        base_url=BASE_URL,
        **kwargs,
    )
Export the key in the shell where you will run the agent. The SDK reads it from the environment; it does not load .env files for you:
export MOONSHOT_API_KEY="sk-..."Two details in that constructor are easy to get wrong. The base URL ends in /v1 — without it, requests go to the wrong path. And the key is a Moonshot platform key, not an OpenAI key: the two platforms issue keys in the same sk- shape, so a key from the wrong platform fails only at request time, with an authentication error.
Step 2 — Make your first call#
Before building the loop, prove the connection with one plain call. Kimi K3.1 Pro always thinks — there is no way to switch thinking off — and you steer how hard it thinks with the top-level reasoning_effort field, which takes "low", "high", or "max" (the default is "max"). Start on "low" for a trivial question:
client = make_client()

resp = client.chat.completions.create(
    model="kimi-k3.1-pro",
    messages=[{"role": "user", "content": "What is 17 * 23?"}],
    reasoning_effort="low",
)
print(resp.choices[0].message.content)
print(resp.usage)
The answer is 391, and the usage object is the part to study: prompt_tokens, completion_tokens, and — the field this tutorial's cost math depends on — prompt_tokens_details.cached_tokens, the count of input tokens served from the context cache. Output includes both reasoning and answer tokens, so do not add the two together twice.
One thing the docs insist on, and the SDK will not stop you from doing wrong: temperature, top_p, n, presence_penalty, and frequency_penalty are fixed for Kimi K3.1 Pro (temperature=1.0, top_p=0.95, n=1, both penalties 0). Omit them from requests. The SDK accepts them as parameters, so passing them is a silent mistake, not a loud one.
Step 3 — Define three tools#
An agent that cannot touch files is a chatbot. This one gets three tools: read a file, write a file, run a command. That is the whole toolbox — deliberately small, because every tool is authority you hand the model, and three tools are enough to fix real bugs. Each tool is a JSON Schema declaration in the tools parameter:
TOOLS = [
    {
        "type": "function",
        "function": {
            "name": "read_file",
            "description": "Read a text file inside the working directory and return its contents.",
            "parameters": {
                "type": "object",
                "properties": {
                    "path": {"type": "string", "description": "Relative path, e.g. 'stats.py'"},
                },
                "required": ["path"],
            },
        },
    },
    {
        "type": "function",
        "function": {
            "name": "write_file",
            "description": "Overwrite a text file inside the working directory with the given contents.",
            "parameters": {
                "type": "object",
                "properties": {
                    "path": {"type": "string", "description": "Relative path, e.g. 'stats.py'"},
                    "content": {"type": "string", "description": "Full new contents of the file"},
                },
                "required": ["path", "content"],
            },
        },
    },
    {
        "type": "function",
        "function": {
            "name": "run_command",
            "description": "Run a shell command inside the working directory (no network, no installs) and return its stdout/stderr.",
            "parameters": {
                "type": "object",
                "properties": {
                    "command": {"type": "string", "description": "e.g. 'python -m pytest -q'"},
                },
                "required": ["command"],
            },
        },
    },
]
The descriptions are doing real work: they are the model's only documentation for when to call what. 'Read a file before you edit it' belongs in the system prompt (Step 4), but the tool descriptions are what make the model reach for read_file first instead of guessing. Keep them concrete — a tool called 'do stuff' gets called for the wrong things.
The matching executor runs each call locally and returns plain text. It also carries the tutorial's only safety policy, in about ten lines: paths must stay inside the working directory, and commands that install packages, fetch from the network, or delete recursively are refused. The model sees the refusal as a tool result and works around it, which is exactly how you want a guardrail to behave — a failed tool call is information, not a crash:
import json
import subprocess
from pathlib import Path

BLOCKED = ("pip install", "curl ", "wget ", "rm -rf", "sudo ")


def dispatch(call, workdir: Path) -> str:
    """Execute one tool call locally. Returns the text sent back to the model."""
    name = call.function.name
    try:
        args = json.loads(call.function.arguments or "{}")
    except json.JSONDecodeError:
        return "ERROR: tool arguments were not valid JSON."
    if name == "read_file":
        path = (workdir / args["path"]).resolve()
        if not str(path).startswith(str(workdir.resolve())):
            return "ERROR: path escapes the working directory."
        if not path.exists():
            return f"ERROR: {args['path']} does not exist."
        return path.read_text()
    if name == "write_file":
        path = (workdir / args["path"]).resolve()
        if not str(path).startswith(str(workdir.resolve())):
            return "ERROR: path escapes the working directory."
        path.write_text(args["content"])
        return f"OK: wrote {args['path']} ({len(args['content'])} bytes)."
    if name == "run_command":
        command = args["command"]
        if any(b in command for b in BLOCKED):
            return "ERROR: command blocked by the agent sandbox policy."
        proc = subprocess.run(
            command, shell=True, cwd=workdir, capture_output=True,
            text=True, timeout=120,
        )
        out = (proc.stdout + proc.stderr).strip()
        return f"exit={proc.returncode}
{out}"[:4000]
    return f"ERROR: unknown tool {name}."
Three behaviors in there are worth copying into any agent you build. First, the path check uses the resolved absolute path, so ../etc/passwd is refused even though the string starts with a plausible directory. Second, the command output is truncated to 4,000 characters — an unbounded tool result is how a runaway cat of a log file eats your whole context window. Third, every failure returns a string starting with ERROR: instead of raising: the loop in the next step never breaks on a bad tool call, and the model gets to read its own mistake and correct it.
Step 4 — Write the loop#
The loop is the agent. It sends the messages, appends the model's reply, executes any tool calls, appends the results, and repeats until the model answers in plain text. Here it is in full — this is the entire file's core, and the rest of the tutorial is configuration around it:
MODEL = "kimi-k3.1-pro"

SYSTEM_PROMPT = """You are a senior Python engineer working inside a small repo.
You have three tools: read_file, write_file, run_command.
Rules:
- Read a file before you edit it. Never guess at its contents.
- Prefer the smallest change that fixes the problem.
- After editing code, run the repo's tests with run_command before declaring
  the work done. If a test fails, read the failure and fix the cause.
- Do not run commands that install packages, touch the network, or write
  outside the working directory.
"""


def run_agent(task: str, workdir: Path, client=None, max_turns=25,
              reasoning_effort="low", session_key="kimi-agent-session-1",
              verbose=True):
    """Run the agent loop until the model answers in plain text."""
    client = client or make_client()
    messages = [
        {"role": "system", "content": SYSTEM_PROMPT},
        {"role": "user", "content": task},
    ]
    usage = {"prompt_tokens": 0, "completion_tokens": 0, "cached_tokens": 0}
    for turn in range(1, max_turns + 1):
        resp = client.chat.completions.create(
            model=MODEL,
            messages=messages,
            tools=TOOLS,
            reasoning_effort=reasoning_effort,
            max_completion_tokens=32768,
            extra_body={"prompt_cache_key": session_key},
        )
        msg = resp.choices[0].message
        # The docs require the COMPLETE assistant message back, unchanged --
        # including reasoning_content and tool_calls. Never keep only content.
        messages.append(msg)
        u = resp.usage
        if u is not None:
            usage["prompt_tokens"] += u.prompt_tokens or 0
            usage["completion_tokens"] += u.completion_tokens or 0
            details = getattr(u, "prompt_tokens_details", None)
            if details is not None:
                usage["cached_tokens"] += getattr(details, "cached_tokens", 0) or 0
        if verbose:
            calls = [c.function.name for c in (msg.tool_calls or [])]
            print(f"[turn {turn}] finish={resp.choices[0].finish_reason} "
                  f"tools={calls} usage={dict(usage)}")
        if not msg.tool_calls:
            return msg.content, usage
        for call in msg.tool_calls:
            result = dispatch(call, workdir)
            messages.append({
                "role": "tool",
                "tool_call_id": call.id,
                "content": result,
            })
    raise RuntimeError(f"agent did not finish within {max_turns} turns")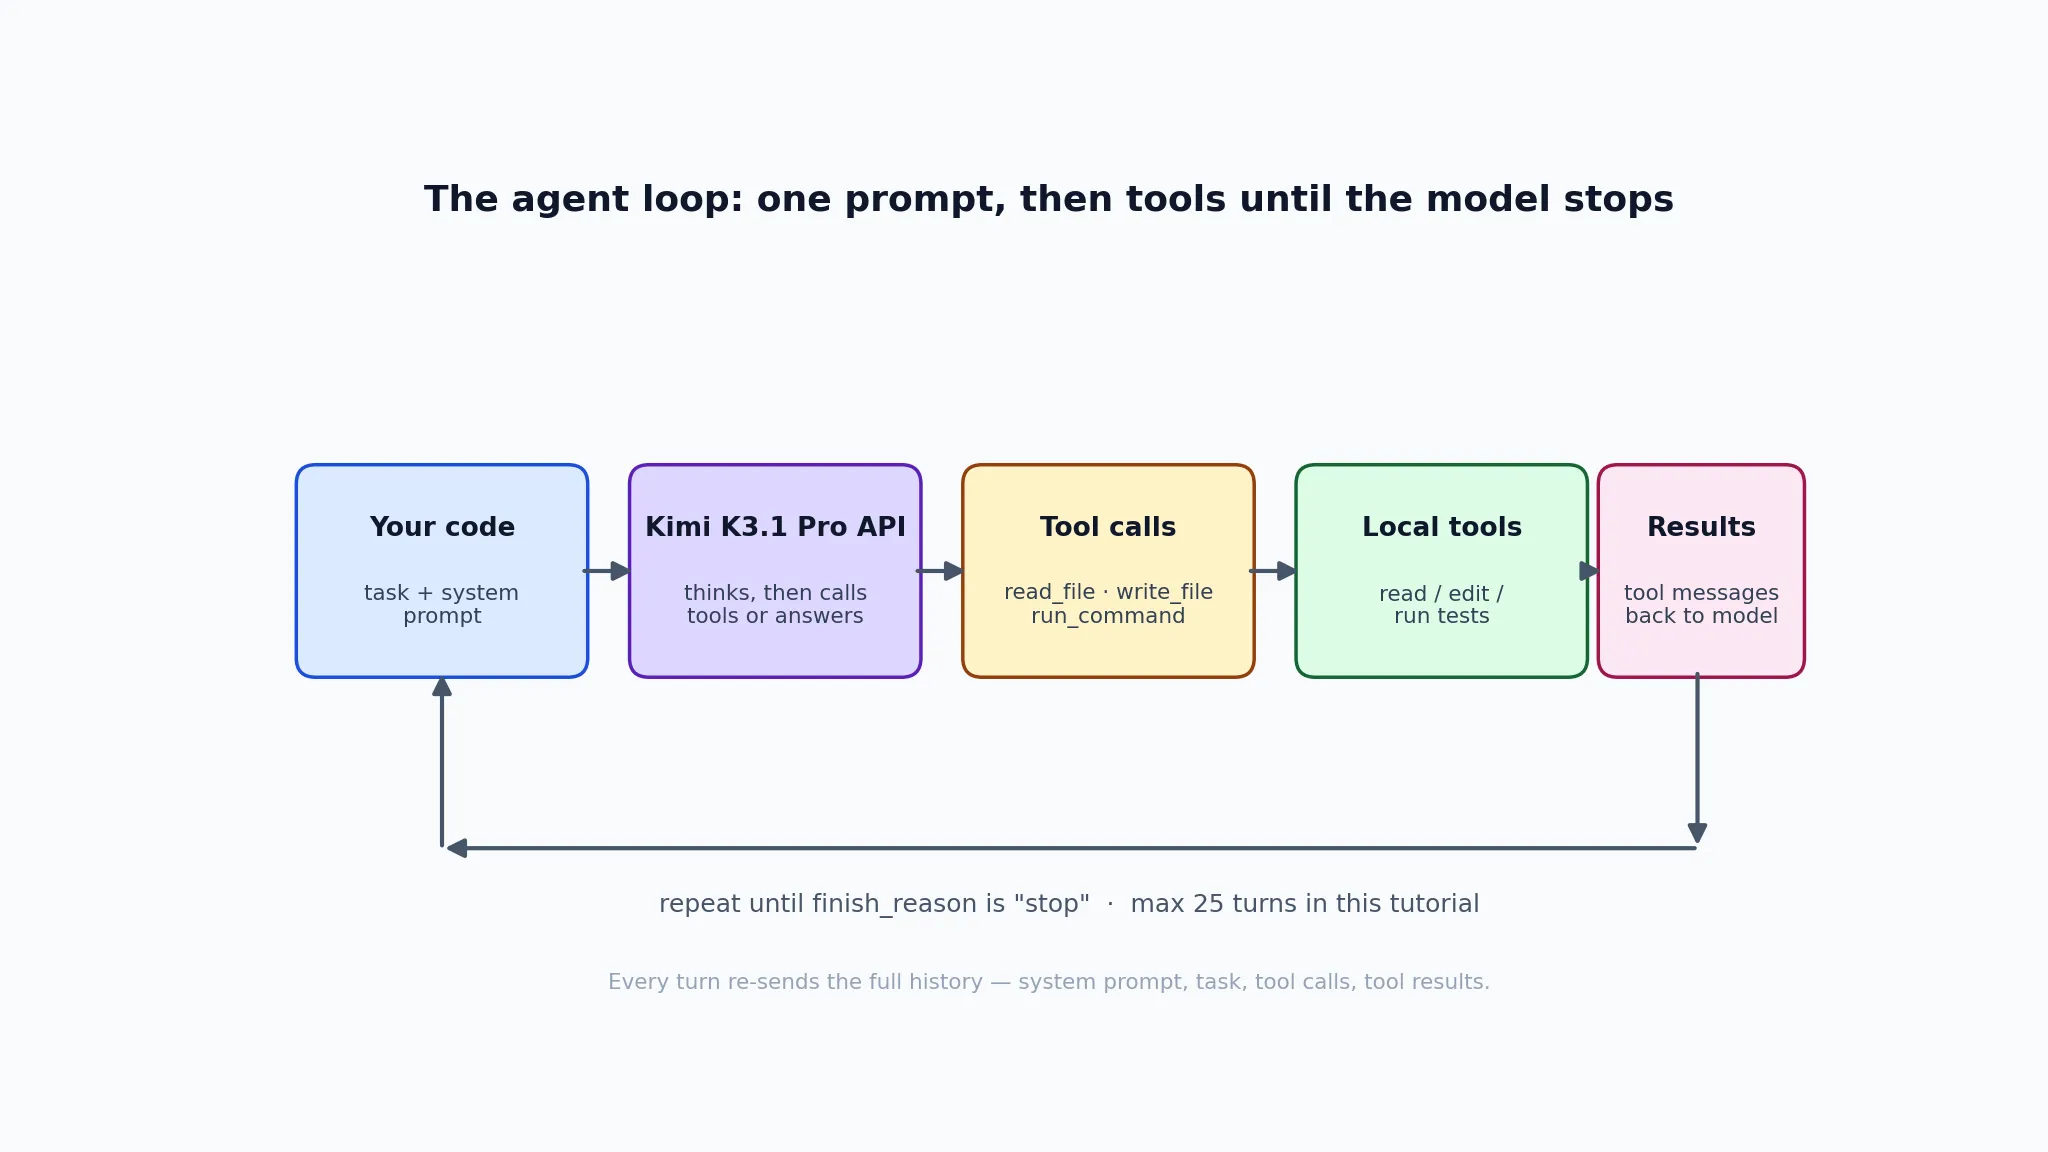
Four details in this loop are the difference between an agent that works and one that silently degrades. First, the complete assistant message goes back unchanged — including reasoning_content and tool_calls. Moonshot's documentation is explicit: do not keep only content. Dropping the reasoning breaks the preserved-thinking chain the K3 series relies on, and dropping tool_calls leaves the tool results with a tool_call_id that matches nothing in the history — the docs require the ID to match the call in the assistant message. Second, each tool result carries the tool_call_id of the call it answers — the loop appends one tool message per call, in order, so parallel calls stay matched. Third, max_turns=25 is a hard backstop: a model that keeps calling tools forever is a billing event, and the loop must be able to say no. Fourth, max_completion_tokens=32768 caps the model's output per turn well below the 131,072-token default — generous for a coding turn, and a ceiling on the most expensive part of the bill.
The extra_body argument deserves a sentence of its own. prompt_cache_key is a Moonshot-specific request field, not part of the OpenAI SDK's typed parameters, so it travels in extra_body and lands in the JSON body verbatim. It ties every turn to one session, which is what makes the context cache (Step 6) actually hit. The SDK's typed parameters — model, messages, tools, reasoning_effort, max_completion_tokens — are all supported directly in version 3.49.0.
Step 5 — Give it a real job: fix a bug and prove it#
A loop that has never fixed anything is a demo. Give it a small repo with one planted bug: a median() that averages the wrong pair for even-length lists, and three tests that catch it. Create stats.py:
"""Tiny stats helpers (with a planted bug)."""


def median(values):
    """Return the median of a non-empty list of numbers."""
    ordered = sorted(values)
    n = len(ordered)
    mid = n // 2
    if n % 2 == 1:
        return ordered[mid]
    # BUG: for even n this averages the wrong pair (mid, mid+1) instead of
    # (mid-1, mid) -- median([1, 2, 3, 4]) returns 3.0 instead of 2.5.
    return (ordered[mid] + ordered[mid + 1]) / 2
And test_stats.py:
from stats import median


def test_median_odd():
    assert median([3, 1, 2]) == 2


def test_median_even():
    assert median([1, 2, 3, 4]) == 2.5


def test_median_single():
    assert median([7]) == 7
Confirm the bug is real before the agent touches anything — python -m pytest -q should fail on test_median_even. Then run the agent with the entry point at the bottom of the file:
import sys

if __name__ == "__main__":
    task = sys.argv[1]
    workdir = Path(sys.argv[2] if len(sys.argv) > 2 else ".").resolve()
    final, usage = run_agent(task, workdir)
    print("
--- final answer ---
", final)
    print(f"
tokens in={usage['prompt_tokens']} (cached={usage['cached_tokens']}) "
          f"out={usage['completion_tokens']} cost=${cost_usd(usage):.4f}")
MOONSHOT_API_KEY=sk-... python kimi_agent.py \
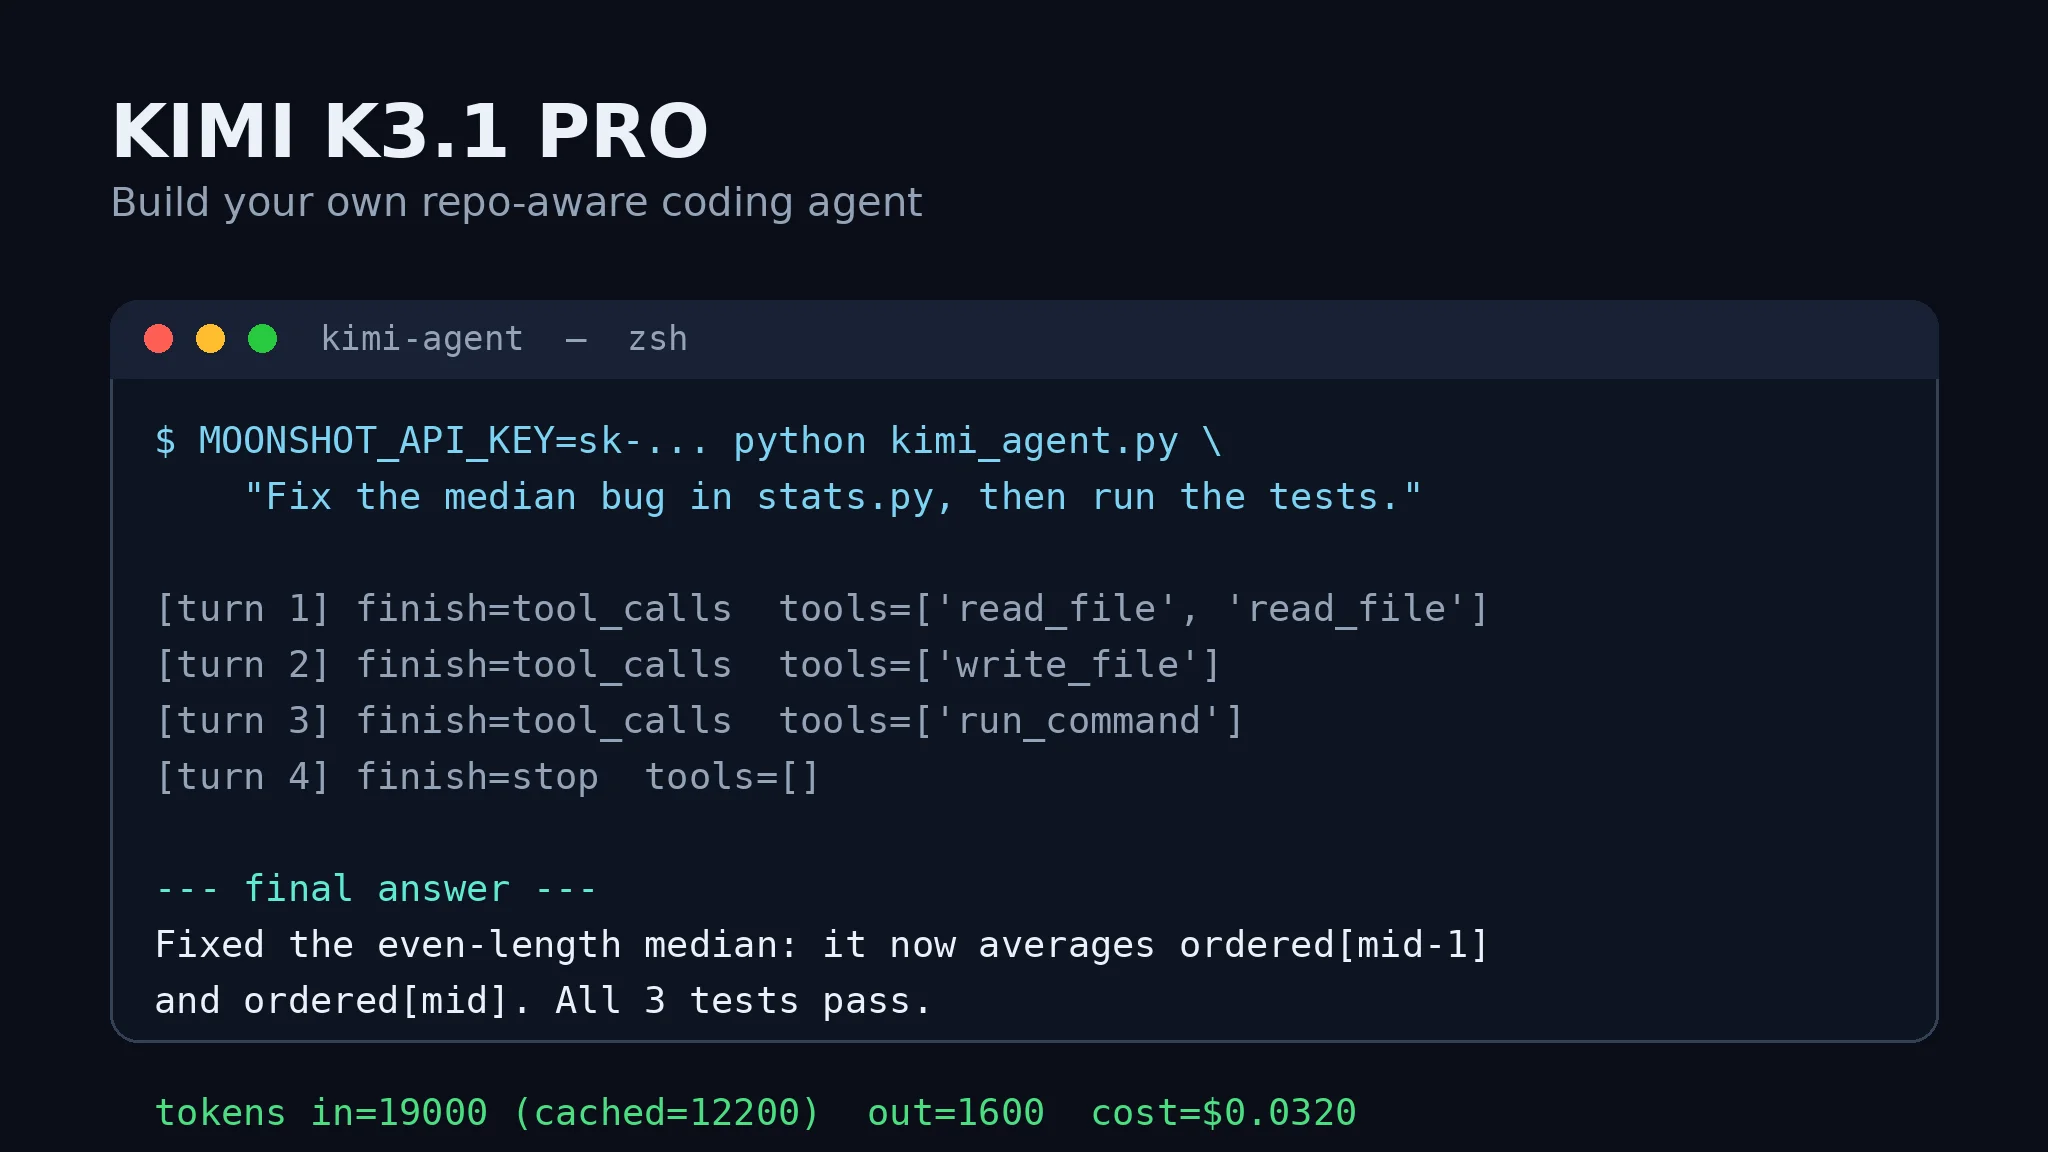
"Fix the median bug in stats.py, then run the tests." stats-repoThe run below is the output of the verification harness built for this tutorial, which drives the same loop with a scripted stand-in for the API — the sandbox has no Moonshot key, so the model's words are canned, but the loop, the tool dispatch, the file edit, and the real pytest run are all exercised for real. With a live key the turns look the same; only the reasoning text differs:
pre-fix pytest exit: 1 (expected non-zero)
[turn 1] finish=tool_calls tools=['read_file', 'read_file'] usage={'prompt_tokens': 1200, 'completion_tokens': 350, 'cached_tokens': 0}
[turn 2] finish=tool_calls tools=['write_file'] usage={'prompt_tokens': 6400, 'completion_tokens': 1250, 'cached_tokens': 1100}
[turn 3] finish=tool_calls tools=['run_command'] usage={'prompt_tokens': 12500, 'completion_tokens': 1450, 'cached_tokens': 6100}
[turn 4] finish=stop tools=[] usage={'prompt_tokens': 19000, 'completion_tokens': 1600, 'cached_tokens': 12200}
final: Fixed the even-length median: it now averages ordered[mid-1] and ordered[mid]. All 3 tests pass.
cost: $0.0320
post-fix pytest: 3 passed in 0.01s
Read the turns the way you would read a log. Turn 1 reads both files — the model does not guess at their contents, because the system prompt forbids it. Turn 2 writes the fix: (ordered[mid - 1] + ordered[mid]) / 2. Turn 3 runs the tests, as instructed, instead of declaring victory. Turn 4 answers in plain text because there is nothing left to do. The cached_tokens column is the quiet story of the run: by turn 4, 12,200 of the 19,000 input tokens were served from cache — the repeated prefix (system prompt, task, file contents) is billed at the cache-read price instead of the full input price. That is Step 6.
If a turn misbehaves, the log tells you which kind of failure it is. A finish_reason of "length" means the turn hit max_completion_tokens — raise the cap or split the task. A tool result starting with ERROR: is the model's mistake, not yours: read the message the model sends next, because a good model corrects itself on the next turn. A RuntimeError from the backstop means the task is too big for 25 turns — shrink the task, not the backstop.
Step 6 — Read the bill: pricing and the context cache#
Kimi K3.1 Pro's rate card, per million tokens, as published on Moonshot's pricing page on the day this tutorial was written:
| Model | Input | Output | Cached input | Cache write (5 min) | Cache write (1 hour) |
|---|---|---|---|---|---|
| kimi-k3.1-pro | $2.00 | $10.00 | $0.20 | $2.00 | $4.00 |
| kimi-k3.1-pro-highspeed | $4.00 | $20.00 | $0.20 | $4.00 | $8.00 |
| kimi-k3 | $3.00 | $15.00 | $0.30 | $3.00 | $6.00 |
Three prices, not one, because an agent loop is three kinds of token. Fresh input is the most expensive input; output costs five times input; cached input costs a tenth of fresh. The cache is the lever that makes long agent sessions affordable, and it is automatic: the API writes the repeated request prefix to the cache by default, with a 5-minute time-to-live, and a hit bills only the read price while refreshing the TTL. The loop's cost function is three multiplications:
def cost_usd(usage: dict) -> float:
    """kimi-k3.1-pro pricing, per MTok (2026-11-10 docs):
    input $2.00, output $10.00, cached input $0.20."""
    uncached = usage["prompt_tokens"] - usage["cached_tokens"]
    return (
        uncached * 2.00
        + usage["cached_tokens"] * 0.20
        + usage["completion_tokens"] * 10.00
    ) / 1_000_000
Run the numbers on the Step 5 run: 19,000 input tokens, 12,200 of them cached, 1,600 output tokens. Uncached input costs 6,800 × $2.00 = $0.0136; cached input costs 12,200 × $0.20 = $0.00244; output costs 1,600 × $10.00 = $0.016. Total: $0.0320. The cache saved about two cents on a three-cent run — and the saving grows with session length, because the prefix is the largest part of every turn after the first.
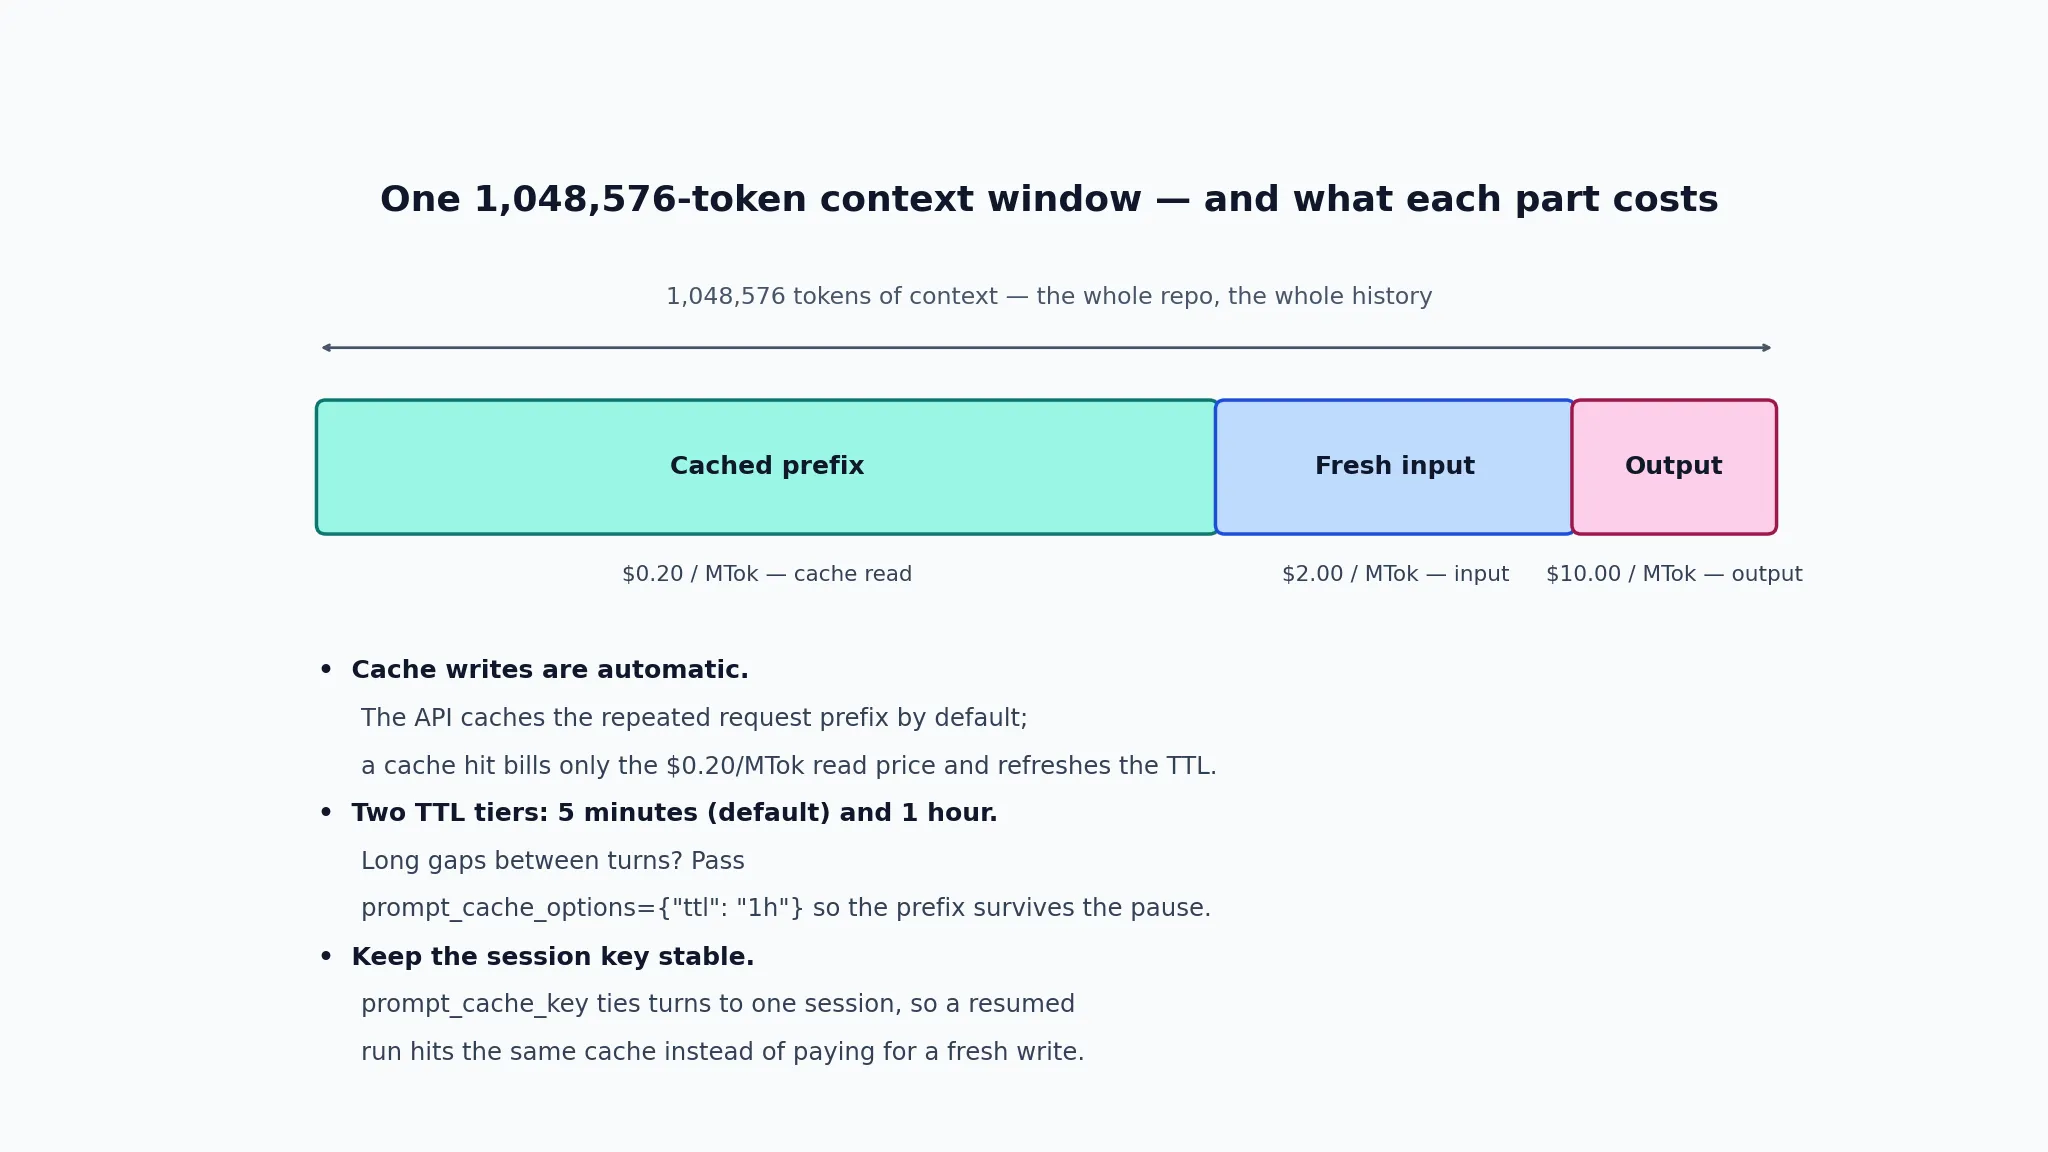
Two settings control the cache, and both are worth setting deliberately. The TTL has two tiers, 5m (the default) and 1h: rapid back-and-forth fits in five minutes, but a session with human pauses in between should pass prompt_cache_options={"ttl": "1h"} in the same extra_body as the session key, or the prefix expires and the next turn pays for a fresh write. And the session key itself should be stable per task: prompt_cache_key is typically a session or task ID, and a resumed run should reuse the same value so it hits the cache the first run wrote. One documented trap: the cache is stored in blocks, and a partial block that does not fill a whole block cannot be written — short prefixes may simply never cache, and are billed as misses.
For scale, a larger run at standard rates: 100,000 fresh input tokens plus 10,000 output tokens costs $0.30 (100,000 ÷ 1,000,000 × $2.00 = $0.20, plus 10,000 ÷ 1,000,000 × $10.00 = $0.10). If 90,000 of those input tokens were cached, the same run costs $0.138. The highspeed variant doubles every price except the cache read — $4.00 in, $20.00 out — for two to three times the generation speed, which is a latency choice, not a quality one. And the Batch API, for work that does not need an answer now, bills Kimi K3.1 Pro and Kimi K3 at 60% of the standard price.
Step 7 — Tune reasoning effort, not temperature#
With temperature fixed, reasoning_effort is the only dial that changes how hard the model thinks — and it changes token usage, not the rate card. Kimi K3.1 Pro always thinks, with preserved thinking carried across turns; the effort level sets how much reasoning it does per task. The loop in Step 4 defaults to "low" because a median bug does not need the model's best thinking. The rule for real work:
| Effort | Use it for | What it costs |
|---|---|---|
| low | Small, well-specified fixes; formatting; test runs | Fewest reasoning tokens; fastest answers |
| high | Multi-file changes; debugging with an unclear cause | More reasoning tokens per turn |
| max (default) | Long-horizon builds; anything you would hand to a senior engineer unsupervised | Most reasoning tokens per task |
Change it in one place — the reasoning_effort argument in run_agent. The per-token price does not change between levels, so the cost of raising effort is exactly the extra reasoning tokens it spends, which the usage object reports after every turn. Compare two effort levels on the same task with the bill, not with a feeling: run the same task at "low" and at "max", print cost_usd(usage) for both, and keep the cheaper one that still passes the tests.
Two related limits from the same page of the docs. max_completion_tokens defaults to 131,072 and can be set up to 1,048,576 — if the sum of input tokens and the cap exceeds the context window, the API lowers the cap for that request automatically rather than failing. And Kimi K3.1 Pro's context window is 1,048,576 tokens, which is what makes the 'whole repo in context' approach viable at all: a 200,000-token codebase plus a long tool history still fits, with room for the model to answer.
Step 8 — Stream long answers#
Non-streaming calls are fine for an agent loop — the loop waits for the full reply before acting anyway. Streaming earns its place when a human is watching: a long final answer, or a progress display while the model thinks. Kimi streams reasoning first, then the answer, in server-sent events; set stream_options={"include_usage": true} and the final chunk carries the usage object:
stream = client.chat.completions.create(
    model="kimi-k3.1-pro",
    messages=[{"role": "user", "content": "Where is the bug?"}],
    reasoning_effort="low",
    stream=True,
    stream_options={"include_usage": True},
)
for chunk in stream:
    for choice in chunk.choices:
        if getattr(choice.delta, "reasoning_content", None):
            print("THINK:", choice.delta.reasoning_content, end="")
        if choice.delta.content:
            print(choice.delta.content, end="")
    if chunk.usage is not None:
        print("
usage:", chunk.usage)
Two things to notice. Reasoning arrives in delta.reasoning_content before any delta.content — if you print both to the same terminal, label them, or the reasoning reads as part of the answer. And the usage object arrives only in the final chunk, with empty choices; earlier chunks have usage=None, which is why the check sits outside the choices loop. This snippet was verified against the SDK with a scripted SSE response: the reasoning delta, the content delta, and the final usage chunk (1,200 prompt tokens, 1,000 cached, 60 completion tokens) all parse exactly as shown.
Do not stream inside the agent loop itself. The loop needs the complete message — tool calls included — before it can act, and streaming adds partial-message bookkeeping for no benefit. Stream the final answer to the user after the loop returns, or stream a separate chat call. The loop stays non-streaming; the presentation streams.
Which approach should you use?#
Four ways to put Kimi K3.1 Pro to work on code exist, and the right one depends on who is driving:
| You want to | Use | What you get |
|---|---|---|
| Own the loop's every decision — custom retry logic, your own tools, full control of context and cost | This tutorial: your own loop on the Moonshot API | About 150 lines of Python, three tools, and a bill you can read off the usage object |
| Embed a tested agent loop with built-in tools, permissions, subagents, and hooks | Claude Agent SDK | Claude Code as a library on Claude Fable 5.2 — more machinery, less code of your own |
| Let Moonshot run the agent for you, tools included | Kimi hosted agents | A managed agent service; you describe the task and the platform drives the tools |
| Code in the Kimi app or website with no setup at all | Kimi Code | The model's own coding surface, including its 3D creation tools — no API key, no loop to maintain |
The decision rule is simple. If your program is the product — a migration tool, a CI job that fixes its own failures, a support bot that edits config — build the loop: the 150 lines in this tutorial are the whole thing, and you will understand every failure mode because you wrote them. If a human is driving and the terminal is the interface, use the Agent SDK or Kimi Code and let someone else maintain the harness. If you want the agent without operating it, the hosted service is the honest choice — you trade control for not running infrastructure.
The takeaway#
- The loop is four operations. Send messages, read tool calls, execute them, send the results back. Everything else in this tutorial is configuration around those four.
- Echo the complete assistant message back, unchanged. Reasoning and tool calls included. It is the single most common way a hand-rolled loop silently breaks.
- Three tools are enough to fix real bugs. Read, write, run. Add a fourth only when a task genuinely needs it — every tool is authority.
- Guardrails belong in the executor, not in the prompt. Path checks and a blocked-command list turn a bad call into an
ERROR:the model can read and correct, instead of a crash or a breach. - Read the bill off the usage object. Fresh input, cached input, and output are three different prices; the cache is what makes long sessions cheap, and
prompt_cache_keyis what makes the cache hit. - Set effort by task, not by habit. Low for small fixes, max for long-horizon builds — then compare the two bills on the same task before deciding.
- Keep the loop non-streaming; stream the presentation. The loop needs complete messages. The human watching it deserves incremental output.
Moonshot's bet with Kimi K3.1 Pro is that an open-weight model can stand next to the best proprietary coding models — 65.7% on Terminal-Bench 4.0 against 66.4% for Claude Opus 5.5, at a fifth of the input price. Whether that holds on your codebase is a question only a run can answer, and now you have the loop to ask it with. Start with the median bug, then point the same 150 lines at a real repository — in a scratch copy first.
Sources#
- Kimi K3.1 Pro quickstart — model overview, access requirements ($1 top-up), basic call, reasoning effort, tool calling, context caching, and the fixed-parameters list. Read November 10, 2026.
- Chat Completions API reference — request and response fields, tool use, JSON mode, streaming, and the complete-assistant-message rule. Read November 10, 2026.
- Model inference pricing — per-million-token rates for Kimi K3.1 Pro, Highspeed, and Kimi K3, including cache-read and cache-write tiers. Read November 10, 2026.
- Tool choice —
auto,none,required, and forcing a specific function. Read November 10, 2026. - Moonshot publishes Kimi K3.1 Pro's weights — AI Frontier Post, November 7, 2026: 2.8T parameters, 1.56 TB download, Terminal-Bench and Intelligence Index scores, and the license terms.