Swap the lead actor in any video on your own GPU: a hands-on guide to OpenJutsu
OpenJutsu swaps the main person in a video for a character from a single photo — locally, on your own NVIDIA GPU, on open weights. This guide installs it over ComfyUI, runs your first swap, and fixes the faces it gets wrong.
- Project: OpenJutsu (D3voz/openjutsu), MIT licence, created October 26, 2026 — 1,968 stars and 281 forks as of November 8, 2026.
- What it does: Genjutsu-style character and object swap for video, local and on open weights — MiniMax H3 for video, SAM 3.1 for tracking, Qwen3-VL 8B to describe pictures and shots.
- Hardware: NVIDIA GPU, tested on an RTX 4060 Ti 16 GB with 64 GB of system RAM; ComfyUI 0.41.2+, Node.js 22.6+, Python for the proxy.
- Speed: a 6-second clip at 480p takes about 6–13 minutes on the tested card; 736p is the default and 1080p is about 2.5× slower.
- Modes: Simple (one person), Advanced (1–4 characters), Object swap, From picture with FLUX.3 Klein relighting in 17 looks, plus Fix faces and Fix colours post-processing.
- Licence catch: the app is MIT, but Fix faces depends on InsightFace buffalo_l (non-commercial research only) and YOLO weights under AGPL-3.0.
Higgsfield’s Genjutsu made a neat trick look easy: hand it a video and a photo, and the person on screen becomes someone else — same walk, same camera move, same soundtrack. The catch is that it runs on someone else’s servers, on someone else’s terms. OpenJutsu is the open-source answer: the same one-photo character swap, running on your own GPU, on open weights, with nothing uploaded anywhere.
It is a small Next.js front end over a ComfyUI workflow. MiniMax H3 generates the video, SAM 3.1 tracks the people in it, and Qwen3-VL 8B describes the pictures and shots so the prompts write themselves. Drop in a video and a character photo, press Generate, and the main person is replaced while the camera, cuts, motion and soundtrack stay. This guide installs it, runs a first swap, then goes through the modes that make it more than a one-trick app — multi-person swaps, object edits, FLUX relighting, and face fixes. Every command and number below comes from the project’s own README and workflow docs.
What you’ll need#
- An NVIDIA GPU. The project was tested on an RTX 4060 Ti with 16 GB of VRAM and 64 GB of system RAM; the H3 int8 models stream from RAM. The README’s timings assume that setup — anything smaller is untested.
- ComfyUI 0.41.2 or newer, Node.js 22.6 or newer, Python, and git. Python is needed for the small proxy that sits between the app and ComfyUI.
- Disk space for the models. The H3 video model, two VAEs, the Qwen3-VL text encoder and describer, SAM 3.1, plus LoRAs — budget several gigabytes of downloads (Step 2 lists every file).
- A short test video and a character photo. Pick a clip a few seconds long with one clear person and no mirrors — the limitations section explains why mirrors matter.
- Time. A 6-second clip at 480p takes about 6–13 minutes on the tested card. This is not a real-time tool; treat the first run as a coffee break.
Step 1 — Install ComfyUI and the custom nodes#
Install ComfyUI 0.41.2 or newer first. Core ComfyUI already provides MiniMax H3, SAM 3.1 and text generation; everything else comes from custom node packs. Install these twelve into ComfyUI/custom_nodes (ComfyUI Manager finds the first three by name):
| Pack | Used for |
|---|---|
| SolarRenderer | From picture: LoRA loading, conditioning, four-step sampling |
| ComfyUI-MiniMaxH3-Context-Loop 0.7.3+ | Clip loop, checkpoints, final assembly |
| ComfyUI-Fantastic-MiniMaxH3-PromptBuilder | Masked video-edit latent |
| ComfyUI-KJNodes | Grow Mask With Blur; VRAM cleanup |
| comfyui_controlnet_aux | Metric3D normal maps |
| ComfyUI-VideoHelperSuite | Video loading |
| comfyui-h3-oneclick-swap | Swap and object plans, people and role masks, grey mannequins, track labelling, cut finder, shot list, face-fix chunks |
| ComfyUI-H3-FaceRefine | Fix faces: face tracking and cropping, SAM face masks, pasting back |
| ComfyUI-Impact-Pack | Fix faces: SAM loader |
| comfyui-image-detail-contrast | Fix colours: Image Detail Contrast |
| Orion4D_FXMax | Fix colours: DCTL Tone Mapper and presets |
| comfyui-websocket-reconnect-fix | Every job: keeps live progress coming after the proxy reconnects (adds no nodes) |
Restart ComfyUI after installing them. One safety net is built in: before uploading a job, OpenJutsu checks the selected workflow against ComfyUI’s node and model lists. Missing packs appear with installation links and missing model files with their destination folders — so if you skipped one, the app tells you exactly what is absent.
Step 2 — Download the models#
The models go into folders under ComfyUI/models, exactly as listed here:
Folder in ComfyUI/models | File |
|---|---|
diffusion_models | minimax_h3_ref2va_pruned_int8_convrot.safetensors |
loras | minimax_h3_DMAD_4step_full_lora_avg_rank_39_bf16.safetensors |
text_encoders | qwen3vl_32b_minimax_h3_int4_convrot.safetensors (H3 text encoder) |
text_encoders | qwen3vl_8b_int8_convrot.safetensors (visual describer) |
vae | minimax_h3_video_vae_int8_convrot.safetensors, minimax_h3_audio_vae_fp32.safetensors |
checkpoints | sam3.1_multiplex_fp16.safetensors |
ultralytics/bbox, ultralytics/segm | face_yolov8m.pt, person_yolov8m-seg.pt (from Bingsu/adetailer), for Fix faces |
sams | sam_vit_b_01ec64.pth, for Fix faces |
insightface/models | buffalo_l (InsightFace downloads it on first use), for Fix faces |
Two more downloads belong to the From-picture mode in Step 5: the SolarRenderer LoRAs (solarrenderer_4step_lora.safetensors and solarrenderer_control_lora.safetensors, or the rank-64 pair from mdevoz/SolarRendererRank64) go in ComfyUI/models/loras. The visual describer defaults to Qwen3-VL 8B INT8; Qwen3-VL 4B FP8 and Gemma 4 E2B INT8 are smaller alternatives. Install any single-file model including its vision weights in ComfyUI/models/text_encoders, then press Refresh models in the app.
Step 3 — Start ComfyUI, the proxy, and OpenJutsu#
Start ComfyUI on 127.0.0.1:8188. On Windows, set AIOHTTP_NOSENDFILE=1 first (PowerShell: $env:AIOHTTP_NOSENDFILE = "1"). Without it, the first partial-file request — the video player sends one when you seek — can stall ComfyUI’s /view endpoint, and every later file download hangs until ComfyUI restarts.
Next, the proxy. It serves the ComfyUI API v2 on 127.0.0.1:8189; the --max-upload-mb 500 flag raises its default 100 MB upload cap for longer videos:
pip install comfy-api-proxy==0.1.6
python openjutsu/patch_proxy.py
comfy-api-proxy run --max-upload-mb 500
Run patch_proxy.py from the OpenJutsu checkout, with the same Python you installed the proxy with — it fixes the proxy’s live progress (node changes and mid-job previews). Then install and start the app itself:
git clone https://github.com/D3voz/openjutsu.git openjutsu
cd openjutsu
cp .env.example .env.local
npm ci
npm run build
npm start
Open http://127.0.0.1:3000. The .env.local file sets COMFY_BASE_URL=http://127.0.0.1:8189; leave COMFY_API_KEY empty for a local proxy. On Windows you can skip the manual steps and double-click start_openjutsu.bat instead (ComfyUI must already be running) — the first run installs the proxy into .venv-proxy and the node packages, then opens the proxy and the app in two windows. While changing the code, npm run dev runs the development server instead of the production build.
Two limits to know up front: uploads are capped at 512 MB total per request, including reference pictures, and up to three can arrive at once per app process — a fourth is asked to retry shortly. After a job ends, its uploads are removed from the proxy, but the files stay in ComfyUI’s input/ folder. Generation continues in ComfyUI independently of the browser tab.
Step 4 — Run your first character swap#
On first visit the welcome page asks you to choose the vision-language model that describes pictures and video frames and writes prompts. Qwen3-VL 8B INT8 is the default; pick it, or choose Set up later and decide under Model components. Your selection is saved in the browser and used for swaps, prompt descriptions and Find people.
Simple motion transfer is the default mode: one character replaces the main person — the one who fills the most of the frame. Upload your source video and the character photo. Under Who do they replace?, name the person by role (the singer), never by clothes: clothing words leak into the result. Leave it blank and the describer names them for you. What to replace is the text SAM tracks: person by default, an animal such as cat, or a short description (black and white cat) when the biggest match is the wrong one.
Before you spend ten minutes rendering, run Check mask. It runs only SAM and the mask — about a minute per 3 seconds of video — and shows a preview you can scrub frame by frame: cyan is the area H3 regenerates, orange is the tracked person, and on the right is the grey mannequin H3 copies the motion from. Anything outside the cyan area stays as it is. If the character is cut off, or too much background changes, set Mask margin (Tight, Normal, Loose) and check again; a re-check takes seconds.
Then press Generate. The defaults are the H3 pruned INT8 model with the DMAD speed LoRA at 6 steps. Without a speed LoRA, use 20 steps or more. Change the seed for a new take — running the same inputs again resumes from the last finished clip, so an interrupted job does not start over. Part to use swaps only part of the video (Whole, or a Length placed at the Start, Middle or End); a shorter part renders faster, and the sound is cut to the same part.
What comes back is your video with one person changed: the camera, cuts, motion and soundtrack are untouched, and anyone else in the frame stays exactly as they were. Under the hood, SAM 3.1 tracks everyone at 1008 px, H3 keeps the largest person, and the motion reference H3 follows is the source clip with that person turned into a sharp grey mannequin of their exact silhouette — so the pose, arms and fingers stay readable. If you want to study how a finished video is put together shot by shot before you start cutting one up, our hands-on guide to REA Video shows the reverse-engineering side of the same craft.
Step 5 — Go further: several people, object swaps, and relighting#
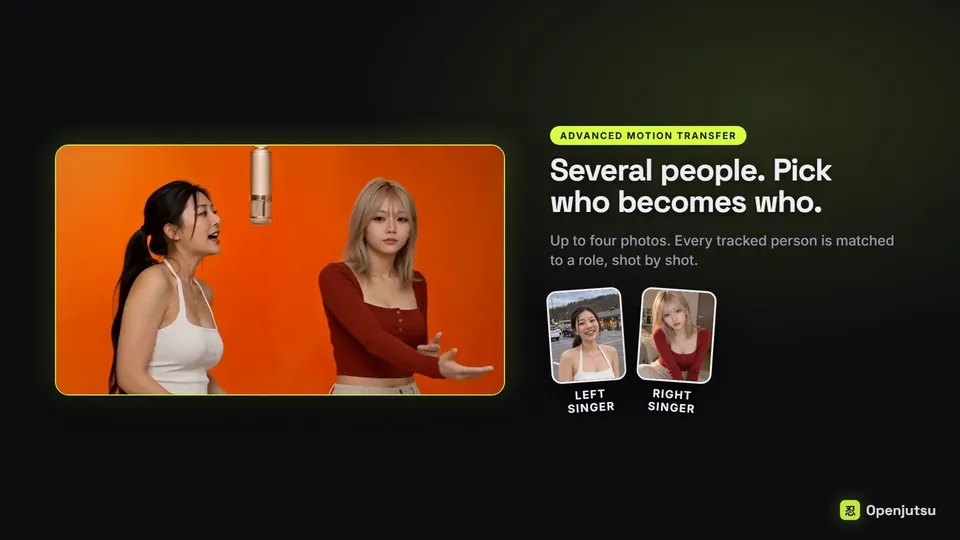
Advanced motion transfer handles 1–4 characters, each with an optional role. Every tracked person is matched to a role per shot, and people without a character stay untouched. Write roles as “who – looks” (“the dancer - white polo, jeans”): the looks help match the people, and only the part before the dash reaches H3. One pass per person gives each of two characters their own H3 pass with only their photo, at about twice the time. The Montage tab covers edited clips where different people take turns within one shot without a hard cut, and Find people (about 3 minutes for 18 seconds of video) is the optional review pass: it does the tracking and matching alone and lets you correct each match with a photo picker before generating.
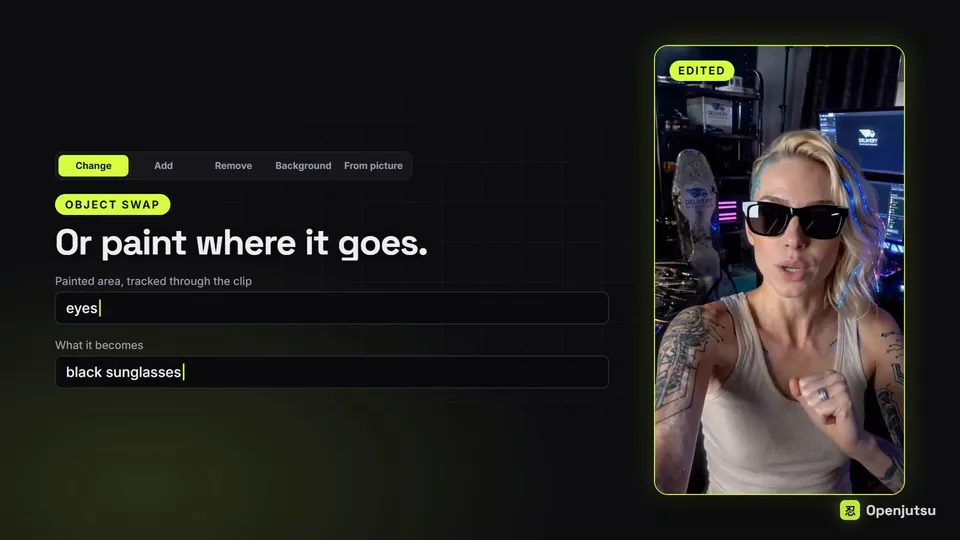
Object swap changes what SAM tracks into something else, removes it, or changes the Background around it (the person stays). Name what SAM tracks in a word or two (hair, jacket, poster), or several separated by commas to change them together. Change keeps the outline of what it replaces — a tank top turned into a flannel shirt stays sleeveless. Add places a new object: describe it (a chocolate cake on a plate), say where it goes (on the table), and draw a box covering the whole object and its shadow; scrub forward and draw more boxes to animate the placement as the camera moves. Under Paint edit area you can brush extra space around the tracked part, and the painting follows SAM’s bounding box in position and scale.
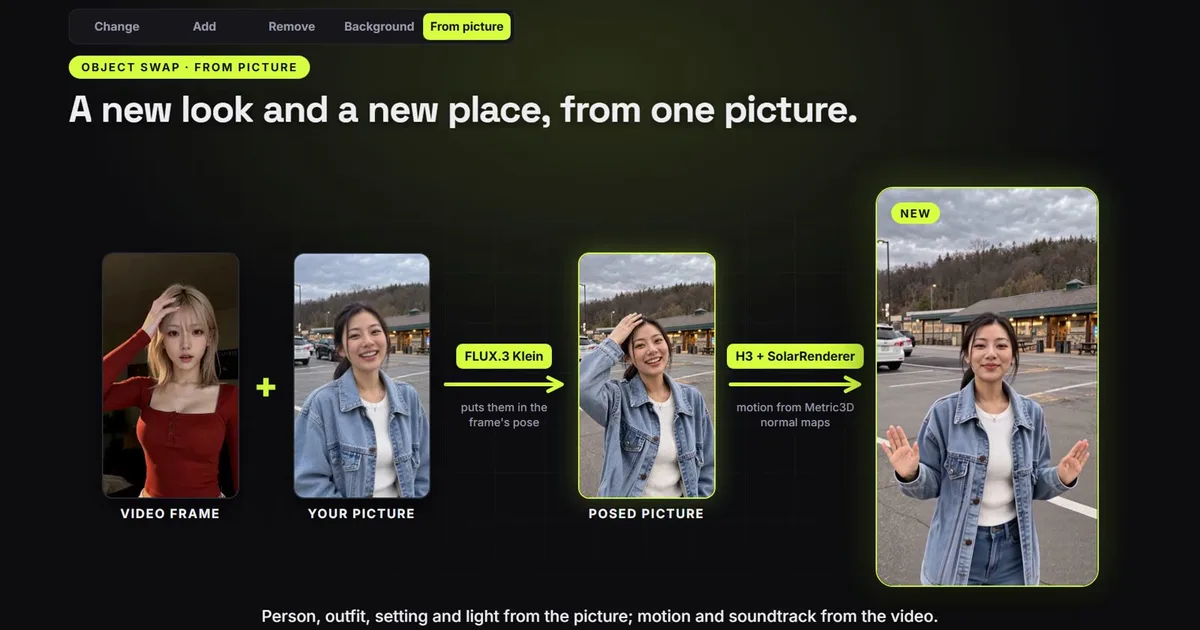
From picture (under Object swap) is the most cinematic mode. FLUX prepares the character in the raw video frame’s pose and body cut while keeping the character picture’s background. Review or regenerate the image, choose Use this image, set the video length, resolutions, models, LoRAs, steps and seed, and Render video reuses the saved preview with normal-map motion guidance in one clip. SolarRenderer defaults to four steps with a selectable rank-384 or rank-64 four-step/control pair and supports up to 15 seconds; clips longer than six seconds can take considerably longer to render. Relight (off by default) changes the light in the same FLUX pass: pick one of seventeen looks, or describe your own light — FLUX then sees only your picture, and the Qwen 3.5 9B prompt upsampler reads the pose from the video frame. Relight the video’s own person skips the character picture and relights the frame itself, keeping its person, pose and setting. FLUX is the same family of models behind our hands-on guide to running FLUX.1-dev locally, so the still-image side of this workflow will feel familiar if you have done that.
One quality lever is worth knowing about: the Motion reference size (under Advanced) is the size of the grey figures H3 copies the motion from — 512 px by default, or 768 or 1376 px. For general, simple videos 512 px is probably enough, but a bigger size improves quality a bit: H3 follows the source poses and placement more closely. Sampling takes about a third longer at 768 px and about 2.4× as long at 1376 px.
Step 6 — Fix faces and soften colours#
H3 draws faces poorly when the person is small in the frame, so Fix faces redraws the face of the person in a photo at close-up size and pastes it back. Drop the finished video and the photo the person was made from. Match the photo redraws the face from the photo: the closest likeness, but H3 makes up the expressions and mouth movements. Follow the mouth keeps the video’s expressions and mouth movements, with a little less likeness. Only that person’s face changes (matched by face identity); faces taller than a fifth of the frame are left alone, and stretches with only such faces are skipped. A 17-second video at 768p (4 chunks) took about 28 minutes on the tested card, including model loading.
Fix colours softens H3’s harsh look without an H3 run: Image Detail Contrast takes some fine detail contrast out (Detail contrast defaults to −0.20; above 0 it sharpens instead), then Orion4D’s DCTL Tone Mapper grades every frame, starting from the H3 soft preset. A 1.75-second 480p clip took 5 seconds. Both post-processing passes read the video at 24 fps.
What you built#
A local video-swap station: ComfyUI plus twelve node packs and a shelf of open models, a small web app on port 3000, and a workflow that takes a video and a photo and returns the same video with a different lead actor — same motion, same edit, same soundtrack. The simple swap is the five-minute version. The advanced modes are where it earns its keep: four characters in one scene, an outfit changed mid-shot, a product placed on a table, a whole scene relit in golden hour. Compared with the cloud video generators in our 2026 comparison of AI video generators, the trade is clear: you pay in setup time and render minutes, and you get the result back with no upload, no per-clip fee, and no one else’s content policy deciding what your video may contain.
Honest limitations#
- Mirrors and reflections do not work yet. The reflection keeps the original person, and H3 copies their look from it: hair, outfit and build come back on your character. Use videos without a mirror, window or other reflection of the person.
- Only the main person is regenerated in Simple mode. Anyone else in the frame stays as they are — that is a feature for crowd shots and a limit for ensemble scenes, where Advanced mode is the answer.
- Render times are long. Six seconds at 480p is 6–13 minutes; 736p is the default resolution, and 1080p is about 2.5× slower than 736p and needs much more memory. Fix faces on a 17-second video is the better part of half an hour.
- Lip-sync is all or nothing. By default H3 makes the new people lip-sync any vocals. The No lip-sync toggle (off by default) gives H3 silent audio and a prompt saying nobody sings, at about 30 seconds more per clip — use it for songs nobody in the video sings along to. Mouths can still smile more widely than the source.
- Licences are mixed. The app is MIT, but Fix faces depends on InsightFace’s
buffalo_lmodel, licensed for non-commercial research only, and on YOLO weights from Bingsu/adetailer under AGPL-3.0. Check both before using face fixes commercially. - The project is young and moving fast. It was created on October 26, 2026 and already has several releases a week; expect breaking changes, and read the README again before upgrading — the swap workflows are rebuilt by scripts in
workflows/build/, so node ids and exports can shift.
Troubleshooting#
| Symptom | Most likely cause | Fix |
|---|---|---|
| First video seek stalls, then every file download hangs | Windows partial-file request bug in ComfyUI’s /view | Set AIOHTTP_NOSENDFILE=1 before starting ComfyUI (see Step 3) |
| Job upload lists missing packs or models | Skipped custom node or model file | Install from the links and destination folders the app shows, then restart ComfyUI |
| Character cut off, or too much background changes | Mask too tight or too loose | Run Check mask, adjust Mask margin (Tight/Normal/Loose), re-check — seconds, not minutes |
| Original person’s hair or outfit leaks back onto the character | Mirror or window reflection in the shot | Reshoot without reflections; there is no in-app fix yet |
| Render is very slow at 1080p | Resolution: 1080p is ~2.5× slower than 736p | Drop to the 736p default or 480p for test renders |
| Small faces look wrong | H3 draws small faces poorly | Fix faces with the character photo; Match the photo for likeness, Follow the mouth for expressions |
The takeaway#
OpenJutsu takes the single most eye-catching trick in AI video — swap the person, keep the shot — and moves it onto your own machine. The install is the honest price: ComfyUI, twelve node packs, and a shelf of model files. Once it is running, the loop is short: video plus photo, check the mask, generate, and fix the faces if H3 fumbled them. The result is not magic — mirrors break it, small faces need a second pass, and six seconds costs ten minutes — but it is yours: no upload, no subscription, no render queue. For a creator who reuses the same character across videos, that trade is worth an evening of setup.
Sources: the OpenJutsu README (github.com/D3voz/openjutsu) — modes, requirements, custom nodes, model files, run steps, and timings; workflows/picture/README.md — FLUX.3 Klein relighting; repository metadata — 1,968 stars, 281 forks, MIT licence, created October 26, 2026, as of November 8, 2026.