Stop copy-pasting SKILL.md files: install any agent skill with one command
Vercel's skills CLI installs any agent skill from GitHub into every coding agent you use, with a lock file and an update check. Every command verified — no account, no API key.
skills CLI is the package manager for that job: one command installs a skill from GitHub into any of 80 agents, a lock file records exactly what you installed, and skills check tells you when an update exists. Every command in this tutorial was run for the article, and the core loop needs no account and no API key.- Verified versions:
skills1.8.1 (npm, vianpx), Node 24.22.1,vercel-labs/agent-skills(9 skills, MIT). - The core loop ran end to end with zero API keys: list a repo's skills, install one for Claude Code, install another for OpenCode, try one without installing it, check for updates, restore from the lock file, and remove cleanly.
- Gotcha — removal is per-agent:
skills remove -a opencodereports success but leaves the shared.agents/skills/files in place; omit-ato actually delete the skill. - Why now: the CLI is Vercel Labs' answer to the skills explosion — thousands of skills, 80 supported agents, one install command — and it gained 5,332 GitHub stars in the last month.

Agent skills went from a curiosity to the default way coding agents learn new tricks in about six months. Anthropic published its official skills repo, Vercel shipped a design-guidelines skill, Cloudflare shipped a security-audit skill, and now every agent framework has a skill directory. The problem is what happens after you find one: the install instructions still say "copy this folder into your agent's skills directory" — and every agent has a different directory, a different layout, and a different idea of what "installed" means. Do that for five skills across three agents and you are maintaining a small, undocumented package manager by hand.
The skills CLI from Vercel Labs is that package manager, made official. One command installs a skill from GitHub into every agent you use, a lock file records exactly what you installed, and skills check tells you when an update exists. It is free, MIT-licensed, needs no account and no API key, and it runs on the machine you already have. This tutorial installs it, puts a real skill into two different agents, tries it without installing anything, and builds a skill of your own. Every command below was run for this article on Node 24 with skills 1.8.1.
Why skills need an installer now#
A skill is a folder with a SKILL.md file: a name, a description that tells the agent when to load it, and instructions the agent follows. The format is simple enough that anyone can write one, which is exactly why the ecosystem exploded — there are now thousands of them, covering code review, design, SEO audits, deployment, and domain workflows. The official anthropics/skills repo alone is the reference implementation, and skills.sh indexes the rest.
But a skill is only useful if the agent can find it, and agents look in different places. Claude Code reads .claude/skills/ in your project and ~/.claude/skills/ globally. OpenCode, Codex, Gemini CLI, Antigravity, and Pi all read a shared .agents/skills/ directory. Copy-pasting by hand means remembering which agent reads what, re-copying after every upstream fix, and having no record of which version you installed or where it came from. The skills CLI replaces all of that with four verbs: add, list, check, and update, plus a lock file that makes the whole setup reproducible.
It is also worth knowing what the CLI is not. It does not run agents, it does not supply models, and it does not make a skill work with an agent that cannot read skills. It moves files into the right directories and keeps track of them. That narrow job is the whole point — and the reason it works with 80 agents instead of one.
What you'll need#
- Node.js 22.20 or newer. This walkthrough used Node 24.22.1 with npm 10.9.4. Check yours with
node --version; anything below 22.20 will refuse to run the CLI. - No accounts, no API keys, no credit card. Installing and using skills is entirely local — the CLI downloads skill files from public GitHub repos. A model key only enters the picture later, when you actually run an agent that uses a skill.
- A project directory to install skills into, and ideally one coding agent already installed (Claude Code, OpenCode, Codex, or any of the 80 supported agents) so you can see the skill appear where the agent looks.
- A few megabytes of disk. Skills are markdown files; the whole demo below is under 1 MB.
Step 1: First look at the CLI#
There is nothing to install permanently. Like most Node CLIs, skills runs straight from npm with npx, which downloads it on first use and caches it afterwards:
npx skills --version
# 1.8.1
Pin the version in scripts and CI with npx skills@1.8.1 instead of skills@latest — the @latest tag moves, and a tutorial (or a teammate's machine) should not change behavior under you. The help output is the whole interface, and it is short enough to read once:
npx skills --helpUsage: skills <command> [options]
Manage Skills:
add <package> Add a skill package (alias: a)
use <package>@<skill>
Generate a prompt for using one skill without installing it
remove [skills] Remove installed skills
list, ls List installed skills
find [query] Search for skills interactively
Updates:
update [skills...] Update skills to latest versions (alias: upgrade)
Project:
experimental_install Restore skills from skills-lock.json (alias: install, i)
init [name] Initialize a skill (creates <name>/SKILL.md or ./SKILL.md)
experimental_sync Sync skills from node_modules into agent directories (alias: sync)Two flags do most of the work in this tutorial: -y (--yes) skips every confirmation prompt, which is what makes the CLI usable in scripts and CI, and -a (--agent) picks which agents a skill is installed for. The rest — -g for global installs, -s for picking specific skills, --list for peeking inside a repo before installing — you will meet as they become useful.
Step 2: Find a skill worth installing#
Before installing anything, look at what is available. skills find searches the skills.sh index from your terminal, and it works even without a TTY — pipe it, script it, or run it in CI:
npx skills find web-designelite-brand-design ... 61 installs
└ https://skills.sh/rshvr/elite-web-design/elite-brand-design
cli-ux-designer 61 installs
└ https://skills.sh/sjungling/sjungling-claude-plugins/cli-ux-designer
scroll-audit 38 installs
└ https://skills.sh/mustbesimo/web-design-studio/scroll-auditThe install counts are the useful signal here: a skill with hundreds of installs and a maintained repo is a safer bet than a fork with three. Each result links to its skills.sh page, where you can read the skill's description and — this matters — its trust scan before you install it. The CLI runs that scan at install time too, and prints the result; you will see it in the next step.
For this tutorial the target is Vercel's own skill pack, vercel-labs/agent-skills: the official skills for Vercel's design and writing guidelines, React best practices, and deployment. List what is inside before committing to any of it:
npx skills add vercel-labs/agent-skills --list◇ Found 9 skills
vercel-composition-patterns
React composition patterns that scale...
deploy-to-vercel
Deploy applications and websites to Vercel...
vercel-react-best-practices
React and Next.js performance optimization guidelines...
vercel-react-native-skills
React Native and Expo best practices...
vercel-react-view-transitions
Guide for implementing smooth animations using React's View Transition API...
vercel-cli-with-tokens
Deploy and manage projects on Vercel using token-based authentication...
vercel-optimize
Use for Vercel cost and performance optimization on deployed projects...
web-design-guidelines
Review UI code for Web Interface Guidelines compliance...
writing-guidelines
Review docs/prose for Writing Guidelines compliance...Nine skills, one repo, each with a one-line description of when it triggers. The --list flag is the habit to build: it costs one command and it stops you installing a whole pack when you only wanted one skill.
Step 3: Install one skill into a project#
Install web-design-guidelines — a skill that reviews UI code against Vercel's Web Interface Guidelines — into a project, for Claude Code only, with no prompts:
mkdir skill-demo && cd skill-demo
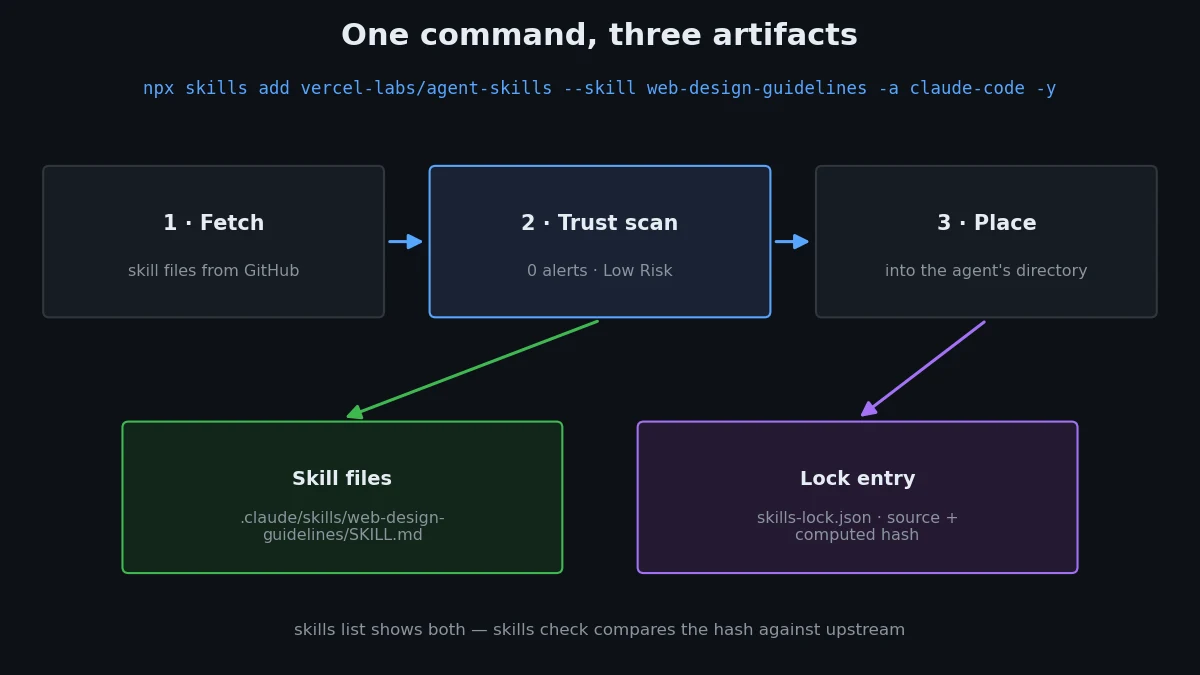
npx skills add vercel-labs/agent-skills --skill web-design-guidelines -a claude-code -y
◇ Installation complete
◇ Installed 1 skill ──────────────────────────────
│ ✓ web-design-guidelines (copied)
│ → ./skill-demo/.claude/skills/web-design-guidelines
└ Done! Review skills before use; they run with full agent permissions.Two things in that output deserve attention. First, the install banner (above the part shown here) reports a trust scan — 0 alerts, Low Risk for this repo, with a link to the full report on skills.sh. A skill runs with your agent's full permissions, so a scan that finds prompt-injection patterns or suspicious instructions is worth reading before you say yes to an unfamiliar repo. Second, the skill was copied, not symlinked: the files in .claude/skills/ are real files, so deleting the source repo later does not break your install. (There is a --copy flag; copying is the default behavior observed here.)
Look at what landed on disk:
find . -type f
# ./.claude/skills/web-design-guidelines/SKILL.md
# ./skills-lock.json
The skill itself is a single SKILL.md. Its frontmatter is the contract the agent reads:
---
name: web-design-guidelines
description: Review UI code for Web Interface Guidelines compliance. Use when asked to "review my UI", "check accessibility", "audit design", "review UX", or "check this page against best practices".
metadata:
  author: vercel
  version: "1.0.0"
  argument-hint: <file-or-pattern>
---
The description is doing the real work: it is the trigger text the agent matches against your request. A skill with a vague description never loads; a skill with a precise one loads exactly when it should. Keep that in mind in step 7, when you write your own.
The second file, skills-lock.json, is the one to commit to version control. It records the skill, its source repo, and a hash of the exact content installed:
{
  "version": 2,
  "skills": {
    "web-design-guidelines": {
      "source": "vercel-labs/agent-skills",
      "sourceType": "github",
      "skillPath": "skills/web-design-guidelines/SKILL.md",
      "computedHash": "4f68ae07187fb0d1fb78c88b503d089da4cf5a9d9625d1f2e425b1590bf96d92"
    }
  }
}
That hash is what makes the setup reproducible: a teammate cloning the repo can restore exactly these skills with one command (step 6), and skills check can tell whether the upstream skill has changed since you installed it.
Step 4: Install the same skill for a second agent#
The point of a package manager is that it knows where things go. Install the pack's other general-purpose skill, writing-guidelines, for OpenCode:
npx skills add vercel-labs/agent-skills --skill writing-guidelines -a opencode -yIt lands in a different directory:
find . -type d -name skills
# ./.claude/skills
# ./.agents/skills
Claude Code gets its own .claude/skills/; OpenCode reads the shared .agents/skills/ directory. That shared directory is the detail that makes the CLI worth using across agents: Codex, Gemini CLI, Antigravity CLI, and Pi all read .agents/skills/ too, so one install covers five agents at once. Confirm it with skills list, which shows every installed skill with the agents that can see it:
npx skills listProject Skills
writing-guidelines ./.agents/skills/writing-guidelines
Agents: Antigravity CLI, Codex, Gemini CLI, OpenCode, Pi Source: vercel-labs/agent-skills
web-design-guidelines ./.claude/skills/web-design-guidelines
Agents: Claude Code Source: vercel-labs/agent-skillsPass several agents at once with repeated -a flags (-a claude-code -a opencode), or -a '*' to install for every agent the CLI knows about. For a team standard, the useful shape is one line in a setup script:
npx skills add vercel-labs/agent-skills --skill web-design-guidelines --skill writing-guidelines -a claude-code -a opencode -yStep 5: Use a skill without installing it#
Sometimes you want a skill once — to review a single page, to try a workflow — without adding it to the project. skills use fetches the skill, prints the prompt it would give an agent, and installs nothing:
npx skills use vercel-labs/agent-skills@web-design-guidelinesThe output is the skill's full body, wrapped in a prompt you can paste into any agent's chat: it tells the agent to fetch the latest guidelines from the source URL, read the files you name, check them against the rules, and report findings in file:line format. No files are written, no lock entry is added, and skills list afterwards is unchanged — verified in this session.
With -a <agent>, skills use instead launches a supported agent with that prompt loaded, so the skill runs once and vanishes when the session ends. That is the right shape for a skill you are evaluating: try it in a real session, and only add it if it earns a permanent place.
Step 6: Keep skills updated and reproducible#
Skills change. Vercel updates its guidelines, a security fix lands in a skill's scripts, a description gets sharper. skills check compares your installed copies against their sources:
npx skills checkChecking for skill updates…
Updating for: Claude Code
Checking 1 skill(s)…
Fetching 1 source…
✓ All project skills are up to dateWhen an update exists, skills update pulls the new version (optionally limited to named skills, or to global or project scope with -g / -p). The lock file's hash is what makes this check meaningful: without a recorded hash, "up to date" would be a guess.
The lock file also makes onboarding a one-liner. A teammate who clones the repo restores the exact skills with the experimental install command:
npx skills experimental_install # alias: skills install / skills iRun in a fresh directory containing only the project's skills-lock.json, this restored both skills from their GitHub sources and linked them to the agents it detected. The command is still marked experimental — the CLI's own help says so — so treat it as the team's bootstrap step and keep add as the day-to-day verb. But the direction is clear: the lock file is meant to be committed, and a fresh checkout should be one command away from the same skills.
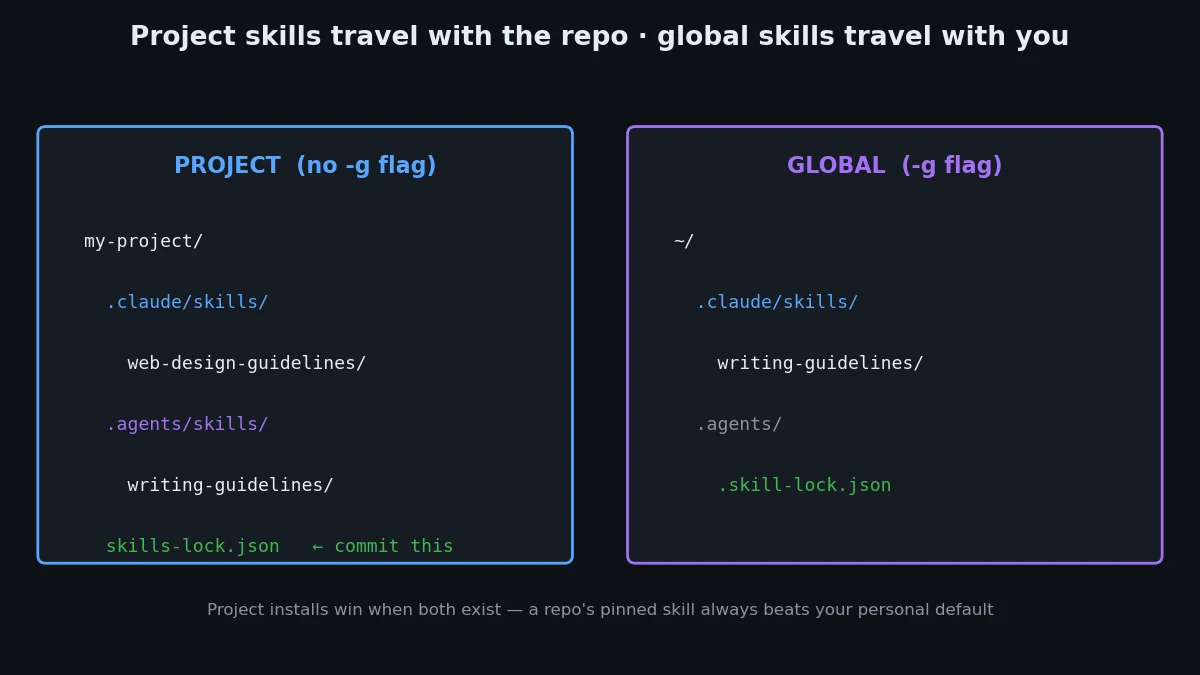
One scope decision to make early: project vs global. Everything above installed into the project directory, which is right for skills a team shares. For skills that are yours alone — a personal review checklist, a writing voice — add -g:
npx skills add vercel-labs/agent-skills --skill writing-guidelines -a claude-code -g -yA global install lands in ~/.claude/skills/ (for Claude Code) with its own global lock file at ~/.agents/.skill-lock.json. Project installs win over global ones when both exist, so a project's pinned skill always beats your personal default — the behavior you want when a repo standardizes on a particular skill version.
Step 7: Write your own skill#
The fastest way to understand the format is to generate the template and read it:
npx skills init my-first-skill---
name: my-first-skill
description: A brief description of what this skill does
---
# my-first-skill
Instructions for the agent to follow when this skill is activated.
## When to use
Describe when this skill should be used.
## Instructions
1. First step
2. Second step
3. Additional steps as neededThat is the whole format. The template's advice is also the whole craft: the description is the trigger, so write it as the request a user would actually type ("review my UI", "check accessibility"), not as a summary of the skill. The body is instructions, not documentation — imperative steps the agent follows, with the files it should read and the output format it should produce. Keep it under a few hundred lines; long skills get skimmed, and a skill the agent skims is a skill that does not work.
Publishing is the same mechanism as installing. Push the folder to a GitHub repo and anyone can install it with npx skills add <owner>/<repo>; host the file at a URL and npx skills add https://example.com/my-skill/SKILL.md installs it directly. The CLI also accepts a subdirectory URL, a GitLab or Azure DevOps repo, an SSH remote, or a local path (npx skills add ./my-local-skills) — the source formats are all documented under skills add in the CLI reference.
Step 8: Remove a skill cleanly#
Removal has one gotcha, and it is worth hitting deliberately before it surprises you. Remove the OpenCode skill from step 4, scoped to that agent:
npx skills remove writing-guidelines -a opencode -y◆ Successfully removed 1 skill(s)Success — except the files are still there. skills list still shows writing-guidelines, now attributed to the other agents that share .agents/skills/, and the lock file still lists it. The -a flag removed OpenCode's link, but the shared directory belongs to five agents, and the CLI will not delete files other agents still reference.
The fix is to omit -a, which removes the skill for every agent:
npx skills remove writing-guidelines -yThat deletes the files from .agents/skills/ and prunes the lock entry — verified: after the bare remove, the project contains only web-design-guidelines and the lock lists only that skill. Rule of thumb: use -a to stop one agent seeing a skill; drop it when you mean the skill to be gone.
Which approach should you use?#
There are three honest ways to get a skill into an agent, and the CLI is not always the answer.
| Approach | Best when | Watch out for |
|---|---|---|
skills CLI | You use two or more agents, share skills with a team, or want updates and a lock file | Still young: experimental_install is experimental, and the ecosystem index is curated, not exhaustive |
| Copy-paste by hand | One skill, one agent, once — or a skill from a source the CLI cannot fetch | No record of what you installed, no update check, and the agent's directory is yours to remember |
| Agent-native install | Your agent has its own skill marketplace or plugin command and you live in that one agent | Skills installed one way are invisible to your other agents; you re-install per agent |
The deciding factor is how many agents you use. One agent and a handful of skills: copy-paste is fine, and the CLI is optional. Two agents, a team, or skills you update more than once: the CLI pays for itself the first time a skill changes upstream and skills check catches it before you do. The lock file is the quiet argument — it turns "the skills I happen to have installed" into a checked-in, reviewable part of the repo.
The takeaway#
Agent skills are becoming the shared vocabulary of coding agents, and the skills CLI is the first installer that treats them like software instead of snippets: one command to add, a lock file to record what you added, a check command to find updates, and a remove command that — once you know the shared-directory gotcha — actually removes. Everything in the core loop ran here with no account, no key, and no cost, on a plain Node install. Start with one skill in one project, commit the lock file, and let skills check do the remembering from now on.