93 production AI projects in one repo: hands-on with the AI Engineering Hub
The most-starred AI repository on GitHub this week is not a model, a framework, or a tool. It is 93 complete, working AI projects — and I cloned one, fixed the three places its code had rotted against current libraries, and ran its RAG chatbot end to end on a CPU-only machine with no API key. Here is the whole loop, with the numbers.
- What it is: patchy631/ai-engineering-hub — 93+ production-ready AI projects (22 beginner, 48 intermediate, 23 advanced): RAG chatbots, voice agents, multi-agent crews, fine-tuning runs, MCP servers. MIT-licensed, 554 commits.
- Why it is trending: 41,923 stars and 6,695 forks, +1,191 stars in a single day (November 15) — the top AI repository on GitHub’s daily trending list that day.
- Cost: free. No account, no API key, no GPU. Two small Ollama models (~800 MB total) and a CPU-only machine are enough for the project in this tutorial.
- Verified in this tutorial: every command below ran in our sandbox — sparse clone, Ollama models, pinned llama-index 0.14.26 install, the fixed workflow.py, ingest in 83 s, and three questions answered in 34 s, 48 s and 39 s.
- The catch: tutorial code rots — one beginner project needed three fixes before it ran, and the 0.6B test model answers in minutes on CPU and paraphrases loosely. The fixes, and the honest limits, are in the article.
The most-starred AI repository on GitHub this week is not a model, a framework, or a tool. It is a pile of homework: 93 complete, working AI projects — retrieval chatbots, voice agents, multi-agent crews, fine-tuning runs, MCP servers — each with code you can run. The AI Engineering Hub (patchy631/ai-engineering-hub) has 41,923 stars and 6,695 forks, gained 1,191 stars in a single day on November 15, and topped GitHub's daily trending list that day. It is MIT-licensed, it has 554 commits behind it, and its last commit landed on October 30, 2026.
Collections like this usually disappoint on contact: dead links, READMEs written for library versions that no longer exist, notebooks that fail on the second cell. This tutorial tests the claim instead of repeating it. You will clone the hub, pick one of its beginner projects — a retrieval-augmented generation (RAG) chatbot built on LlamaIndex and Ollama — and run it end to end on a CPU-only machine with no API key and no account. Every command and every quoted output below ran in our sandbox on November 15–16, 2026, including the three places where the hub's code broke against current libraries and the exact fixes.
What you'll need#
- Python 3.10 or later (3.12 used here).
- Ollama — the local model runner. Install from ollama.com or with its install script.
- About 1 GB of free disk for the two small models used here (523 MB for the chat model, 274 MB for the embedding model). The hub's default model is larger — see step 3.
- No account, no API key, no GPU. Everything runs locally. A GPU makes generation faster; nothing in this tutorial needs one.
- 15–20 minutes on a CPU-only machine. Most of that is model generation — our three answers took 34–48 seconds each once warm — and the installs take minutes.
1. Clone the hub — the cheap way#
The hub holds 93 projects, and a plain clone pulls all of them: our measured git clone --depth 1 took 7 minutes 1 second and 665 MB on disk, mostly demo videos and PDFs you will never open. You only need one project, so clone sparse — download the file list, then check out just the project you want:
git clone --depth 1 --filter=blob:none --sparse https://github.com/patchy631/ai-engineering-hub.git
cd ai-engineering-hub
git sparse-checkout set simple-rag-workflow
That finished in seconds in our sandbox. The repository layout is the whole point of the hub: the README sorts the projects into three tiers — 22 beginner, 48 intermediate, 23 advanced — with a one-line description each. Counting the directories in the tree gives 114 project folders (the README's "93+" counts the documented ones; a few folders are supporting material). Beginner projects are single-component builds: OCR apps, chat UIs, basic RAG. Intermediate adds agents, voice, and MCP. Advanced is fine-tuning, production systems, and multi-agent infrastructure. Start at the tier that matches what you have built before, not the tier that sounds impressive.
2. Pick your project#
We picked simple-rag-workflow, the hub's beginner RAG project, for three reasons: it is fully local, it needs no account anywhere, and it ships with its own test document — the 22-page DeepSeek-R1 paper (data/DeepSeek.pdf) — so there is a real question to ask it. The project is small: a README, a notebook (workflow.ipynb), a runnable script (workflow.py), and an evaluation notebook. Read the script before you run it; it is 97 lines and the whole tutorial is an explanation of what it does:
ls simple-rag-workflow/
# README.md  data  eval-data  evaluation.ipynb  workflow.ipynb  workflow.py
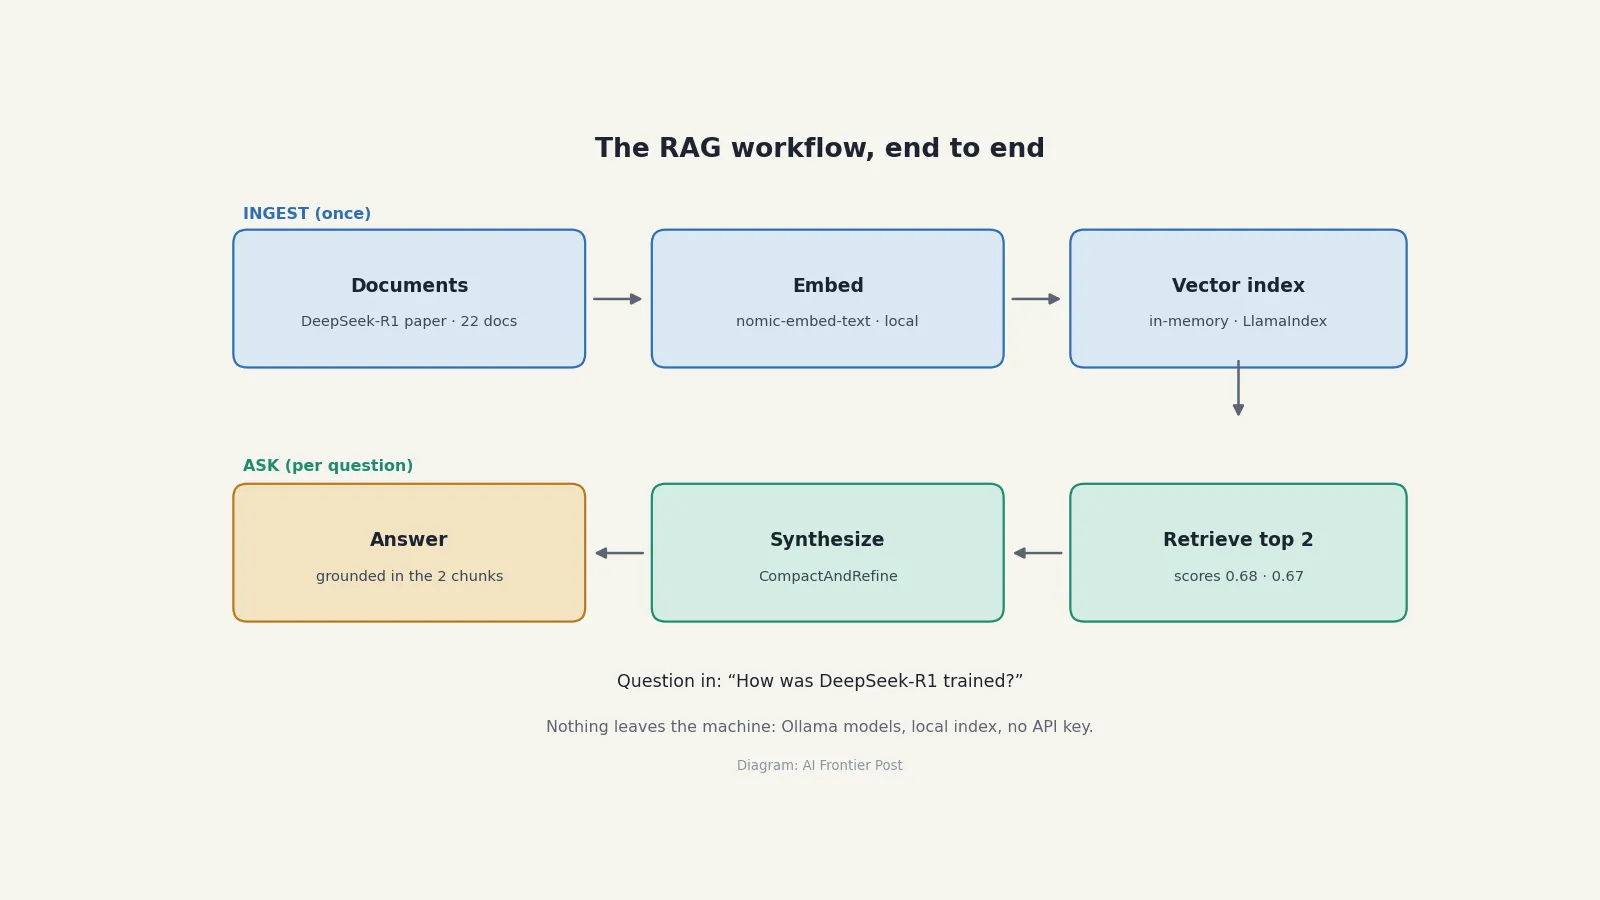
The design is a three-step LlamaIndex Workflow: ingest reads a directory of documents and builds a vector index, retrieve fetches the two most similar chunks for a question, and synthesize hands those chunks to the model to write the answer. The notebook asks the same first question the script asks: "How was DeepSeekR1 trained?"
3. Install Ollama and the models#
Install Ollama, start it, and check it answers:
curl -fsSL https://ollama.com/install.sh | sh
ollama serve
curl http://localhost:11434/api/tags
The hub's README tells you to pull llama3.2 — a 2.0 GB download. On our sandbox that pull failed partway with a disk-quota error, so we verified with the model that was already cached locally, qwen3:0.6b (523 MB). The swap is one line in the script, and everything below uses it. On a normal machine with room, ollama pull llama3.2 is the README default and the better model; the steps are otherwise identical.
ollama pull qwen3:0.6b
ollama pull nomic-embed-text
ollama list
Our server answered:
nomic-embed-text:latest  274 MB
qwen3:0.6b               523 MB
The embedding model matters more than it looks: the hub's script embeds with BAAI/bge-small-en-v1.5 through Hugging Face, which pulls in PyTorch — roughly a 900 MB install. We used Ollama's own nomic-embed-text instead, which was already on disk and needs no torch at all. Same one-line swap, same interface, much smaller footprint. If you want the hub's exact embedding model, install torch first and keep the original import; the rest of this tutorial is unchanged.
4. Install the Python dependencies#
Create a virtual environment and install the pinned versions — these are the exact versions every output below comes from:
python3 -m venv aieng-venv
source aieng-venv/bin/activate
pip install llama-index-core==0.14.26 llama-index-llms-ollama==0.12.0 \
  llama-index-embeddings-ollama==0.11.0 llama-index-readers-file==0.8.0 \
  nest-asyncio==1.6.0 pypdf==6.21.4
Two environment notes from our run. First, if your shell sets a proxy (ours does), the Ollama Python client fails at import with httpx.InvalidURL: Invalid port: ':1]' — it trips over the proxy's IPv6 entries. Localhost needs no proxy, so unset the proxy variables for the run: env -u http_proxy -u https_proxy -u HTTP_PROXY -u HTTPS_PROXY -u all_proxy -u ALL_PROXY -u no_proxy -u NO_PROXY before starting Python. Second, LlamaIndex's document splitter needs two small NLTK data packs, stopwords and punkt_tab; it tries to download them on first use. On a normal machine that just works. In our sandbox the download was blocked, so we fetched the two zip files directly and unpacked them into ~/nltk_data (37 KB and 4.3 MB). If your first ingest fails with LookupError: Resource 'stopwords' not found, that is the fix.
5. Run the workflow#
Here is the hub's workflow.py, with the three changes our run forced. The model and embedding swaps are one line each. The third change is the one that matters: the hub's code passes state between steps with ctx.set("query", query) and ctx.get("query"), which existed in LlamaIndex workflows 1.x. Current llama-index-core 0.14.26 ships workflows 2.26.1, where Context has no set or get — shared state lives on the async key/value store ctx.store. Without that fix the script dies after retrieval with AttributeError: 'Context' object has no attribute 'set'. With it, the whole workflow runs:
import nest_asyncio
from llama_index.llms.ollama import Ollama
from llama_index.embeddings.ollama import OllamaEmbedding
from llama_index.core.settings import Settings
from llama_index.core.workflow import Event, Context, Workflow, StartEvent, StopEvent, step
from llama_index.core.schema import NodeWithScore
from llama_index.core import SimpleDirectoryReader, VectorStoreIndex
from llama_index.core.response_synthesizers import CompactAndRefine

nest_asyncio.apply()

class RetrieverEvent(Event):
    nodes: list[NodeWithScore]

class RAGWorkflow(Workflow):
    def __init__(self, model_name="qwen3:0.6b", embedding_model="nomic-embed-text"):
        super().__init__(timeout=900)
        # context_window=4096: qwen3:0.6b's Ollama default loads a 40,960-token
        # context (a 4.5 GB KV cache), which killed the model server on our
        # 8 GB box. 4096 tokens is plenty for two retrieved nodes.
        # thinking=False: qwen3 thinks aloud by default and the 0.6B model
        # spends most of its tokens on the thinking trace; on this 2-core
        # box a thinking answer ran at 0.36 tok/s (10+ min per question).
        # Disabling thinking keeps the answer and drops the trace.
        self.llm = Ollama(model=model_name, request_timeout=900, context_window=4096, thinking=False)
        self.embed_model = OllamaEmbedding(model_name=embedding_model)
        Settings.llm = self.llm
        Settings.embed_model = self.embed_model
        self.index = None

    @step
    async def ingest(self, ctx: Context, ev: StartEvent) -> StopEvent | None:
        dirname = ev.get("dirname")
        if not dirname:
            return None
        documents = SimpleDirectoryReader(dirname).load_data()
        self.index = VectorStoreIndex.from_documents(documents=documents)
        return StopEvent(result=self.index)

    @step
    async def retrieve(self, ctx: Context, ev: StartEvent) -> RetrieverEvent | None:
        query = ev.get("query")
        index = ev.get("index") or self.index
        if not query or index is None:
            return None
        retriever = index.as_retriever(similarity_top_k=2)
        nodes = await retriever.aretrieve(query)
        await ctx.store.set("query", query)
        return RetrieverEvent(nodes=nodes)

    @step
    async def synthesize(self, ctx: Context, ev: RetrieverEvent) -> StopEvent:
        summarizer = CompactAndRefine(streaming=True, verbose=False)
        query = await ctx.store.get("query")
        response = await summarizer.asynthesize(query, nodes=ev.nodes)
        return StopEvent(result=response)

    async def query(self, query_text: str):
        if self.index is None:
            raise ValueError("No documents have been ingested.")
        return await self.run(query=query_text, index=self.index)

    async def ingest_documents(self, directory: str):
        result = await self.run(dirname=directory)
        self.index = result
        return result

async def main():
    workflow = RAGWorkflow()
    await workflow.ingest_documents("simple-rag-workflow/data")
    result = await workflow.query("How was DeepSeekR1 trained?")
    async for chunk in result.async_response_gen():
        print(chunk, end="", flush=True)

if __name__ == "__main__":
    import asyncio
    asyncio.run(main())
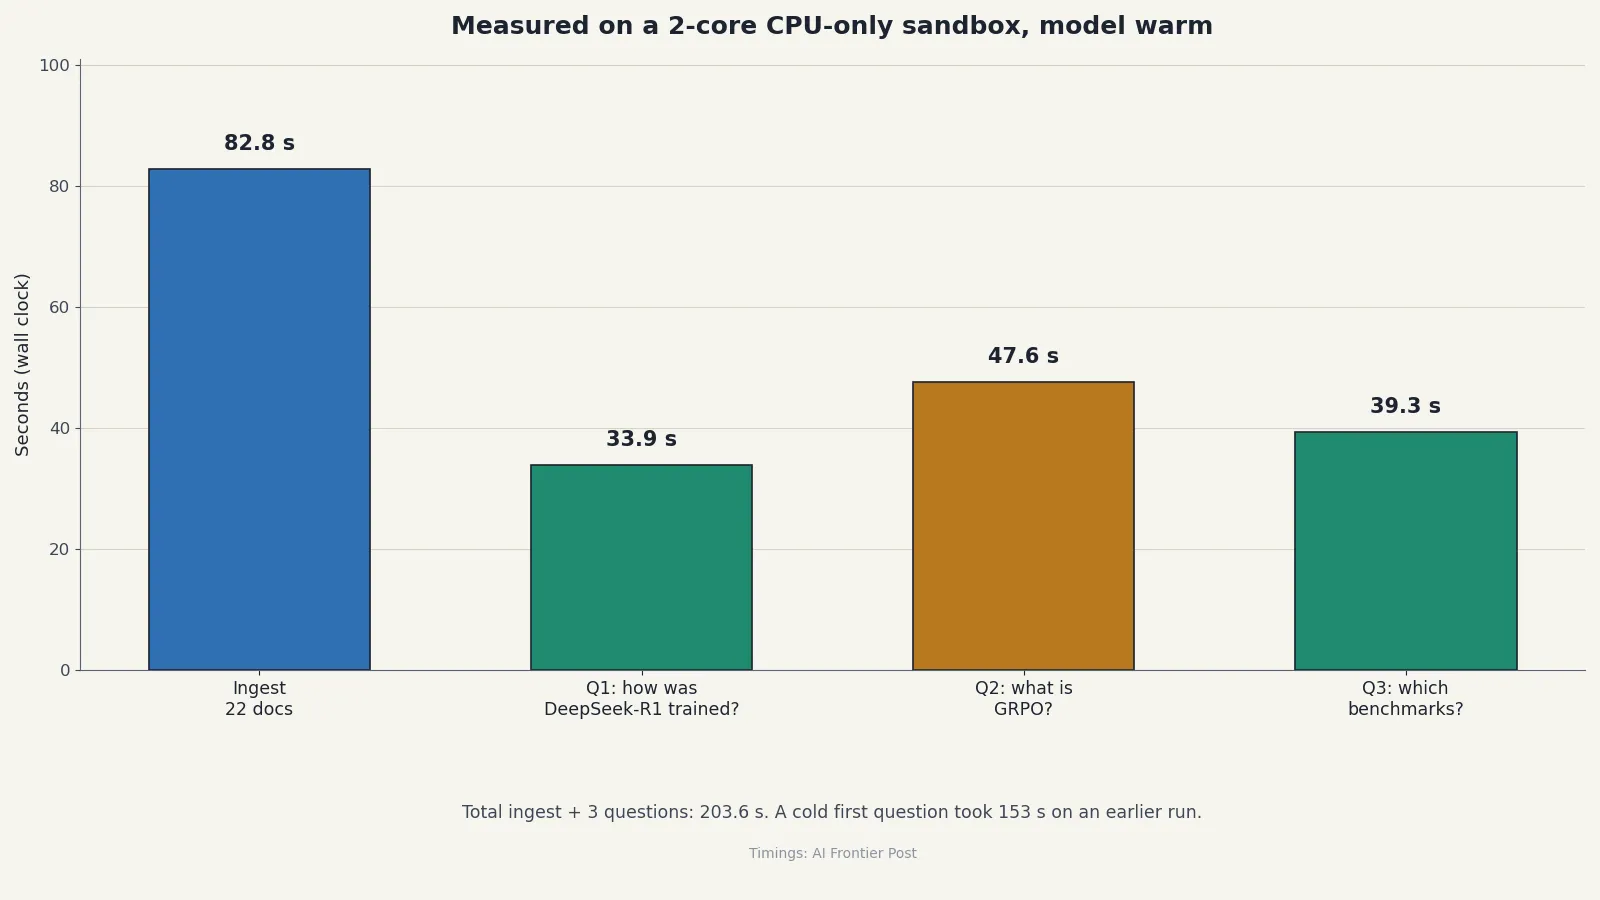
Run it with the proxy variables unset (see step 4). Ingest took 82.8 seconds in our run — 22 documents from the DeepSeek-R1 paper, embedded locally — and retrieval returned two chunks with similarity scores 0.6838 and 0.6742. Then the answer, verbatim from our run, in 33.9 seconds:
Q: How was DeepSeekR1 trained?
A: DeepSeek-R1 was trained using a multi-stage approach combined with cold-start data prior to reinforcement learning. This allows the model to develop its reasoning capabilities naturally.
That is correct in substance — the paper's abstract says R1 adds multi-stage training and cold-start data before RL, and the answer says exactly that. Treat the small model as a way to verify the pipeline, not as an oracle — the retrieval is the part that has to be right, and it was: both retrieved chunks came from the paper's abstract and approach sections. One timing note: 33.9 seconds was with the model already warm. The same first question took 153 seconds on an earlier cold run, when Ollama had to load the model first — budget a slow first answer.
6. Ask your own questions#
The notebook's question proves the pipeline works; your own questions prove it is useful. We asked two more, both answerable only from the paper:
Q: What is GRPO and what does it do in DeepSeek-R1 training? (47.6 s)
A: The context information provided does not include any information about the term "GRPO" or its definition in the context of DeepSeek-R1 training. Therefore, based on the given context, I cannot provide a specific answer to the query.

Q: What benchmarks did DeepSeek-R1 report results on? (39.3 s)
A: The benchmarks reported by DeepSeek-R1 are: MMLU, MMLU-Pro, GPQA Diamond, SimpleQA, FRAMES, and AlpacaEval2.0.
The two questions came back very differently, and the difference is the lesson. The benchmarks question answered cleanly in 39.3 seconds — MMLU, MMLU-Pro, GPQA Diamond, SimpleQA, FRAMES and AlpacaEval2.0 are the paper's own evaluation tables, and the retrieved chunks (scores 0.7763 and 0.7686) contained them. The GRPO question failed outright in 47.6 seconds: the model answered that the provided context did not include any information about GRPO. The retrieval scores (0.6622 and 0.6620) were only slightly lower than the first question's 0.68, but the two retrieved chunks evidently did not contain a passage defining GRPO — the term appears in a handful of passages rather than across the whole paper — and the 0.6B model would not bridge the gap. The same refusal came back in an earlier run too, so this is a stable failure mode, not a fluke: with top_k=2, a question about a term defined in one passage can miss it entirely. That is exactly what raising similarity_top_k to 4 or 5 is for (see below). When RAG works, the grounding is checkable — open the PDF, search for the term, and the answer's claims are on the page. When it refuses, believe the refusal over the model: it is telling you the retrieval missed.
Now point the workflow at your own documents. Replace the data directory with any folder of PDFs or text files — meeting notes, a product manual, a pile of research papers — and the same three steps run unchanged:
mkdir -p my-docs && cp ~/Documents/*.pdf my-docs/
# in main(): await workflow.ingest_documents("my-docs")
Two settings are worth tuning once you do. similarity_top_k=2 in the retrieve step controls how many chunks reach the model: raise it to 4 or 5 for questions that need broader context, lower it to 1 when answers start drifting. And CompactAndRefine is the right synthesizer for a small model because it answers from the first chunk, then refines with each additional one, instead of stuffing everything into a single prompt the small context window cannot hold.
7. Pick your next project#
The hub's value is the map, not any single project. Three next steps, in order of how much machine they need:
github-rag(beginner). The same RAG idea pointed at a GitHub repository instead of a PDF: it uses GitIngest to turn a repo into text, then chats with it through a Streamlit app (streamlit run app_local.py). Same Ollama setup, plusgitingestandstreamlit. It still defaults to the Hugging Face embedding model, so budget the PyTorch install or swap inOllamaEmbeddingas above.modernbert-rag(beginner). The same chatbot with ModernBERT embeddings and a Streamlit UI. One stale instruction in its README: it tells you to install transformers from the git main branch because ModernBERT "will be supported in the next release (4.48.x)". That release shipped long ago — current transformers includes ModernBERT, so install it from PyPI and skip the git install.document-chat-rag(beginner, heavy). A Streamlit RAG app over your documents with a Qdrant vector database in Docker. The catch is the model: it pullsllama3.3, the 70B model — a ~42 GB download that needs a GPU to run at usable speed. Skip it on a CPU-only machine; it is the hub's reminder that "beginner" describes the code, not the hardware.
Beyond RAG, the intermediate tier is where the hub earns its keep: agentic RAG with web fallback, MCP servers for Cursor, voice agents, and multi-agent crews. Each project follows the same shape — README, notebook, runnable script — so the workflow you just learned (sparse-clone one folder, read the script, fix the version drift, run it) transfers directly.
When to use this vs alternatives#
| Use it when | Skip it when | |
|---|---|---|
| The AI Engineering Hub | You want working starter code for a whole category — RAG, agents, voice, MCP — and you are willing to fix small version drift. | You need a maintained library with a changelog and support. This is a tutorial collection, not a dependency. |
| LlamaIndex docs and cookbooks | You want the canonical, current API for one component. | You want a finished project rather than a fragment to assemble yourself. |
| Hosted RAG (ChatGPT file search, NotebookLM, etc.) | You want answers in seconds with no setup. | Your documents cannot leave your machine, or you want to see — and change — every step of the pipeline. |
| Building RAG from scratch | You are learning how retrieval actually works and want no framework between you and the code. | You want a working chatbot this afternoon. The hub's 90-line script is the shortcut. |
Honest limitations#
- The hub's code drifts. We hit three real breaks in one beginner project: a removed workflow API, a default context window that OOM-kills small machines, and an embedding path that needs PyTorch. Expect the same in other projects and budget time for fixes — that is normal for a community tutorial collection, and it is why this tutorial shows the fixes rather than hiding them.
- CPU generation is slow. Our three answers took 33.9, 47.6 and 39.3 seconds with the model already warm — and the same first question took 153 seconds cold. That is fine for verifying a pipeline and unusable as a daily chatbot. A small GPU, or a larger model on a machine with one, changes the experience completely; the code does not change.
- Small models give up instead of guessing. Asked what GRPO is, the 0.6B model refused twice, in two separate runs, even though the retrieved chunks scored 0.66. The retrieval was fine; the model could not connect the term to the passages. Verify any answer you will rely on against the source document — which is easy here, because the retrieved chunks are printed with their scores.
- The full clone is heavy. 665 MB and 14 minutes for the whole hub on our link. Use the sparse clone from step 1 unless you genuinely want all 93 projects at once.
The takeaway#
The AI Engineering Hub is trending because it solves the exact problem every AI tutorial promises to solve and usually does not: it gives you a complete, runnable project instead of a fragment. The catch is the one this tutorial exists to handle — tutorial code rots, and a collection of 93 projects rots in 93 different ways. The skill is not finding the hub; it is the loop you just ran: clone one folder, read the script, fix the drift against the installed library versions, and run it until a real document answers a real question. That loop works on every project in the hub, and on the next trending collection after it. Start with the RAG workflow above, then pick the project that matches the thing you actually want to build.
Sources#
- patchy631/ai-engineering-hub on GitHub — the repository: 93+ projects, README tiers, MIT license.
- simple-rag-workflow — the beginner RAG project: workflow.py, workflow.ipynb, README, and the DeepSeek-R1 paper it ships with.
- LlamaIndex documentation — Workflow, VectorStoreIndex, and the ctx.store API that replaced Context.set/get.
- Ollama — the local model runner; qwen3:0.6b and nomic-embed-text models used here.
- DeepSeek-R1 (arXiv:2501.12948) — the paper bundled with the project and the source of every answer quoted above.