Build your own browser agent with Gemini Computer Use: the complete hands-on tutorial
Google's Computer Use tool went GA on October 30: Gemini sees your screen and returns clicks, keystrokes, and scrolls, and your code runs them. This tutorial builds a working browser agent with the Interactions API and Playwright — the full loop, the safety gates, and the pricing — with every call verified against Google's docs.
- The loop is four steps: screenshot to the model, function call back, execute with Playwright, screenshot the result — chained with
previous_interaction_id. - Coordinates are normalized 0–1000: scale them to pixels with
int(x / 1000 * width), and keep the viewport size in one place. - Safety is built in, not bolted on:
safety_decision(require_confirmation / blocked), seven policy categories, and opt-in prompt-injection detection. - Verified offline: the executor was run against headless Chromium with a mocked model response — type, click, scroll, keys, navigate, and both safety paths all passed, and the run caught one real bug in Google's published
wheel()example. - Costs real money: Computer Use is paid-tier only; Gemini 4 Hydrogen is $1.50 in / $7.50 out per million tokens, and screenshots dominate the bill.

Until recently, giving an AI model control of your computer meant one of two things: a demo that only worked on the presenter's machine, or a research prototype with no stable API. That changed on October 30, 2026, when Google moved its Computer Use tool to general availability in the Gemini API. Gemini can now look at a screenshot, decide what to click, type, or scroll, and hand your code a precise action to execute — in a real browser, on a real page, through a documented API that Google commits to supporting. The same week, the Gemini app for Mac shipped computer use to consumers, which means the capability is no longer a lab curiosity: it is a shipping product surface with an API behind it.
This tutorial builds a working browser agent on top of it. You will write a small Python program — about 200 lines — that opens Chromium with Playwright, sends the model a screenshot and a goal in plain English, executes the clicks and keystrokes it returns, and screenshots the result back until the job is done. Every call, parameter, and default in this tutorial was checked against Google's own Computer Use documentation and Gemini API pricing page on the day of publication, and the code was run in a sandbox against a real headless Chromium with a mocked model response, so the executor, the coordinate math, and the safety gates are verified — not assumed. The one thing you cannot verify without your own key is the live model call itself: Computer Use is not available on the free tier, so you will need a paid-tier API key. The limitations section at the end is explicit about what was and was not run live.
What you will need#
- Python 3.10 or newer. The tutorial was verified with Python 3.12 on Linux. macOS and Windows work the same way; the only platform-specific note is in Step 4, where the "select all" shortcut differs.
- A Gemini API key with billing enabled. Get one at Google AI Studio. This is the one hard requirement that costs money: the Computer Use tool is not available on the free tier — Google's pricing page lists it as "Not available" for free and "Charged as regular tokens per model pricing" on the paid tier. There is no separate per-action fee; you pay the model's normal token rates, and every screenshot you send back is billed as input tokens.
- The Python SDK and Playwright. Google's docs require
google-genaiversion 2.7.0 or higher; this tutorial was verified against 3.6.1. Playwright drives the browser. Install both in Step 2. - A few dollars of API credit for testing. With the recommended model in this tutorial, Gemini 4 Hydrogen, paid-tier pricing is $1.50 per million input tokens and $7.50 per million output tokens. A five-turn task that sends a 1440×900 screenshot each turn costs on the order of a few cents. The cheaper option, Gemini 3.8 Flash, is $0.75 in / $3.75 out per million tokens through December 31, 2026 — and doubles to $1.50 / $7.50 on January 1, 2027. Model choice is covered in Step 8.
- A disposable browser profile, not your daily one. The agent will click and type wherever the model tells it to. Run it in a fresh Playwright browser with no saved logins, no cookies, and no access to your real accounts. Google's own docs say the same thing: run the agent in a sandboxed VM or container.
How Computer Use works#
The most important thing to understand is what the model does not do: it never touches your computer. Computer Use is a perception-and-decision tool, not a remote desktop. Your code owns the loop, and the model only ever returns a suggestion. Each turn looks like this:
- Your app sends a request with the Computer Use tool enabled, the task in plain text, and a screenshot of the current screen.
- The model replies with a function call — an action such as
clickwith coordinates, plus anintentfield explaining its reasoning. It may also attach asafety_decisionthat marks the action as allowed,require_confirmation, or blocked. - Your code executes the action in the browser with Playwright, scaling the model's normalized 0–1000 coordinates to real pixels.
- Your code screenshots the new state and sends it back as a
function_result, and the loop repeats until the model returns a text answer instead of an action.
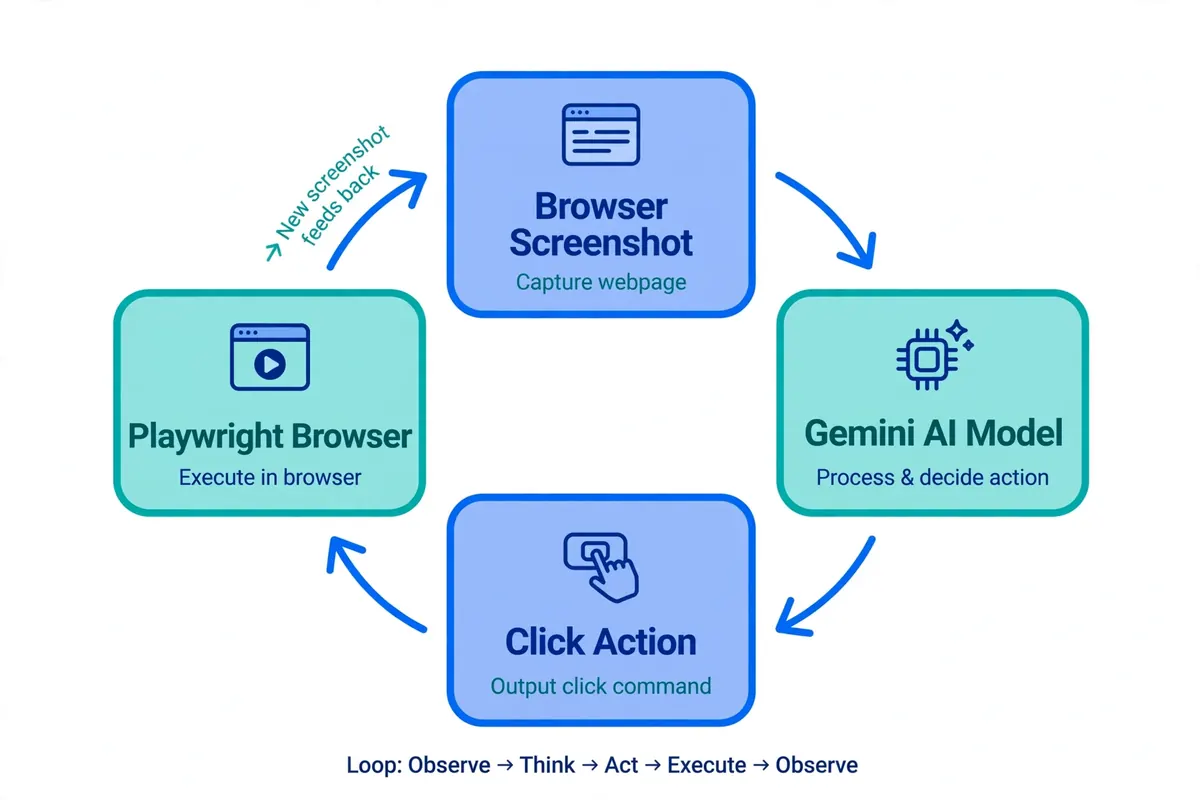
Two details in that loop are easy to get wrong. First, coordinates are normalized to a 0–1000 grid, not pixels: a click at x: 450, y: 120 means 45% across and 12% down the viewport, and your code must scale it to the actual window size. Second, the conversation is stateful through previous_interaction_id: each turn you pass the ID of the previous interaction, so the model remembers the task and the history of actions. If you start a fresh interaction every turn, the model forgets what it already did and repeats itself.
The API behind all of this is the Interactions API — client.interactions.create() in the Python SDK, POST https://generativelanguage.googleapis.com/v1/interactions over REST. Google also supports Computer Use through the older GenerateContent API, but every example in the current documentation uses Interactions, and this tutorial follows the docs.
Step 1 — Get a paid-tier API key#
Open Google AI Studio, create an API key, and enable billing on the Google Cloud project it belongs to. A key without billing will not work for Computer Use: the tool is gated to the paid tier even though the underlying models (Gemini 4 Hydrogen, Gemini 3.8 Flash) have free tiers for ordinary text calls. If you send a Computer Use request on a free-tier key, the API rejects it — the model itself is free, the tool is not.
Export the key in your shell and keep it out of your code and your shell history file:
export GEMINI_API_KEY="AIza..."The Python SDK reads GEMINI_API_KEY from the environment automatically, so genai.Client() with no arguments is all the setup you need. Never paste the key into the script itself; the full program at the end of this tutorial reads it from the environment and nothing else.
Step 2 — Install the SDK and Playwright#
Google's docs require google-genai 2.7.0 or higher — earlier versions predate the Interactions API. Install it alongside Playwright:
pip install "google-genai>=2.7.0" playwright
playwright install chromium
Verify the install before going further. This tutorial was verified with google-genai 3.6.1:
python -c "import google.genai as g; print(g.__version__)"
python -c "from google import genai; c = genai.Client(api_key='test'); print(hasattr(c, 'interactions'))"
The first command should print a version number of 2.7.0 or higher. The second should print True — it constructs a client with a dummy key and confirms the interactions namespace exists. No network call is made; the key is never sent. If the second command fails with ModuleNotFoundError, you are in the wrong virtual environment; if it prints False, your SDK is too old.
The playwright install chromium step downloads roughly 200 MB of browser binaries. If it fails with ENOSPC: no space left on device, the download is staging through your system's /tmp, which on many machines is a small tmpfs — point it at a roomier directory with TMPDIR=$HOME/tmp playwright install chromium. That exact failure happened while preparing this tutorial, and the TMPDIR workaround fixed it.
Step 3 — Your first interaction: one API call, no browser yet#
Before building the loop, send a single Computer Use request and look at what comes back. This is the smallest possible program that uses the tool, taken from Google's documentation:
from google import genai

client = genai.Client()

interaction = client.interactions.create(
    model="gemini-4-hydrogen",
    input="Search for 'Gemini API' on Google.",
    tools=[{"type": "computer_use", "environment": "browser"}]
)

print(interaction)
Three things to notice. The model is gemini-4-hydrogen — the model Google uses in every example on the Computer Use docs page. The tool is declared as a dict with "type": "computer_use" and an "environment" of "browser"; the other environments are "mobile" (Android-optimized) and "desktop". And there is no screenshot in this first call — the model will still answer, because the Interactions API can start a task from text alone and ask for a screenshot when it needs one. In the full agent you will always include a screenshot, because a model that cannot see the screen guesses coordinates.
The response is an Interaction object whose steps list holds the model's reply. A click looks like this (from Google's docs):
{
  "steps": [
    {
      "type": "function_call",
      "name": "click",
      "arguments": {
        "x": 450,
        "y": 120,
        "intent": "Click the search box to type the destination."
      }
    }
  ]
}
The intent field is the model's own explanation of the step, and it is present on Gemini 4 and Gemini 3.x models. It is the single most useful debugging signal in the whole system: when the agent does something odd, the intent tells you what it thought it was doing. Log it on every turn, as the full program does.
If you run the snippet above, expect it to cost a fraction of a cent and return within a few seconds. If it fails with an authentication error, your key is wrong or billing is not enabled — the two most common failures at this step. The equivalent raw HTTP call, for reference, is POST https://generativelanguage.googleapis.com/v1/interactions with the API key in the x-goog-api-key header.
Step 4 — Build the action executor#
The executor is the half of the agent Google does not write for you. Its job is narrow: take a function call, turn normalized coordinates into pixels, and perform the action in Playwright. Save the code below as computer_use_agent.py — the later steps add the loop around it.
import base64
import json
import time

from google import genai
from playwright.sync_api import sync_playwright

MODEL = "gemini-4-hydrogen"
SCREEN_WIDTH = 1440
SCREEN_HEIGHT = 900
MAX_TURNS = 25

COMPUTER_USE_TOOL = {
    "type": "computer_use",
    "environment": "browser",
    "enable_prompt_injection_detection": True,
}

# Playwright key names are case-sensitive ("Enter", not "enter").
_KEY_ALIASES = {
    "enter": "Enter", "return": "Enter", "esc": "Escape", "escape": "Escape",
    "tab": "Tab", "space": "Space", "backspace": "Backspace",
    "delete": "Delete", "del": "Delete", "up": "ArrowUp", "down": "ArrowDown",
    "left": "ArrowLeft", "right": "ArrowRight", "pageup": "PageUp",
    "pagedown": "PageDown", "home": "Home", "end": "End",
    "meta": "Meta", "cmd": "Meta", "command": "Meta",
    "ctrl": "Control", "control": "Control", "alt": "Alt", "shift": "Shift",
}


def denormalize_x(x):
    """Model coordinates are normalized to 0-1000; scale to real pixels."""
    return int(x / 1000 * SCREEN_WIDTH)


def denormalize_y(y):
    return int(y / 1000 * SCREEN_HEIGHT)


def _key(name):
    return _KEY_ALIASES.get(str(name).lower(), name)
The coordinate conversion is the exact formula from Google's docs — int(x / 1000 * screen_width) — and the viewport size must match the browser window you launch, or every click lands in the wrong place. Keep both constants in one place and pass the same numbers to Playwright's new_page(viewport=...).
Next, the executor itself. The browser environment exposes a fixed action vocabulary: click, double_click, triple_click, middle_click, right_click, mouse_down, mouse_up, move, type, drag_and_drop, wait, press_key, key_down, key_up, hotkey, take_screenshot, scroll, go_back, navigate, and go_forward. The mobile environment adds open_app and list_apps and drops the desktop-only mouse actions. Your executor should handle the full browser list and warn on anything else, so a model that invents an action name fails loudly instead of silently doing nothing:
def execute_function_calls(interaction, page):
    """Run every function_call step the model returned."""
    results = []
    calls = [s for s in interaction.steps if s.type == "function_call"]
    for call in calls:
        fname, args = call.name, call.arguments
        result = {}
        print(f"  -> {fname} (intent: {args.get('intent', 'N/A')})")

        # Safety gate, explained in Step 7.
        sd = args.get("safety_decision") or {}
        decision = sd.get("decision")
        if decision == "blocked":
            print(f"     BLOCKED by safety policy: {sd.get('explanation', '')}")
            results.append((fname, call.id, {"error": "blocked by safety policy"}))
            continue
        if decision == "require_confirmation":
            print(f"     Safety confirmation required: {sd.get('explanation', '')}")
            ok = input("     Approve this action? [y/N] ").strip().lower() == "y"
            if not ok:
                results.append((fname, call.id, {"error": "user declined confirmation"}))
                continue
            result["safety_acknowledgement"] = True

        try:
            if fname in ("click", "double_click", "triple_click", "middle_click",
                         "right_click", "move", "long_press", "mouse_down", "mouse_up"):
                x, y = denormalize_x(args["x"]), denormalize_y(args["y"])
                if fname == "click":
                    page.mouse.click(x, y)
                elif fname == "double_click":
                    page.mouse.dblclick(x, y)
                elif fname == "triple_click":
                    page.mouse.click(x, y, click_count=3)
                elif fname == "middle_click":
                    page.mouse.click(x, y, button="middle")
                elif fname == "right_click":
                    page.mouse.click(x, y, button="right")
                elif fname == "move":
                    page.mouse.move(x, y)
                elif fname == "long_press":
                    page.mouse.move(x, y)
                    page.mouse.down()
                    time.sleep(args.get("seconds", 2))
                    page.mouse.up()
                elif fname == "mouse_down":
                    page.mouse.move(x, y)
                    page.mouse.down()
                elif fname == "mouse_up":
                    page.mouse.move(x, y)
                    page.mouse.up()
            elif fname == "type":
                if "x" in args and "y" in args:
                    page.mouse.click(denormalize_x(args["x"]), denormalize_y(args["y"]))
                page.keyboard.press("ControlOrMeta+A")
                page.keyboard.press("Backspace")
                page.keyboard.type(args["text"])
                if args.get("press_enter", False):
                    page.keyboard.press("Enter")
            elif fname == "drag_and_drop":
                page.mouse.move(denormalize_x(args["start_x"]), denormalize_y(args["start_y"]))
                page.mouse.down()
                page.mouse.move(denormalize_x(args["end_x"]), denormalize_y(args["end_y"]), steps=10)
                page.mouse.up()
            elif fname == "scroll":
                # Playwright's wheel() scrolls at the current cursor position,
                # so move there first, then scroll by the delta.
                page.mouse.move(denormalize_x(args["x"]), denormalize_y(args["y"]))
                mag = args.get("magnitude_in_pixels", 300)
                dx, dy = 0, 0
                if args["direction"] == "down":
                    dy = mag
                elif args["direction"] == "up":
                    dy = -mag
                elif args["direction"] == "right":
                    dx = mag
                elif args["direction"] == "left":
                    dx = -mag
                page.mouse.wheel(dx, dy)
            elif fname == "press_key":
                page.keyboard.press(_key(args["key"]))
            elif fname == "key_down":
                page.keyboard.down(_key(args["key"]))
            elif fname == "key_up":
                page.keyboard.up(_key(args["key"]))
            elif fname == "hotkey":
                page.keyboard.press("+".join(_key(k) for k in args["keys"]))
            elif fname == "navigate":
                page.goto(args["url"])
            elif fname == "go_back":
                page.go_back()
            elif fname == "go_forward":
                page.go_forward()
            elif fname == "wait":
                time.sleep(args.get("seconds", 1))
            elif fname in ("take_screenshot", "open_app"):
                pass  # Nothing to do: the loop screenshots after every turn anyway.
            else:
                print(f"     Warning: unhandled function {fname}")
            page.wait_for_load_state(timeout=5000)
            time.sleep(1)
        except Exception as e:
            print(f"     Error executing {fname}: {e}")
            result = {"error": str(e)}
        results.append((fname, call.id, result))
    return results
Three implementation choices deserve a note. First, type clears the field before typing — ControlOrMeta+A then Backspace — because the model often types into a field that already has text, and appending to a search box produces garbage queries. Google's own example does the same, with Meta+A; ControlOrMeta+A is Playwright's cross-platform spelling, so the same code works on macOS and Linux. Second, scroll is the one place Google's published example and Playwright's API disagree: the docs' sample calls page.mouse.wheel(x, y, dx, dy), but Playwright's Python wheel() takes only (delta_x, delta_y) and scrolls wherever the cursor already is. The version above moves the cursor first, then scrolls — and this was the one bug the offline verification caught: the docs' form raises TypeError: Mouse.wheel() takes 3 positional arguments but 5 were given. Third, every action is wrapped in try/except and the error is returned to the model in the next turn instead of crashing the program. A failed click is information the model can act on; a crashed agent is not.
The key-name table exists because the model returns keys as plain strings — "enter", "esc", "ctrl" — and Playwright expects "Enter", "Escape", "Control". Without the alias map, press_key with "enter" throws an "unknown key" error on the first form submission.
Step 5 — Close the loop: screenshots back as function results#
After the executor runs, the model is blind until you show it the new screen. The function_result for each executed call carries two things: a JSON text part with the current URL (plus any error or safety acknowledgement) and a fresh PNG screenshot, base64-encoded. One result per call — if the model issued three calls in one turn, you send three results, each with its own call_id:
def get_function_responses(page, results):
    """Screenshot the new state and package one function_result per call."""
    screenshot = base64.b64encode(page.screenshot(type="png")).decode("utf-8")
    return [
        {
            "type": "function_result",
            "name": name,
            "call_id": call_id,
            "result": [
                {"type": "text", "text": json.dumps({"url": page.url, **result})},
                {"type": "image", "data": screenshot, "mime_type": "image/png"},
            ],
        }
        for name, call_id, result in results
    ]
Note that all results in a turn share one screenshot, taken after the last action — that matches Google's own example. It also means screenshots dominate your token bill: a 1440×900 PNG is a large image input on every turn, so keep MAX_TURNS small and the viewport no bigger than the model needs. A 1280×720 viewport is a reasonable cheaper alternative; just keep the constants and the Playwright viewport in sync.
Now the loop itself. It opens the browser, takes the first screenshot, sends the task, and then alternates between executing actions and asking for the next step — chaining turns with previous_interaction_id — until the model answers in text instead of calling a function, or the turn limit is hit:
def run_agent(task):
    client = genai.Client()
    with sync_playwright() as p:
        browser = p.chromium.launch(headless=False)
        page = browser.new_page(viewport={"width": SCREEN_WIDTH, "height": SCREEN_HEIGHT})
        try:
            page.goto("https://www.google.com")
            first_shot = page.screenshot(type="png")
            print(f"Goal: {task}")
            interaction = client.interactions.create(
                model=MODEL,
                input=[
                    {"type": "text", "text": task},
                    {"type": "image", "data": base64.b64encode(first_shot).decode("utf-8"),
                     "mime_type": "image/png"},
                ],
                tools=[COMPUTER_USE_TOOL],
            )
            for turn in range(1, MAX_TURNS + 1):
                print(f"
--- Turn {turn} ---")
                calls = [s for s in interaction.steps if s.type == "function_call"]
                if not calls:
                    text = " ".join(
                        block.text
                        for s in interaction.steps if s.type == "model_output"
                        for block in s.content if block.type == "text"
                    )
                    print(f"Agent finished: {text}")
                    return text
                results = execute_function_calls(interaction, page)
                responses = get_function_responses(page, results)
                interaction = client.interactions.create(
                    model=MODEL,
                    previous_interaction_id=interaction.id,
                    input=responses,
                    tools=[COMPUTER_USE_TOOL],
                )
            print("Turn limit reached without a final answer.")
            return None
        finally:
            browser.close()


if __name__ == "__main__":
    import sys
    if len(sys.argv) < 2:
        print("Usage: python computer_use_agent.py \"<task in plain English>\"")
        sys.exit(1)
    run_agent(" ".join(sys.argv[1:]))
headless=False is deliberate: watch the first few runs with your own eyes. The model will misclick — clicking the wrong search result, typing into the address bar instead of the page's search box, scrolling past the element it wanted. Watching the window is how you learn whether a failure is a bad prompt, a bad coordinate, or a page that changed layout. Once a task works reliably, flip it to headless=True and run it unattended.
Step 6 — Run it: a real task, end to end#
With the three pieces in one file, run the agent on the same task Google uses in its own docs example — searching the AI Studio documentation for pricing:
python computer_use_agent.py "Go to aistudio.google.com/docs and search for pricing."What you should see: a Chromium window opens at google.com, and the console prints one turn at a time. Each turn lists the actions the model chose with its stated intent — a navigate to the docs site, a click on the search box, a type of "pricing" with press_enter — followed by a fresh screenshot going back to the model. When the model has what it needs, the loop ends with Agent finished: and a short summary of what it found.
Expect the run to take a handful of turns. The exact sequence varies run to run: the model may navigate directly to the docs URL, or search from the homepage and click through. That variance is normal for a vision model working from screenshots, and it is why the turn limit exists — if the agent loops (clicking the same link, scrolling up and down), MAX_TURNS stops it after 25 turns instead of burning tokens indefinitely.
Two tasks that make good second runs, because they exercise different actions: "Open the Gemini API pricing page and find the price of Gemini 3.8 Flash" (tests scroll and reading a dense page) and "Go to example.com and click the 'More information' link" (tests navigate plus a precise click on a small target). Keep the first dozen tasks read-only — searching, navigating, summarizing. Do not point the agent at anything logged in, anything with a checkout, or anything that sends a message until you have read Step 7.
Step 7 — Safety: the confirmation gate and the policy knobs#
A browser agent is a program that clicks things on your behalf, on pages it does not fully understand, including pages that may contain text written by someone trying to mislead it. Google builds three layers of protection into Computer Use, and the executor in Step 4 already wires in the first. This step explains all three.
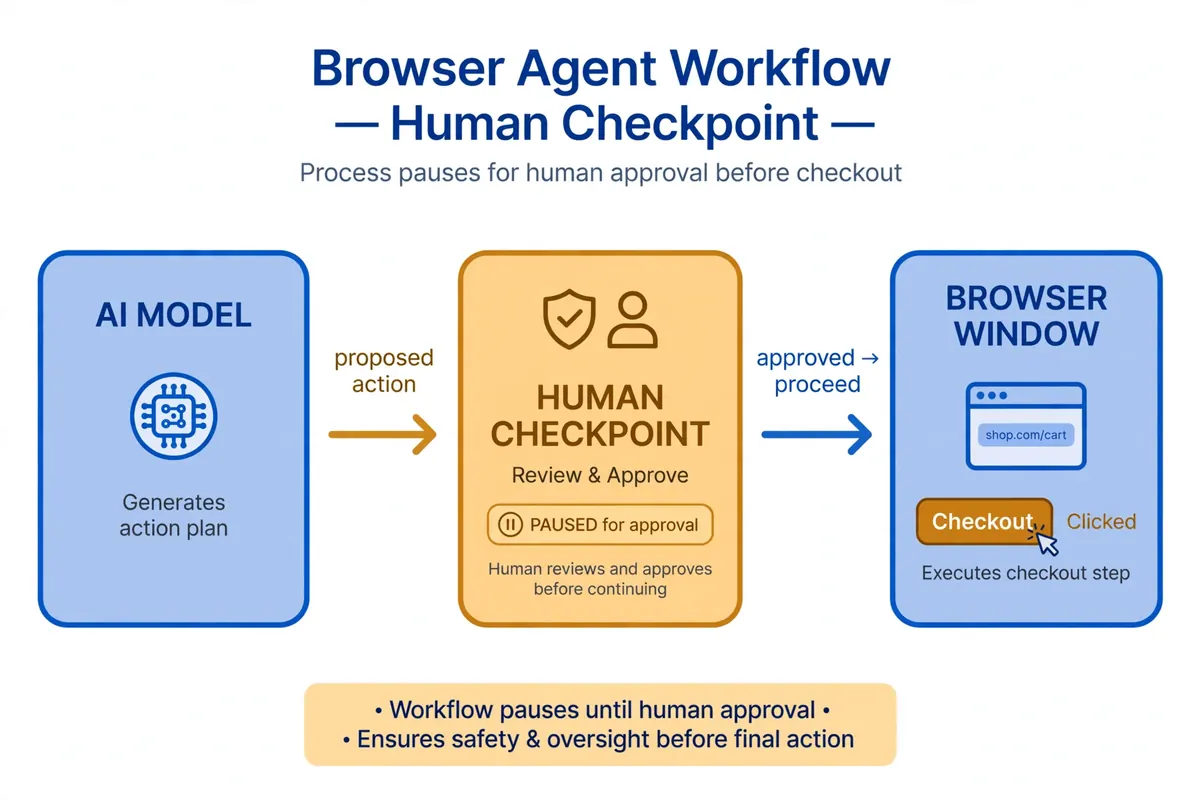
Layer 1: the safety decision on every action. The model can attach a safety_decision to any function call, with a decision of require_confirmation or blocked and an explanation in plain text. The executor checks this before doing anything: a blocked action is skipped and the block is reported back to the model, and a require_confirmation action pauses for your typed approval. If you approve, the executor sets safety_acknowledgement: True in that call's result, which is how the model knows a human signed off. Never delete this check to make a demo smoother — it is the only thing standing between the model and an irreversible click.
Layer 2: configurable safety policies. Gemini 4 and Gemini 3.x models carry built-in policy categories that decide when confirmation is required:
| Policy category | What it guards |
|---|---|
FINANCIAL_TRANSACTIONS | Payments, retail checkout, regulated goods |
SENSITIVE_DATA_MODIFICATION | Health, financial, or government records |
COMMUNICATION_TOOL | Sending emails, chat messages, or drafts |
ACCOUNT_CREATION | Registering new accounts on websites |
DATA_MODIFICATION | File-system changes, data sharing, storage deletion |
USER_CONSENT_MANAGEMENT | Cookie banners and privacy prompts |
LEGAL_TERMS_AND_AGREEMENTS | Accepting terms of service or other contracts |
You can relax a category with disabled_safety_policies in the tool config — Google's example disables data_modification for a desktop cleanup task — but the docs warn that the model may still return require_confirmation even with an override, so the Layer 1 handling must stay in place regardless. Do not disable FINANCIAL_TRANSACTIONS or LEGAL_TERMS_AND_AGREEMENTS for a browser agent you leave unattended.
Layer 3: prompt-injection detection. The tool config in this tutorial already sets enable_prompt_injection_detection: True. When enabled, the model scans screenshots for hidden adversarial instructions — text on a page saying "ignore previous commands", for example — and blocks execution when it finds them. It is opt-in, defaults to false, and is supported on Gemini 3.5 Flash-Lite and later models. There is no reason to leave it off: it costs nothing extra and it is the only defense that operates on what the model actually sees.
On top of Google's three layers, add your own: a system instruction that draws the line in plain language. Google's docs publish a long example that boils down to two rules — ask for confirmation before any consequential action (purchases, sending messages, accepting terms, solving CAPTCHAs, logging in, touching sensitive data) and otherwise keep acting until the task is done. Pass it as system_instruction in interactions.create(). And keep the agent in a sandboxed browser with no access to your real accounts: the strongest safety control is the one where the damage cannot happen in the first place.
Step 8 — Make it yours: models, environments, and custom tools#
The program now works. The remaining choices are which model to run, which environment to target, and how far to extend the action vocabulary.
Model choice. Seven models support Computer Use, per Google's documentation. The practical choice is between the two below; the others are for heavier reasoning or lower cost.
| Model | Paid-tier price per 1M tokens (in / out) | When to use it |
|---|---|---|
gemini-4-hydrogen | $1.50 / $7.50 | The default in this tutorial and in Google's examples. Fast, current-generation, and the one whose behavior the docs describe. |
gemini-3.8-flash | $0.75 / $3.75 through Dec 31, 2026; $1.50 / $7.50 from Jan 1, 2027 | High-volume or background runs. Half the price of Hydrogen until the January increase — after which the two cost the same, and Hydrogen is the better pick. |
gemini-4-argon / gemini-4-carbon | $2.00 / $10.00 through Nov 30, 2026; $4.00 / $20.00 from Dec 1, 2026 | Complex multi-step workflows where the cheaper models stall or loop. Argon is the efficient frontier model; Carbon is the most capable reasoning model. |
gemini-4-neon | See the pricing page | Frontier-level tasks in software engineering and knowledge work; the newest Gemini 4 model, released November 18. |
gemini-3.5-flash-lite / gemini-3-flash-preview | See the pricing page | Low-latency, low-cost runs; Flash-Lite is the cheapest model that supports prompt-injection detection. |
Swap models by changing one string: MODEL = "gemini-3.8-flash". Prices are from Google's pricing page as read on November 19, 2026 — check the page before budgeting a big run, because the November and December increases above are already scheduled.
Environment choice. Change "environment": "browser" to "desktop" and the same loop drives a whole desktop — but then you must implement the desktop action handler (screenshots via OS APIs, clicks via a tool like pyautogui), because Playwright only knows browsers. Change it to "mobile" and the model gains open_app and list_apps for Android. For a first agent, browser is the right call: the handler is a solved problem, the blast radius is one browser window, and every site you care about is a web page anyway.
Custom tools. You can extend the action vocabulary with your own function declarations and remove predefined actions you do not want the model to have. Google's example registers a yield_to_user tool — "yields control back to the user for assistance when an automated action is unsafe or ambiguous" — and excludes the predefined click in the same call, using excluded_predefined_functions: ["click"]. Your executor receives the custom call like any other, so add a branch for it: print the model's reason, wait for your input, and return the answer as the result. This is the cleanest way to build a "ask me when stuck" agent without prompt hacks.
Ready-made alternatives. If you want a starting point with the sandbox included instead of building the loop yourself, Google publishes a reference implementation with a Docker-based sandbox, and there is a hosted demo at gemini.browserbase.com where you can watch the tool work without writing code. Both are linked from Google's docs. They are good for learning the shape of the loop; the program in this tutorial is better for understanding it, because every line is yours.
Which approach should you use?#
- Build the loop yourself (this tutorial) when you want to understand the system, customize the safety gates, or embed the agent in a larger program. About 200 lines, no framework, and you own every decision.
- Google's reference implementation when you want a sandbox included and do not mind reading someone else's code to find the knobs. Best for a first deployment where isolation matters more than understanding.
- The Browserbase demo when you want to see Computer Use work before spending anything. It is a demo environment, not a place to run real tasks.
- The Gemini app on Mac when you want a computer-use agent, not a project. Google shipped it in the consumer app on November 19 — the same capability, no code — but you give up the safety gates, the logging, and the control over where it can click.
- The GenerateContent API instead of Interactions only if you are integrating Computer Use into an existing GenerateContent-based codebase. The Interactions API is the documented path for new agents, and its
previous_interaction_idchaining is simpler than managing conversation history by hand.
Limitations and honest caveats#
- The live model call was not run for this tutorial. The executor, the coordinate math, the screenshot packaging, and the safety gates were verified offline against a real headless Chromium with a mocked model response — type, click, scroll, keyboard, hotkey, navigate, go-back, and both safety paths all behaved as documented, and the run caught one real bug (the
wheel()call in Google's example). The first API call's shape was verified against the installed SDK (google-genai 3.6.1,interactions.create), but a live end-to-end run needs a paid-tier key, and none was available in the sandbox. Treat the console output in Step 6 as the expected shape, not a transcript. - The model will misclick. Vision models misread dense pages, click the wrong result, and get stuck in loops on pages with cookie banners and login walls. The turn limit, the intent logging, and the confirmation gate are not optional extras — they are how you find out what went wrong.
- Screenshots are the main cost. Every turn sends a full-screen PNG as input tokens. A 25-turn run at 1440×900 costs noticeably more than the same task at 1280×720, and far more than a text-only agent. Keep the viewport small and the turn limit tight.
- Google's docs are the source of truth, and they move. Computer Use went GA on October 30, 2026; the model list and the pricing on this page were read on November 19, 2026. The January 1, 2027 price increase for Gemini 3.8 Flash is already on the pricing page — re-check it before you build a budget around the current rates.
- Do not run this against anything that matters. No logged-in accounts, no purchases, no messages, no file downloads, and no CAPTCHAs — Google's own docs forbid using the tool for critical decisions or sensitive data, and the safety policies exist because the model can be fooled by text on a screen.
The takeaway#
Computer Use is a small idea with a large consequence: the model sees and decides, your code executes. That split is what makes it buildable in an afternoon — you never write a planner, a parser, or a screen-understanding model, because Gemini is the planner and the screenshot is the interface. The work is the loop around it: normalized coordinates scaled to pixels, screenshots fed back as function results, a turn limit, and a confirmation gate that never gets deleted for convenience. Build that loop once, with the code in this tutorial, and you have a browser agent you can point at any read-only task on the web. Then decide, deliberately, which tasks deserve a human in the loop — because the agent will do exactly what the screen tells it to, and the screen is not always on your side.