One-shot a playable browser game with a frontier model: the workflow behind the Opus 5.5 demos
A Reddit poster claims Sonnet 5.5 one-shot a 3D zombie FPS in 49 minutes; Tidewater, a full fishing game, was reportedly built with Opus 5.5 in eight hours. The clips never show the workflow. This tutorial is the missing middle: the complete process from blank prompt to published browser game — spec, one-shot prompt, debug loop, playtest, polish, ship — with every step verified on a real game we built, tested, and ran.

On Monday afternoon, Anthropic's Claude Sonnet 5.5 was barely a day old when a Reddit poster claimed it had one-shot an entire 3D zombie FPS in 49 minutes for $177 of API spend. Three days earlier, a different builder posted Tidewater — a fully playable fishing game with an upgrade economy, day-night cycles, and a fish market — built, according to its creator, in about eight hours with Claude Opus 5.5. We covered both stories this week, and both threads filled with the same question: how?
The demos never show the workflow. A 53-second gameplay clip doesn't tell you what the first prompt said, what broke, how it was fixed, or what the tenth iteration looked like. This tutorial is the missing middle: the complete, repeatable workflow for going from a blank prompt to a playable browser game — spec, one-shot prompt, debug loop, playtest, polish, and publish. Every step below was verified on a real game: a neon arcade shooter I specified, generated, debugged, and ran, with the test harness catching a genuine bug along the way.
What you'll need#
- A frontier model with strong code generation. Any current top-tier model works — the workflow below is model-agnostic. An agentic coding tool (Claude Code, or the chat interface of your model of choice) makes the debug loop faster, but a plain chat window is enough.
- A browser and a text editor. That's the whole toolchain. No game engine, no build step, no assets to download.
- Budget: $0–$20. A single focused build like the one in this tutorial typically costs a few dollars in API tokens at most — or nothing extra on a flat subscription plan. The viral demos' larger bills come from days of open-ended iteration, not from the technique itself.
- An itch.io account (free) if you want to publish at the end. Optional but recommended — shipping is the step most tutorials skip.
- No game-development experience required. You need to be able to read JavaScript well enough to spot when something looks wrong; the model writes it.
Step 1: Pick the one-shot stack#
Every reliable one-shot game demo shares the same stack: a single HTML file, vanilla JavaScript, and the Canvas 2D API. This is not a coincidence — it is the format frontier models generate most reliably, for three reasons.
First, a single file eliminates an entire class of failure: no module resolution, no build configuration, no asset paths to get wrong. The model emits one artifact and you double-click it. Second, Canvas 2D is a small, stable, extremely well-documented API surface — fillRect, arc, drawImage — that has barely changed in a decade, so the model's training data is dense and consistent. Third, everything runs from a file:// URL with zero server, which means your test loop is "save, refresh" and takes two seconds.
What to avoid on a first attempt: WebGL/Three.js (the demos that work are impressive; the failure modes are brutal — shader compile errors the model can't see), TypeScript (build step), and any engine with an asset pipeline. Once the workflow below is second nature, graduate to 3D. The viral zombie-FPS demo shows what’s possible once the fundamentals are solid.
Fix the canvas size up front — 960×540 is the sweet spot: 16:9, large enough to feel like a real game, small enough that the model keeps coordinates sane. You'll reference it in the spec and the prompt.
Step 2: Write the spec before you write the prompt#
This is the highest-leverage step in the entire workflow, and it's the one the "just prompt it" demos skip. Before touching the model, write a GAME-SPEC.md: a one-page design document that pins down the game so completely that generating the code becomes transcription, not invention.
A good spec has seven sections: the one-line pitch, the 60-second core loop, the controls table, the entities (with numbers — speeds, sizes, counts), the rules and scoring, the tech constraints, and — most importantly — acceptance criteria: a checklist the finished game must satisfy. The acceptance criteria are what turn "make me a game" from a wish into a contract you can test against.
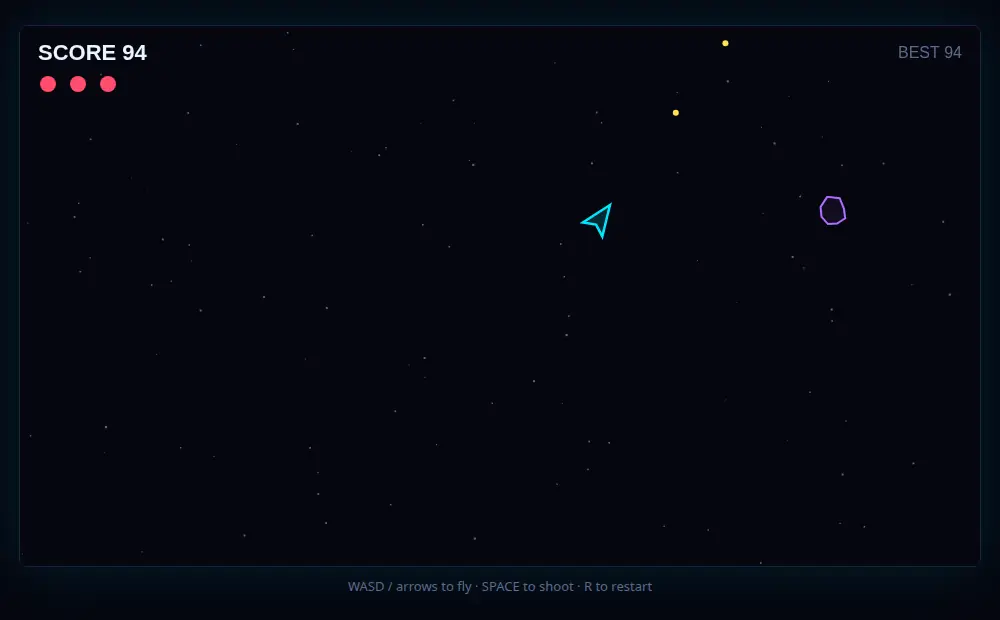
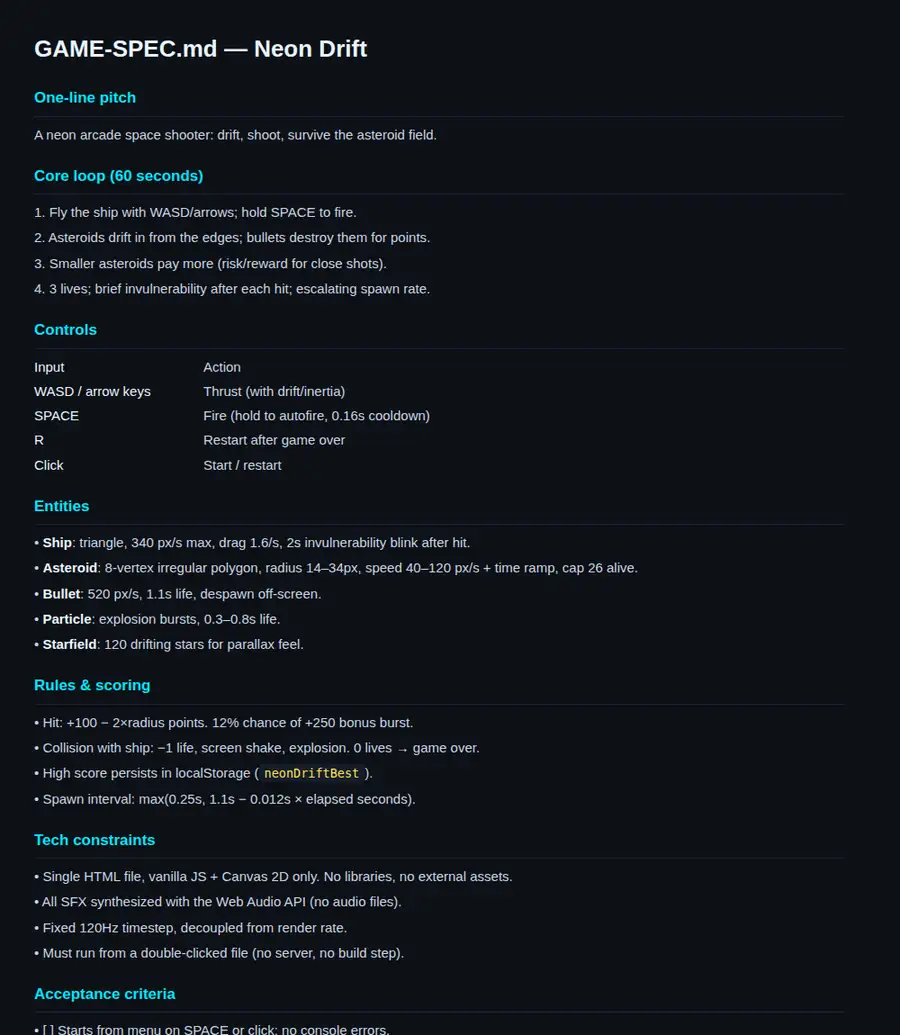
Here is the real spec I wrote for the demo game built for this tutorial, a neon arcade shooter called Neon Drift:
# GAME-SPEC.md — Neon Drift

## One-line pitch
A neon arcade space shooter: drift, shoot, survive the asteroid field.

## Core loop (60 seconds)
1. Fly the ship with WASD/arrows; hold SPACE to fire.
2. Asteroids drift in from the edges; bullets destroy them for points.
3. Smaller asteroids pay more (risk/reward for close shots).
4. 3 lives; brief invulnerability after each hit; escalating spawn rate.

## Controls
| Input | Action |
|---|---|
| WASD / arrow keys | Thrust (with drift/inertia) |
| SPACE | Fire (hold to autofire, 0.16s cooldown) |
| R | Restart after game over |
| Click | Start / restart |

## Entities
- **Ship**: triangle, 340 px/s max, drag 1.6/s, 2s invulnerability blink
  after hit.
- **Asteroid**: 8-vertex irregular polygon, radius 14–34px,
  speed 40–120 px/s + time ramp, cap 26 alive.
- **Bullet**: 520 px/s, 1.1s life, despawn off-screen.
- **Particle**: explosion bursts, 0.3–0.8s life.
- **Starfield**: 120 drifting stars for parallax feel.

## Rules & scoring
- Hit: +100 − 2×radius points. 12% chance of +250 bonus burst.
- Collision with ship: −1 life, screen shake, explosion.
  0 lives → game over.
- High score persists in localStorage (`neonDriftBest`).
- Spawn interval: max(0.25s, 1.1s − 0.012s × elapsed seconds).

## Tech constraints
- Single HTML file, vanilla JS + Canvas 2D only.
  No libraries, no external assets.
- All SFX synthesized with the Web Audio API (no audio files).
- Fixed 120Hz timestep, decoupled from render rate.
- Must run from a double-clicked file (no server, no build step).

## Acceptance criteria
- [ ] Starts from menu on SPACE or click; no console errors.
- [ ] Ship moves with inertia and stays inside the arena.
- [ ] Bullets destroy asteroids; score increases; particles spawn.
- [ ] 3 hits → game over screen with score + best; R restarts cleanly.
- [ ] Survives 60 seconds of random-input play without errors.
Notice how much is decided here: every number the model would otherwise invent on the spot. "Smaller asteroids pay more" is a design decision; "+100 − 2×radius" is its implementation. When the model has to invent numbers, it invents them inconsistently — the spec removes that failure mode entirely. Thirty minutes with this document saves hours of "no, I meant…" iteration later. (If the spec-driven approach appeals to you, our spec-driven development tutorial covers the general method.)
Step 3: The one-shot prompt#
With the spec written, the prompt itself is short. Its anatomy has four parts: the spec pasted verbatim, the output contract (one file, complete, runnable), the constraints restated as non-negotiables, and the acceptance criteria as the definition of done. Here is the pattern, ready to adapt:
Build the complete game described in the spec below as ONE self-contained
HTML file. Requirements:

1. Everything in a single file: HTML, CSS, and JavaScript. No external
   libraries, fonts, images, or audio files.
2. Use only the HTML Canvas 2D API for rendering.
3. The file must run by double-clicking it — no server, no build step,
   no console errors on load.
4. Implement every entity, rule, and number EXACTLY as specified.
   Do not invent mechanics that aren't in the spec.
5. Structure the code cleanly: input, update, draw, and a fixed-timestep
   game loop as separate sections with comments.

Verify your output against each acceptance criterion in the spec before
responding. If any criterion can't be met, say which one and why
instead of silently skipping it.

--- SPEC ---
[paste GAME-SPEC.md here]
Two details matter. First, "do not invent mechanics": without it, models add features — a second weapon, a boss fight, a settings menu — each one a new surface for bugs. Scope discipline is a prompt-level concern. Second, "verify against each acceptance criterion": asking the model to self-check against your checklist avoids the most common one-shot failure, the game that loads but silently ignores half the spec.
A game of this scope usually lands around 300 lines — the Neon Drift demo built for this tutorial is 323, JavaScript included. Save it as game.html and double-click it.
Step 4: The debug loop — where games are actually made#
No one-shot output is perfect on the first try. The demos that claim otherwise are showing you the highlight reel. The professional workflow is a tight loop:
- Open the browser console (F12 → Console) and play for 60 seconds. The console is your test suite.
- Copy the full error text — not your paraphrase of it — back to the model with the relevant code section.
- Ask for the smallest possible fix, not a rewrite: "Fix this error with the minimal change. Don't restructure anything else." Rewrites introduce new bugs; surgical fixes don't.
- Re-test the acceptance criteria, not just the fixed bug. Fixes break neighbors.
The most common first-run errors are worth knowing by name: Cannot read properties of null (the script ran before the DOM loaded — the fix is moving the <script> below the canvas or waiting for DOMContentLoaded), X is not defined (a typo'd variable the model introduced), and silent failures where the game loads but nothing moves (usually the game loop never starting, or the state machine stuck in "menu").
This loop caught a real bug while building this tutorial's demo. My headless test harness — a Node script that stubs the DOM and canvas and plays the game programmatically for simulated minutes — flagged that the ship's invulnerability timer could drift to -0.0083 instead of stopping at zero:
// before: timer drifts negative on the final frame
if (ship.invuln > 0) ship.invuln -= dt;

// after: clamped, one-line fix
if (ship.invuln > 0) ship.invuln = Math.max(0, ship.invuln - dt);
Harmless in play — a negative timer behaves like zero — but exactly the kind of sloppiness that compounds across a 500-line file. The lesson generalizes: don't just playtest with your hands; simulate. A 40-line Node script that holds keys down and fast-forwards the game loop will exercise more code paths in ten seconds than you will in an hour of manual play. My harness verified menu → playing transitions, scoring, collisions, all three lives, game-over, high-score persistence, and clean restart — every acceptance criterion, automatically.
And the reverse happened too. The harness passed with flying colors — but the first real browser run died instantly with stars is not iterable. The test stub recorded requestAnimationFrame callbacks without ever invoking them, so frame() had never executed in Node; the real browser ran the loop immediately, before resetGame() had initialized the starfield. The fix was two lines: call resetGame() before starting the loop, then park the state back on "menu". The lesson cuts both ways: simulate what your hands can't, and run in the browser what your harness can't. Neither catches everything alone.
Step 5: Playtest like a QA engineer#
Once the console is clean, playtest against this 60-second checklist. Every item is a real failure mode I've seen in one-shot games:
- Controls: does the ship respond within one frame? Is there input lag from doing too much work per frame?
- Collision fairness: do hits feel earned or cheap? One-shot games often ship with collision radii that are far too generous — shrink the hitbox to the visual core.
- Difficulty curve: is the first 30 seconds boring and minute three impossible? Check that your ramp (spawn interval, enemy speed) actually engages.
- Edge cases: what happens when you hold two opposing directions? Mash restart during game-over? Resize the window mid-game?
- Mobile: touch the game on your phone. If the answer is "nothing happens," add touch controls now — mobile players are a large share of itch.io traffic.
For each failure, return to the debug loop: describe the symptom precisely ("asteroids spawn inside the ship's starting position"), demand the minimal fix, re-run the acceptance criteria. Two or three laps of this loop is the difference between a demo and a game.
Step 6: The juice pass — game feel is a feature#
Compare a viral demo with a game people replay and the difference is rarely mechanics — it's juice: particles, screen shake, sound, and feedback for every action. The good news is that juice is cheap for a model to generate and almost impossible to get wrong. Ask for it explicitly in a second pass, after the mechanics are solid:
The game works. Now add game feel, changing as little existing code
as possible:
1. Particle burst on every asteroid destroyed (12–20 particles,
   0.3–0.8s life, fade out).
2. Screen shake (0.3s, small) when the ship is hit.
3. Engine flame behind the ship proportional to thrust.
4. Synthesized sound effects with the Web Audio API — shoot, explosion,
   player hit, bonus. No audio files.
The Web Audio requirement deserves emphasis: generated games can't ship audio files they don't have, but every browser can synthesize sound. This ten-line pattern covers most arcade SFX needs — an oscillator swept from one frequency to another with an exponential volume decay:
// Verified in the Neon Drift demo: runs in any modern browser.
function blip(freqStart, freqEnd, dur, type, vol) {
  const t = audioCtx.currentTime;
  const osc = audioCtx.createOscillator();
  const g = audioCtx.createGain();
  osc.type = type; // "square" for shots, "sawtooth" for explosions
  osc.frequency.setValueAtTime(freqStart, t);
  osc.frequency.exponentialRampToValueAtTime(Math.max(freqEnd, 1), t + dur);
  g.gain.setValueAtTime(vol, t);
  g.gain.exponentialRampToValueAtTime(0.0001, t + dur);
  osc.connect(g).connect(audioCtx.destination);
  osc.start(t); osc.stop(t + dur + 0.02);
}
const sfx = {
  shoot:   () => blip(880, 220, 0.12, "square", 0.05),
  explode: () => blip(160, 30, 0.35, "sawtooth", 0.10),
  hit:     () => blip(300, 60, 0.5, "triangle", 0.12),
};
One browser rule to know: audio contexts start suspended until the user interacts with the page. Resume or create the context inside the first click/keypress handler — otherwise your game is silent and the console shows a warning, not an error, so it's easy to miss.
Persistence is the other cheap win: a high score in localStorage takes five lines and doubles replay value:
const best = +(localStorage.getItem("neonDriftBest") || 0);
if (score > best) localStorage.setItem("neonDriftBest", String(score));
Step 7: Assets without the legal risk#
Sooner or later you'll want the game to look like more than glowing polygons. You have three safe options, in order of preference:
- Ask the model for inline SVG or data-URI sprites. Vector shapes embedded directly in the HTML keep the single-file property and can't break. Best for UI icons, simple characters, and backgrounds.
- Kenney.nl. Thousands of sprites, tilesets, UI packs, and audio files, all released as CC0 public domain — free for commercial use with no attribution required. The art style is consistent across packs, which matters more than you'd think. Download a pack, drop the PNGs next to your HTML, and have the model wire them in.
- AI image generation for hero art — cover images, title screens. Fine for decoration; don't build gameplay-critical sprites this way, since you can't control exact dimensions or transparency reliably.
What not to do: rip sprites from games you like, or use "free" asset packs without checking the license. itch.io is full of packs with no stated license at all — treat those as unusable for anything you publish.
Step 8: Ship it — the step everyone skips#
An unplayed game is a demo. Publishing takes fifteen minutes:
itch.io (recommended for games). Zip your HTML file — with index.html at the root of the zip, not inside a folder — then Dashboard → Create new project → set Kind of project to HTML → upload the zip → tick "This file will be played in the browser" → set the embed size to your canvas (960×540) → Save & view page → set the project public. Your game is now playable by anyone with the link, no install.
GitHub Pages (recommended for portfolios). Push the file to a repository, enable Pages in the repo settings, and the game lives at yourname.github.io/repo/game.html with a URL you control.
Before you publish, do the final acceptance pass from your spec — on the published build, not your local file. itch.io serves games inside an iframe from a different origin, which occasionally surfaces issues (usually audio autoplay policies) that never appear locally.
Which approach should you use?#
There are four live workflows for AI game building right now, and the viral demos use different ones:
- Pure one-shot (this tutorial's core): one detailed prompt → one file → debug loop. Cheapest and fastest — a few dollars of tokens, under an hour for a small game. Best when the scope is small and the spec is tight. Fails when the game is too big for one context window.
- Iterative nudging ("add X", "make it better"): how Tidewater was reportedly built — about eight hours and, according to its creator, $1,874 in tokens. Maximum creative exploration, maximum cost. The bill surprises people because every "make it better" re-sends the entire growing file.
- Spec-driven: the spec-first method from Step 2, extended across multiple sessions — spec the whole game, then generate it system by system (physics, then enemies, then UI). The best cost/quality ratio for anything beyond a toy.
- Agent harness: point an agentic coding tool at the spec and let it run the debug loop itself — write code, run it headless, read errors, fix, repeat. Closest to a professional pipeline; needs the most setup.
The honest answer for your first game: start with pure one-shot, graduate to spec-driven. One-shot teaches you what the model is good at; the spec teaches you to aim it. The builders posting eight-hour epics didn't start there — they started exactly where you are now.
The takeaway#
The viral game demos look like magic because they hide the workflow. There is no magic: a tight spec, a disciplined one-shot prompt, a debug loop that treats the browser console as a test suite, a QA checklist, a juice pass, and fifteen minutes to publish. The model writes the code; you supply the taste — the numbers in the spec, the fairness of the collisions, the decision that the game is done.
Build one small game this week with the workflow above. Time yourself. Then build a second one, and watch how much of the first game's spec, prompt, and checklist you reuse. That compounding — not any single prompt — is the actual skill the demo builders have. The games are just the receipts.