Give your coding agent a video editor: hands-on with ffmpeg-skill
ffmpeg-skill gives Claude Code, Cursor and Codex 42 local FFmpeg tools with a machine-readable contract — no cloud, no API keys. Install it, cut a clip to Reels spec, and watch check.py catch the one thing you got wrong.
- No cloud, no API keys: 42 standard-library Python tools, FFmpeg 6.1+, Python 3.10+, one npx install — version 3.10.1, shipped November 15, 2026.
- Measure first: probe.py reports duration, resolution, frame rate, and codecs as JSON before any edit is decided.
- Stream-copy cuts snap to keyframes: pass --accurate when frame accuracy matters — this run's cut landed exactly on 6.00 s.
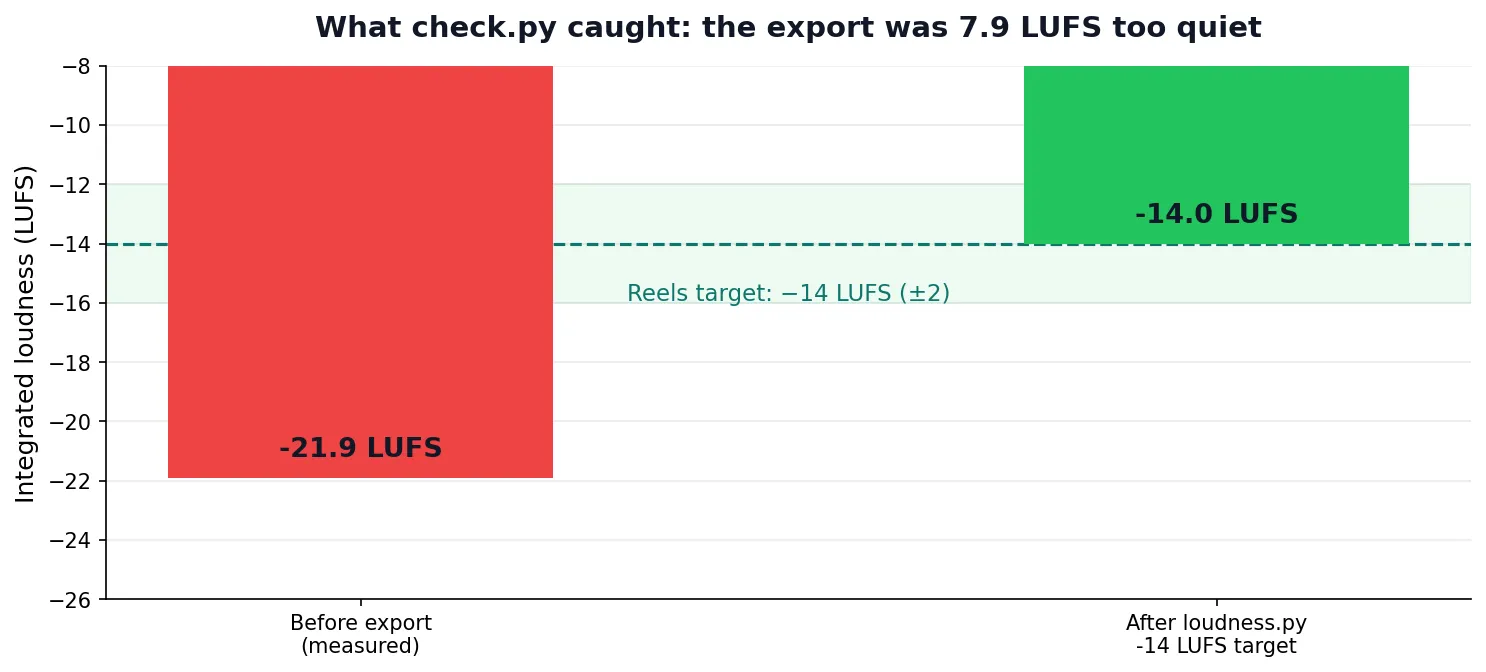
- check.py caught the one miss: the export measured -21.9 LUFS against Reels' -14 ± 2; loudness.py fixed it to -14.0 LUFS and the re-check passed.
- MCP serves 12 core tools by default, all 42 with FFMPEG_SKILL_MCP_FULL=1. Arguments use the scripts' argparse names, and media paths must be absolute.

Ask a coding agent to cut a video and it will write FFmpeg commands from memory. Sometimes they work. Often they don't: a guessed frame rate, a codec the container can't hold, a full re-encode where a stream copy would have done, and a confident "done" from an agent that never opened the output file. FFmpeg is one of the tools agents get wrong most often, because a command that exits 0 can still produce a broken file.
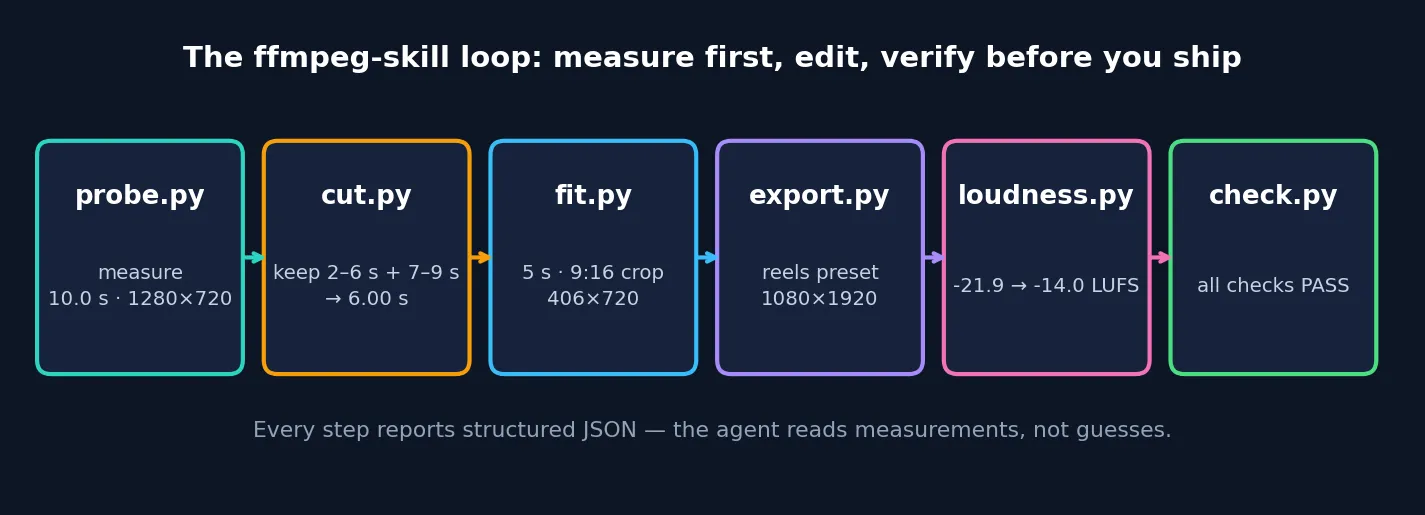
ffmpeg-skill takes the guessing out. It is an Agent Skill — a SKILL.md plus 42 small Python tools — that teaches Claude Code, Cursor, Codex, or any MCP client a fixed workflow: measure the footage first, edit with typed tools, then verify the result against the platform it is going to. Every tool reports structured JSON, every tool re-measures what it just wrote, and the whole set is described by a machine-readable contract that is derived from the tools' own argument parsers at runtime. If the contract drifts from the code, CI fails the build.
It is having a moment: 6,158 stars and 544 forks since the repo opened on September 3, 2026, 205 releases, version 3.10.1 shipped on November 15, and a spot on GitHub's daily trending page today. This tutorial installs it, runs the full loop on a test clip — probe, cut, fit, export, loudness, check, look — and hands the tools to an agent over MCP. Every command below ran on this machine; the numbers are the measured ones.
What you’ll need#
- Python 3.10 or newer. The tools are standard-library Python with no third-party dependencies. Tested here on Python 3.12.3.
- FFmpeg 6.1 or newer, with ffprobe. The skill refuses anything older. Tested here on FFmpeg 8.1.2. Ubuntu/Debian:
sudo apt install ffmpeg. macOS:brew install ffmpeg— note the plain Homebrew build lackszscale, which the HDR-to-SDR conversion needs;ffmpeg-fullhas it. - Node.js, for the installer. Tested on Node v24.22.1. You only need
npx; nothing runs on Node after install. - A coding agent for the agent half — Claude Code, Cursor, or Codex. The CLI tools work standalone without one, and this tutorial uses them directly so you can see exactly what the agent would run.
- No account, no API key, no GPU, no cloud. Everything runs on your machine, on footage you never upload. About ten minutes, plus whatever footage you bring.
1. Install the skill#
One command installs the skill for Claude Code. Cursor, Codex, and all three at once are one flag away:
npx [email protected]          # Claude Code: ~/.claude/skills/ffmpeg-skill
npx ffmpeg-skill --cursor        # Cursor: ~/.cursor/skills/ffmpeg-skill
npx ffmpeg-skill --codex         # Codex: ~/.agents/skills/ffmpeg-skill
npx ffmpeg-skill --all           # all three
npx ffmpeg-skill --project       # ./.claude/skills/ffmpeg-skill, this project only
Pin the version, as above. The installer copies SKILL.md, the 42 scripts, the templates, and the MCP server into the agent's skills directory. Re-run it to refresh; copies are never updated automatically. Then check the machine:
npx ffmpeg-skill doctorffmpeg-skill 3.10.1 (this installed copy; re-run `npx ffmpeg-skill` to refresh it)
python 3.12.3; ffmpeg 8.1.2; ffprobe 8.1.2
ok: 86 capabilities available, 0 required missing, 2 optional missing
missing required: none
missing optional: external:parakeet, external:whisper
GPU-backed encoders in this build: 16 (only --hw / FFMPEG_SKILL_HW=1 use one)
fonts: 'DejaVu Sans' available; renders ja zh ko ar he hi bn pa gu ta te kn ml si th lo km my ru el; emoji noneThat is the whole readiness check: 86 capabilities present, nothing required missing. The two optional misses are the local speech engines for transcription — parakeet and whisper — which only matter if you ask caption.py --transcribe or silence.py --transcribe to turn speech into text. Everything in this tutorial works without them. doctor --json gives the per-tool answer if you want to know exactly which tool needs what.
2. Measure first: probe the footage#
Every job starts with probe.py. The agent decides from measured duration, frame rate, resolution, colour, and audio layout — never from the file name. To follow along without footage of your own, generate a synthetic clip with FFmpeg's own test sources:
mkdir -p footage out
ffmpeg -y -v error -f lavfi -i testsrc2=size=1280x720:rate=30:duration=10 \
  -f lavfi -i sine=frequency=440:duration=10 \
  -c:v libx264 -pix_fmt yuv420p -c:a aac -shortest footage/talk.mp4
That is a 10-second, 1280×720, 30 fps clip with a tone track — a stand-in for a talking-head recording. Swap in your own file and nothing below changes. The tools live in the installed skill directory; point a shell variable at them for the session:
S=~/.claude/skills/ffmpeg-skill/scripts
python3 $S/probe.py footage/talk.mp4
{
"file": "footage/talk.mp4",
"duration": 10.0,
"size_bytes": 3871253,
"video": {
"codec": "h264", "profile": "High",
"width": 1280, "height": 720,
"fps": 30.0, "pix_fmt": "yuv420p",
"nb_frames": 300, "hdr": false
},
"audio": { "codec": "aac", "channels": 1 }
}The probe is the whole point of the design: the file is 10.0 seconds, 1280×720, 30 fps, H.264 video with a mono AAC track. Every later step is decided from numbers like these, and every tool returns the same kind of JSON so an agent can read the result instead of parsing console text.
3. Cut the keepers#
Keep two segments — seconds 2–6 and 7–9 — and join them:
python3 $S/cut.py footage/talk.mp4 --segments 2-6,7-9 --accurate -o out/cut.mp4 --jsonThe --accurate flag matters, and it is the first place a hand-written FFmpeg command usually goes wrong. By default cut.py prefers a lossless stream copy, which snaps cuts to keyframes: with a 250-frame keyframe interval, a "2–6 s" cut could silently land on 0–8.3 s. --accurate re-encodes and trims to the frame. The JSON result says so explicitly — "segment_precision": ["frame", "frame"] and "reencode_reason": ["requested"] — and the file measures exactly as asked:
out/cut.mp4: h264, 1280x720, 30 fps, duration 6.000000Six seconds: four from the first segment, two from the second. The same tool handles single cuts (--start / --end), removals (--remove), smart cuts, and a 20 ms declick on audio joins by default.
4. Fit it to 9:16 and five seconds#
The destination is a vertical short, so the clip needs to be five seconds long and 9:16:
python3 $S/fit.py out/cut.mp4 --duration 5 --aspect 9:16 --fit crop -o out/fit.mp4 --jsonout/fit.mp4: h264, 406x720, 30 fps, duration 5.000000Two details worth noticing. First, the duration fit used the default --method speed: the six seconds were retimed to five with pitch-preserving audio, rather than trimmed. Pass --method trim to keep the first five seconds instead. Second, the frame is 406×720, not 1080×1920. fit sets the aspect ratio at the source height; it does not upscale to a delivery frame. The export preset does that. The crop is centred by default — there is no face or subject detection in this repo, so if the subject sits off-centre, pass --crop-x and --crop-y yourself. Alternatives to cropping are --fit pad (pillarbox) and --fit blur (the picture centred on a blurred copy of itself).
5. Export for Reels#
python3 $S/export.py out/fit.mp4 --preset reels -o out/reels.mp4 --jsonout/reels.mp4: h264, 1080x1920, 30 fps, duration 5.015000The preset did what a delivery preset should: scaled to the Reels frame (1080×1920, H.264 CRF 20, AAC 128k), set BT.709 colour tags, and enforced the 90-second maximum. Other presets follow the same pattern — tiktok and shorts are also 1080×1920 (600 s and 180 s caps), youtube is 1920×1080 CRF 18, linkedin is 1080×1080, facebook is 1920×1080, and x is 1280×720. export.py --list prints the full table.
But the export also came back with a warning:
loudness_outside_spec: loudness -21.9 LUFS / -15.3 dBTP is outside reels's
-14 LUFS / -1 dBTP; run loudness.py -I -14 --tp -1 on this file,
or export with --normalize
The video is right; the audio is 7.9 LUFS too quiet for the platform. A plain FFmpeg command would have exited 0 and said nothing. This is the step the skill exists for.
6. Let check.py catch the miss#
Before fixing anything, grade the file against the platform spec:
python3 $S/check.py out/reels.mp4 --platform reels --jsonduration PASS 5.01s
aspect PASS 9:16
resolution PASS 1080x1920
fps PASS 30
video codec PASS h264
pixel format PASS yuv420p
colour PASS bt709/bt709
file size PASS 1.5 MB
audio PASS aac 1ch 48000Hz
subtitles WARN none
loudness FAIL -21.9 LUFS (expected -14 ± 2 LUFS)
true peak PASS -15.3 dBTP
failed: 1, warnings: 1, ok: falseTwelve checks pass, one fails, and the failure names its fix. check.py grades duration, frame size, aspect, frame rate, codec, pixel format, colour tags, file size, loudness, and true peak against the chosen platform — Reels, TikTok, Shorts, YouTube, X, LinkedIn, Facebook, broadcast, or a custom spec. Apply the fix it suggested:
python3 $S/loudness.py out/reels.mp4 -I -14 --tp -1 -o out/reels-loud.mp4 --json
python3 $S/check.py out/reels-loud.mp4 --platform reels --json
loudness PASS -14.0 LUFS | true peak PASS -7.4 dBTP
failed: 0, warnings: 1, ok: trueThe only remaining warning is "subtitles: none" — a note, not a failure. The file now passes every check check.py can measure. Note what the tool does not claim: whether the picture looks right. Each writing tool lists the properties it did not measure under unverified — framing, caption legibility, colour grade — and points you at the next step to judge those yourself.
7. Look at the result#
python3 $S/look.py out/reels-loud.mp4 -o out/contact.jpgcontact sheet: 12 frames every 0.42s
wrote out/contact.jpglook.py pulls frames across the clip into a contact sheet — 12 frames here, one every 0.42 seconds — so the agent (or you) can see whether the crop kept the subject in frame and the captions, if any, are legible. It is the skill's answer to the one thing measurement cannot do: judge the picture. The --safe flag draws a platform's UI safe zones on the sheet, so you can see whether a caption will sit under TikTok's description bar or behind the like column. Open the sheet before you deliver; the whole workflow is built around that pause.
8. Hand the tools to your agent over MCP#
The scripts above are what the agent runs. Over MCP, the same tools appear as callable functions. Start the server:
npx ffmpeg-skill mcpIt speaks MCP over stdio. A tools/list call advertises the core 12 by default — audio, caption, check, cut, export, fit, graphics, look, loudness, probe, render, silence — to keep client context small. Set FFMPEG_SKILL_MCP_FULL=1 and it lists all 42. The other 30 stay reachable by name through tools/call either way. Both counts verified here: 12 by default, 42 with the flag.
One gotcha, found the hard way: MCP arguments use the scripts' argparse names, not the names you might guess. My first tools/call passed {"input": "footage/talk.mp4"} and got probe.py: error: unrecognized arguments: --input. The positional is inputs, and media paths must be absolute:
{"name": "probe", "arguments": {"inputs": ["/home/you/footage/talk.mp4"]}}That call returns the same measured JSON as the CLI — duration 10.0, 1280×720, 30 fps. The server's own instructions say this, but it is the kind of detail that costs an agent a turn if you don't know it.
Two other things the agent cannot do through these tools: pass raw FFmpeg arguments or a filter_complex — no script accepts them, and MCP's argv array carries only the script's own CLI flags. And the machine-readable contract behind all of it is one command away:
npx ffmpeg-skill contract --json | python3 -c "import json,sys; print(len(json.load(sys.stdin)['tools']), 'tools')"42 toolsThe contract states, for every tool, what it takes, what it writes, which FFmpeg components it needs, and how the result is verified — and it is derived from the same argparse parsers that define the CLIs, so documentation and code cannot drift apart quietly.
9. Ship the same edit to every platform#
Once the single-platform loop works, the project file is the multiplier. render.py takes a template and renders every destination from the same edit:
python3 $S/render.py --list-templatestemplate frame fit max loudness safe zones
reels 1080x1920 crop 90s -14 LUFS top 0.08, bottom 0.20, left 0.05, right 0.12
shorts 1080x1920 crop 180s -14 LUFS top 0.06, bottom 0.18, left 0.05, right 0.12
tiktok 1080x1920 crop 600s -14 LUFS top 0.10, bottom 0.22, left 0.05, right 0.14
youtube 1920x1080 pad 43200s -14 LUFS top 0.05, bottom 0.05, left 0.05, right 0.05
linkedin 1080x1080 crop 600s -14 LUFS top 0.05, bottom 0.05, left 0.05, right 0.05
x 1280x720 pad 140s -14 LUFS top 0.05, bottom 0.05, left 0.05, right 0.05
podcast audio - - -16 LUFS noneEach template carries its own frame, fit, duration cap, loudness target, and safe zones — TikTok's captions sit above its description bar and clear of its like column, which is why its bottom safe zone is 0.22. render.py talk.mp4 --template all renders the seven video destinations from one edit and writes a <name>_pack.md table of what each one produced. A --dry-run prints every planned command before anything is written.
When to use this vs alternatives#
| Approach | Use it when | Watch out for |
|---|---|---|
| ffmpeg-skill | An agent edits real footage on your machine and you want every step measured and checked | Transcription needs a local engine; no face tracking; Apple-only GPU encode |
| Raw FFmpeg in the agent's hands | One-off commands you write and verify yourself | Agents guess flags and report success without checking the output |
| Cloud editors (CapCut, Descript, etc.) | You want a GUI, collaboration, or hosted transcription | Footage uploads, subscriptions, and no agent-readable contract |
| Remotion | You render video from React components | It renders; it doesn't edit footage — the two complement each other, and remotion-ffmpeg-skill joins them |
The honest comparison is with the first row's alternative: an agent with shell access and FFmpeg already can cut video. What ffmpeg-skill adds is the verification loop — the probe before, the re-measurement after, the platform check, and the contact sheet — plus a contract that stops the agent inventing flags. In the project's own 100-prompt agent evaluation, the agent made no raw FFmpeg calls and reported no false successes.
Honest limitations#
- Transcription is bring-your-own-engine.
caption.py --transcribeandsilence.py --transcribeneed Parakeet or a Whisper install; the first run downloads model weights. Without one, both refuse with the install line instead of guessing. Both also take a transcript you already have. - Nothing detects a face, product, or subject. Crops centre by default;
cropdetect.py --motion-centrereports where motion sat each second, but choosing what stays in frame is the caller's job. - GPU encoding is Apple-only and opt-in. VideoToolbox on Apple Silicon, via
--hworFFMPEG_SKILL_HW=1. NVENC, QSV, VAAPI, and AMF are reported bydoctor --jsonwhen the build has them, but no tool encodes with them. - No raw FFmpeg escape hatch. If a job needs a filter graph the tools don't expose, you write that command yourself — deliberately. The skill's position is that an unmeasured step is worse than a refused one.
- Burned-in text removal is narrow.
redact.py --mode delogofills a still, known rectangle from the surrounding picture. A moving logo or burned-in subtitles that change position are out of scope.
The takeaway#
ffmpeg-skill is not a video editor. It is a discipline for letting an agent edit video: measure first, use one typed tool per job, re-measure the output, grade it against the platform, and look at frames before you ship. The install is one npx command, the whole loop runs offline with no account and no API key, and the failure mode it prevents — a confident agent handing you a file it never checked — is the one that costs real time. Start with the loop above on a clip of your own, then let the agent run it: the prompt is one sentence — "take this clip, keep the best minute, and make it a Reel" — and the tools do the rest, with receipts.
Sources#
- kajisho5/ffmpeg-skill on GitHub — README, FAQ, tool reference, and CHANGELOG (v3.10.1, November 15, 2026)
- ffmpeg-skill on npm — installer package, version 3.10.1