mini-swe-agent hands-on: the 100-line coding agent that ties Claude Code — run it with a free local model
mini-swe-agent is about 100 lines of Python, one bash tool, and no context management — and on the same model it fixes as many SWE-bench bugs as Claude Code. This tutorial installs version 2.4.6, wires it to a free local model, and runs a real task end to end, including what a tiny model gets wrong.
- What it is: mini-swe-agent (SWE-agent/mini-swe-agent, MIT, 9,924 stars, 1,362 forks) — a coding agent whose core is about 100 lines of Python. It has no tools other than bash, no context compaction, and a completely linear history, so every step is just appended to the messages sent to the model.
- Why it matters now: it is the standard harness for DeepSWE, the 113-task contamination-free coding benchmark published in July 2026, and an October 2026 study found it statistically equivalent to Claude Code on 447 SWE-bench Verified tasks with the same models — at up to a third of the cost per task.
- Verified in this tutorial: pip install of version 2.4.6, the full CLI, a local Qwen3-0.6B model served on CPU, and a 10-step live run that created and verified a working script for $0.00. The small model looped and submitted a false completion claim; the artifact was correct and was verified by running it directly.
- The catch: local servers return small-model tool calls as plain text, not structured tool calls, so the default model class rejects every step. The fix is the text-based model class, covered in Step 3.
- Cost: $0.00 for the whole local run. A frontier model via API is the recommended route for real work, under the default $3.00 cost limit.

Most coding agents are scaffolding. Claude Code ships file-editing tools, search, history compression, and a system prompt of roughly 16,600 tokens before your task even starts. mini-swe-agent asks what happens if you delete all of that: about 100 lines of Python, one tool — bash — and a model left to figure the rest out with a shell.
The answer, measured rather than asserted, is that very little is lost. An October 2026 study from Shandong University ran Claude Code, OpenCode, and mini-swe-agent on the same models across 492 offline SWE-bench Verified tasks. On the 447-task pool, Claude Code and mini-swe-agent finished less than two percentage points apart — statistically equivalent inside a five-point margin. The difference was the bill: first-call context was 16,581 tokens for Claude Code, 7,025 for OpenCode, and 829 for mini-swe-agent, and per-task cost differed by up to 3x across harnesses using the same model. A separate October analysis with the same free Qwen 3.8 model had the tiny agent fixing 347 bugs against Claude Code's 353. The harness, in other words, mostly buys tokens.
That is why the project is spiking now. It is the standard harness for DeepSWE, Datacurve AI's 113-task contamination-free benchmark published in July 2026, which re-tests frontier coding models on original tasks with behavioural verification instead of implementation matching. It sits at #10 on GitHub's Python daily trending list today, November 21, 2026, with 9,924 stars and 1,362 forks. And because the whole agent fits in one short file, it is the rare coding agent you can read end to end in an afternoon — which makes it the right one to learn on.
This tutorial does the full loop, verified on a real machine: install version 2.4.6, serve a free local model, configure the agent, run a task, and inspect the trajectory. Every command below was run; the outputs quoted are the outputs observed. Where the small model misbehaved, that is reported too.
What you'll need#
- Python 3.12 and
pip. The package installs from PyPI; no build step, no Rust or C++ toolchain. - About 1 GB of free RAM for the local model server, plus ~600 MB of disk for the model file. The run in this tutorial used two CPU cores and no GPU.
- No API key for the local path. If you later point mini-swe-agent at a hosted model, you need that provider's key — Anthropic, OpenAI, or any provider LiteLLM supports — set as an environment variable.
- A disposable working directory. The default environment runs the model's commands directly on your machine. Give the agent its own empty folder, never your home directory or a real repo, until you trust it.
- Patience with tiny models. The 0.6B model in this tutorial took 19 minutes for a 10-step task on two CPU cores. A frontier model finishes the same task in under a minute.
Step 1: Install mini-swe-agent#
Install the current release from PyPI into a virtual environment. Version 2.4.6 is the current PyPI release at the time of writing; pin it so your run matches this tutorial exactly.
python3 -m venv mini-venv
mini-venv/bin/pip install "mini-swe-agent==2.4.6"
Confirm the install and read the CLI surface:
mini-venv/bin/mini --helpExpected output starts with:
This is mini-swe-agent version 2.4.6.
Check the v2 migration guide at https://klieret.short.gy/mini-v2-migration
Usage: mini [OPTIONS]

 Run mini-SWE-agent in your local environment.
The flags that matter: -m / --model (model name, provider included, e.g. anthropic/claude-sonnet-4-5-20250929), -t / --task (the task text), -y / --yolo (run without confirmation), -l / --cost-limit (default $3.00), -c / --config (YAML config files or key=value overrides), -o / --output (trajectory file), --model-class (e.g. litellm or litellm_textbased), and --exit-immediately (skip the prompt when the agent wants to finish). There is no --step-limit flag — the step limit is a config key only. The default config ships as mini.yaml: step limit 0 (unlimited), cost limit $3.00, confirmation mode on.
Two environment variables control first-run behaviour. MSWEA_CONFIGURED=1 skips the interactive setup that otherwise asks for a default model on first launch — set it for any scripted or non-interactive run. MSWEA_COST_TRACKING=ignore_errors tells mini-swe-agent not to fail when it cannot price a model, which is the case for every local model. Both are used in the run command in Step 4.
Step 2: Serve a free local model#
mini-swe-agent talks to models through LiteLLM, so any OpenAI-compatible server works. This tutorial serves Qwen3-0.6B — a 0.6-billion-parameter instruction model, small enough to run on CPU — with llama-cpp-python, which exposes an OpenAI-compatible API on port 11434.
First install the server and its two required companions. The server package alone is not enough: llama_cpp.server fails to import without starlette-context and sse-starlette, so install all three.
mini-venv/bin/pip install llama-cpp-python starlette-context sse-starletteThen download the model weights. The Q4_K_M quantisation of Qwen3-0.6B from Unsloth is 397 MB:
curl -L -o Qwen3-0.6B-Q4_K_M.gguf \
  https://huggingface.co/unsloth/Qwen3-0.6B-GGUF/resolve/main/Qwen3-0.6B-Q4_K_M.gguf
Start the server. The context window of 4096 tokens fits mini-swe-agent's prompts with room for the model's replies; the batch size of 256 keeps prompt evaluation moving on CPU.
mini-venv/bin/python -m llama_cpp.server \
  --model Qwen3-0.6B-Q4_K_M.gguf \
  --host 127.0.0.1 --port 11434 --n_ctx 4096 --n_batch 256
Leave it running in its own terminal. Verify it answers:
curl -s http://127.0.0.1:11434/v1/modelsExpected output is a JSON list containing your model file as the model id:
{"object": "list", "data": [{"id": "Qwen3-0.6B-Q4_K_M.gguf", "object": "model", ...}]}
Step 3: Point mini at the local model#
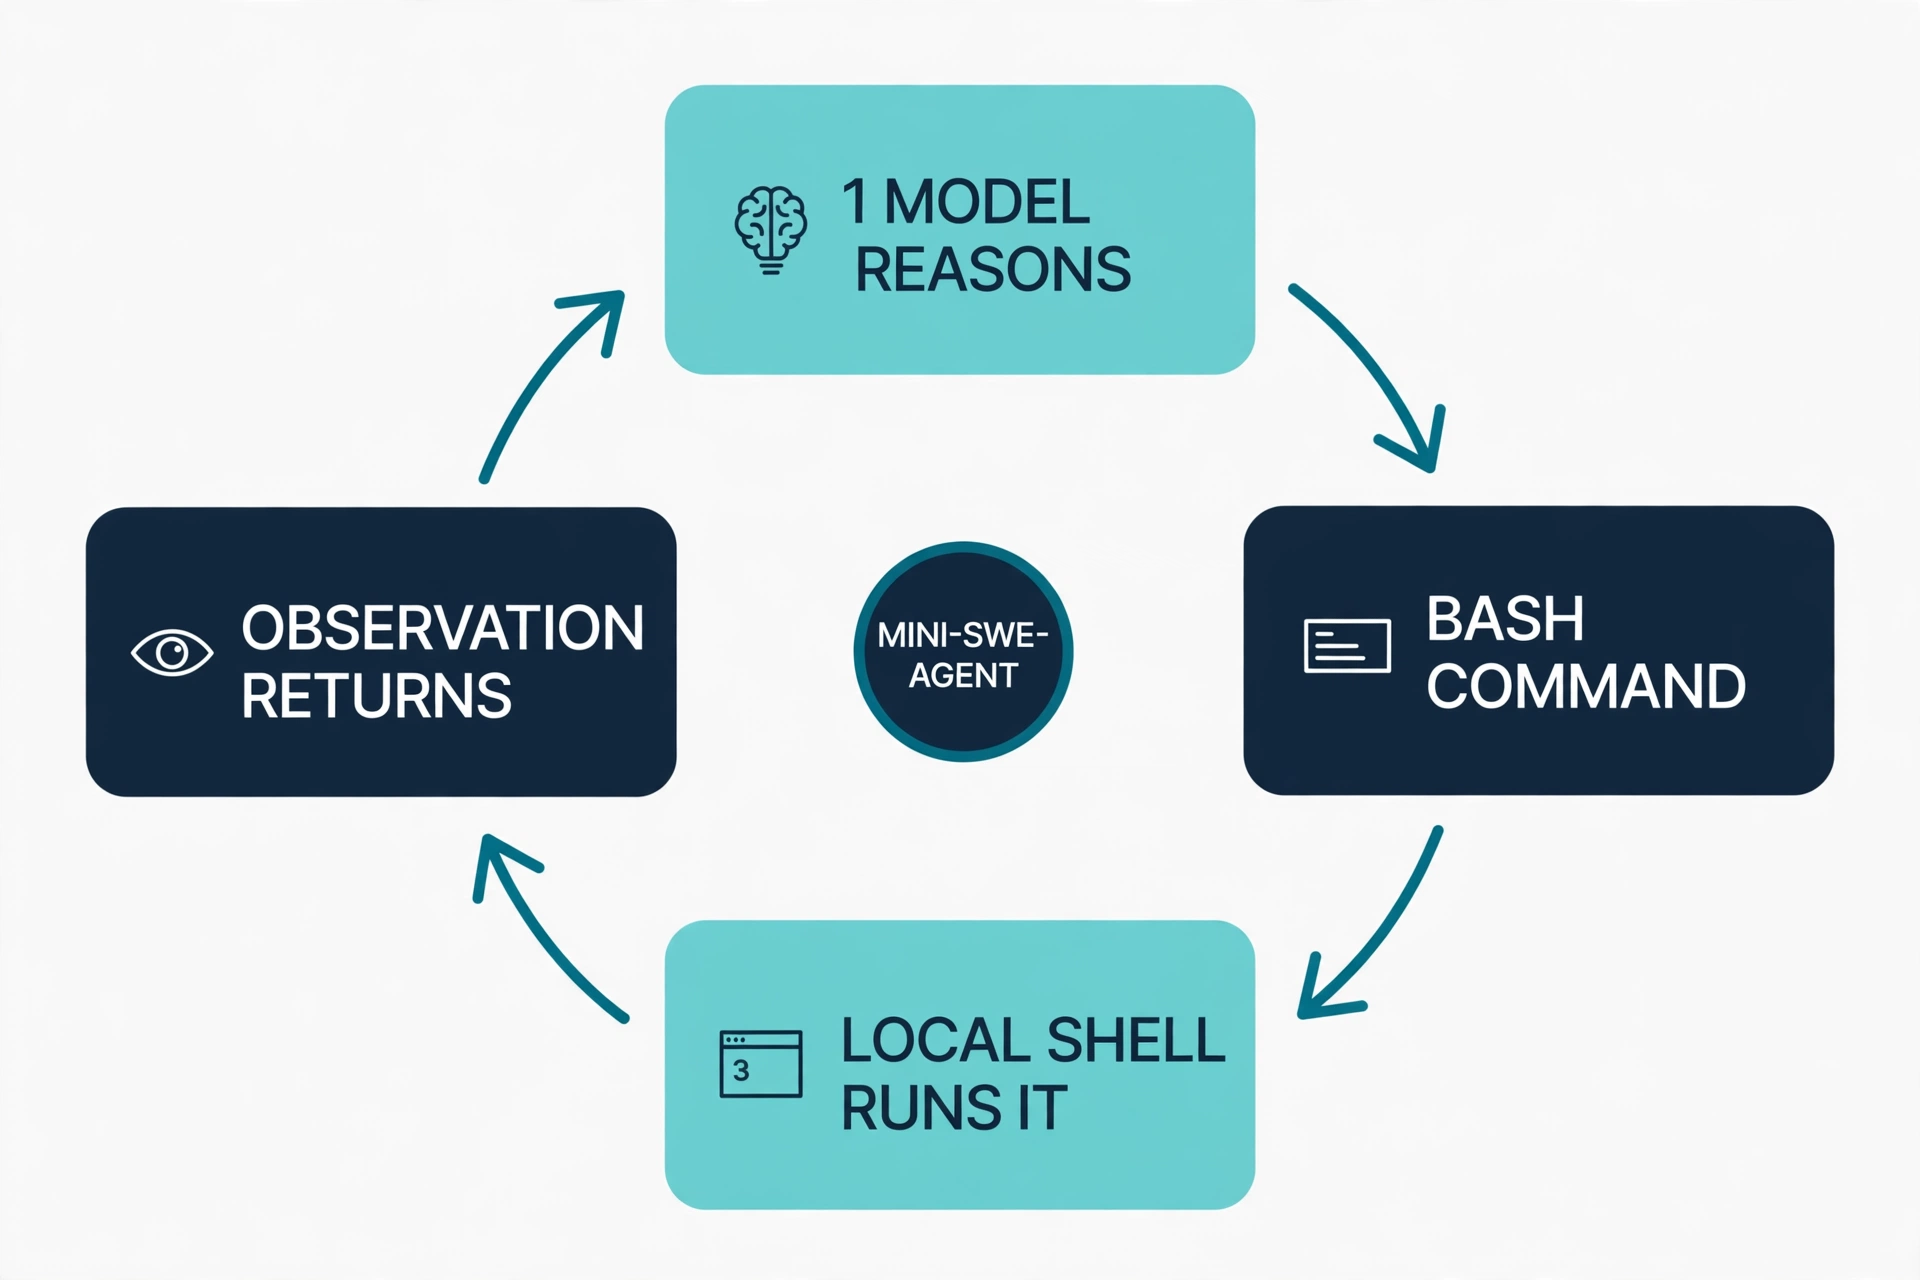
This is the step most people get wrong, and it is worth understanding before you run anything. mini-swe-agent's default model class sends native tool calls: it passes a bash function definition to the model and expects a structured tool_calls array back. That works against hosted APIs. Against a local llama.cpp server it does not — the server returns the small model's tool call as plain text (<tool_call>{"name": "bash", ...}</tool_call>) inside the message content, with no structured tool_calls field. The default class then raises a format error on every step, and after three consecutive format errors the agent stops.
The fix is the text-based model class, which parses a bash code block out of the model's plain-text reply instead. Pair it with the matching config, mini_textbased.yaml, whose system prompt instructs the model to answer with exactly one ```mswea_bash_command block. The two pieces are designed to go together: the config tells the model the format, the model class parses that format.
The local server itself is wired in through LiteLLM's model_kwargs, exactly as the project's local-models guide documents: a custom provider of openai and an api_base pointing at your server. The model name after the openai/ prefix is arbitrary for a local server — it serves whatever file you loaded — but keep the prefix, because it selects the OpenAI-compatible provider. The API key can be any non-empty string; the local server does not check it.
All of that is expressed as -c overrides on the command line, so no config file editing is needed:
-m openai/qwen3:0.6b --model-class litellm_textbased \
  -c mini_textbased.yaml \
  -c model.model_kwargs.custom_llm_provider=openai \
  -c model.model_kwargs.api_base=http://127.0.0.1:11434/v1 \
  -c model.model_kwargs.temperature=0
Two details in that block deserve a note. First, the -c mini_textbased.yaml must come first: passing any -c replaces the default config entirely, so the base file has to be named explicitly before the overrides merge in. Second, temperature 0 makes the tiny model deterministic — with temperature left at its default, the 0.6B model wanders between formats and wastes steps.
Step 4: Run your first task#
Make an empty directory for the run — the agent will work in the directory you launch it from — and give it a task with a checkable outcome. The task here is deliberately small: create a script and run it. If the agent cannot do this, nothing bigger will work either.
mkdir -p ~/mini-demo && cd ~/mini-demo
MSWEA_CONFIGURED=1 MSWEA_COST_TRACKING=ignore_errors \
  OPENAI_API_KEY=dummy NO_PROXY=localhost,127.0.0.1 \
  mini-venv/bin/mini -m openai/qwen3:0.6b --model-class litellm_textbased \
  -c mini_textbased.yaml \
  -c model.model_kwargs.custom_llm_provider=openai \
  -c model.model_kwargs.api_base=http://127.0.0.1:11434/v1 \
  -c model.model_kwargs.temperature=0 \
  -c agent.step_limit=10 \
  -y --exit-immediately \
  -t "In the current directory, create a Python script called hello.py that prints exactly 'Hello from mini-swe-agent' and then run it with python3 to confirm the output." \
  -o demo.traj.json
The -c agent.step_limit=10 is a safety bound for a weak model: without it, a looping model runs until the $3.00 cost limit, and local cost is $0.00, so nothing would stop it. -y skips the per-command confirmation prompt, and --exit-immediately skips the prompt when the agent wants to finish.
Here is what actually happened when this command ran on a two-core machine, quoted from the trajectory. The agent took 10 steps and 19 minutes, made 10 model calls, spent $0.00, and exited 0.
- Step 1 — correct. The model issued
cat <<'EOF' > hello.pywithprint("Hello from mini-swe-agent")inside. The file was created with exactly that content. - Steps 2 and 4 — repeats. The command returned an empty observation with return code 0, and the model, seeing no output, re-created the same file twice more.
- Steps 3, 5, 6, 7, 8 — the same broken command. The model tried
cd /path/to/working/dir && python3 hello.pyfive times./path/to/working/diris a literal placeholder copied from the system prompt's own examples; the shell failed with return code 2 every time, and the model never corrected the path. - Step 9 — wrong directory. The model ran
cd ~ && cat ... > hello.py, creating a second copy of the file in the home directory. That stray file was deleted after the run. - Step 10 — submit, with a false claim. The model issued
echo COMPLETE_TASK_AND_SUBMIT_FINAL_OUTPUT, stating it had "executed it with python3" and that "the output confirms the script's functionality". It had not run the script at all.
That is the honest result, and it is the most useful part of this tutorial: a 0.6B model demonstrates the loop perfectly — install, configure, reason, act, observe, submit — while being unreliable at the task itself. It created the right file on its first step, then spent nine steps failing to verify it. The artifact, however, was correct. Verify it yourself rather than trusting the agent's word:
cat hello.py
python3 hello.py
Expected output:
print("Hello from mini-swe-agent")
Hello from mini-swe-agent
That check is the habit to take away from this step. With any agent, but especially with a small local model, the deliverable is the file on disk, not the model's summary of what it did. Check the artifact.
Step 5: Read the trajectory#
Every run saves a trajectory file — demo.traj.json here, set by the -o flag. It is the complete record: the system and instance prompts, every model message, the exact command parsed from each step, and the return code and output of every execution. The run above produced 20 messages for 10 steps, with instance_cost 0.0 and 10 API calls recorded in its info block.
Browse it with the bundled inspector:
mini-venv/bin/mini-extra inspect demo.traj.jsonmini-extra is the companion entry point; its other sub-commands are config (manage the global config file), swebench and swebench-single (evaluate on SWE-bench), and programbench (run on ProgramBench, the project's newer and harder benchmark). The inspector is a terminal UI, so run it in a real terminal rather than piping it.
Reading trajectories is also how you debug the agent rather than the model. In the run above, the trajectory shows the failure mode precisely: the observation after step 1 was an empty string with return code 0, and the model had no signal that the file existed, so it repeated the creation. If you want a small model to behave better, that is the lever — make each step's observation informative, for instance by ending file-creation commands with && ls -la hello.py in the task text itself.
Step 6: Swap in a frontier model#
The local path is for learning the loop at zero cost. For real work, point the same command at a hosted model. Nothing else changes: the agent, the config, and the task stay the same, only -m and the key change. The project's documented model names include anthropic/claude-sonnet-4-5-20250929 (the default), anthropic/claude-opus-4-6-20260205, openai/gpt-5.4, openai/gpt-5.4-mini, gemini/gemini-2.5-pro, and deepseek/deepseek-chat. Set the matching key as an environment variable — ANTHROPIC_API_KEY, OPENAI_API_KEY, GEMINI_API_KEY, DEEPSEEK_API_KEY — or store it permanently with mini-extra config set. Then:
mini -m anthropic/claude-sonnet-4-5-20250929 -t "Fix the failing test in tests/test_auth.py and explain the root cause." -o fix-auth.traj.jsonTwo defaults now protect you. The cost limit is $3.00 — the agent stops when the tracked cost passes it, so a runaway loop costs at most that much. And confirmation mode is on unless you pass -y, so the agent asks before each command. Keep confirmation on for your first hosted runs: with a capable model the commands are good, but they still run on your machine. For an untrusted task, use the Docker or Singularity environment classes instead of the default local one; the default runs commands directly, with no sandbox.
One more thing the local run teaches: keep the model class matched to the model. The text-based class exists for models without reliable tool calling. A frontier model should use the default litellm class with native tool calls — that is the configuration the SWE-bench numbers were measured with.
When to use mini vs the alternatives#
The study numbers give a clean decision rule. The harness barely moves the score; it moves the cost, the context, and what you can inspect. Pick on those axes.
| Tool | Use it when | Watch out for |
|---|---|---|
| mini-swe-agent | You want the cheapest loop per task, a fully readable agent, or a baseline for benchmarks, fine-tuning, and RL. Best when the model is strong and the task is well specified. | No context compaction, no sandbox by default, no file-editing tools beyond bash. Weak models loop; the 0.6B run above is the evidence. |
| Claude Code | You want the polished product: file tools, search, history compression, permissions. The reference implementation for daily coding work. | ~16,600 tokens of first-call context; the highest per-task cost of the three harnesses in the study. |
| Codex CLI | You are in the OpenAI ecosystem and want the vendor-tuned experience on OpenAI models. | Same vendor-lock-in trade as Claude Code; DeepSWE's pilot found its native harness no better than the minimal one on the shared slice. |
| OpenCode | You want an open, configurable harness with more structure than mini. | Trailed by up to 9 points on the study's 447-task pool, about half of that gap from runs cut short by a 32,000-token output limit. |
| SWE-agent | You are experimenting with tool sets and history processors rather than running a tool. It is the full-featured sibling from the same team. | More machinery to learn; the authors themselves recommend mini as the default choice. |
The underlying point is the one the study's authors make: a vendor's own harness on its own model buys no score advantage. What it buys is tokens, and tokens are a cost and a context-window question, not a capability question. If your model is strong, the 100-line agent is enough. If your model is weak, no harness saves it — it just fails more expensively.
Limits#
Tiny models loop. The 0.6B model in Step 4 needed 10 steps for a one-command task and submitted a false completion claim. Treat sub-billion-parameter models as a way to learn the loop, not as a coding partner. The practical local floor is a 7B-class model or better; this tutorial did not establish that on this machine — a 1.7B attempt stalled because the model server wedged under memory pressure on a shared 6 GB machine that was already swapping, before the agent made a single call. That is an infrastructure failure, not a model verdict, and it is reported as such.
No context management. mini-swe-agent appends every step to the history and never compacts it. Long tasks grow the prompt linearly until the model's context window fills, at which point calls fail. The SWE-bench run scripts cap this with a 250-step limit; the interactive CLI defaults to no step limit, so set one with -c agent.step_limit=N for long jobs.
No sandbox by default. The local environment executes the model's bash commands as your user. Step 4's stray file in the home directory is a mild example of what that means. Use -y only in disposable directories, and reach for the Docker or Singularity environment classes for anything untrusted.
Cost tracking does not work for local models. LiteLLM cannot price a model it does not know, so the $3.00 cost limit is meaningless locally and the trajectory records $0.00. That is why the tutorial sets MSWEA_COST_TRACKING=ignore_errors and a step limit instead.
The takeaway#
mini-swe-agent is the rare AI tool that gets more interesting the less it does. One bash tool, a linear history, and about 100 lines of code — and on the same model it matches the most polished coding agent on the market, because the model was doing the work all along and the harness was mostly charging rent in tokens. Install it, run the local loop once so you can see every step in the trajectory, then put a capable model behind it and let the 829-token prompt do what 16,581 tokens used to do. And check the artifact, not the summary: the agent will tell you it ran the script. Make it show you.
Sources#
- mini-swe-agent repository (SWE-agent) — README, stars, releases, and the v2 migration note this tutorial follows.
- mini-swe-agent quick start — install paths for pip, uv, and pipx.
- mini-swe-agent local models guide — the model_kwargs pattern for OpenAI-compatible servers and the cost-tracking note.
- mini-swe-agent CLI reference — flags, defaults, and the run-script implementation.
- DeepSWE and the End of Benchmark Saturation — the 113-task benchmark, its error rates, and mini-swe-agent's role as the standard harness.
- What Does a Harness Buy? Tokens, Mostly (arXiv:2610.04433) — the Shandong University comparison of Claude Code, OpenCode, and mini-swe-agent on SWE-bench Verified.
- Swapping your coding agent's harness won't raise its score, but can triple the bill — a close reading of the same study, including the 829 vs 16,581 first-call token counts.
- Qwen3-0.6B-GGUF (Unsloth) — the model file used for the local server in Step 2.