Turn any photo into an animatable 3D model: hands-on with img2threejs, the 17K-star image-to-code pipeline
img2threejs is an Apache-2.0 agent skill that rebuilds objects from a single photo as procedural Three.js code — quality-gated, staged, and self-correcting. We installed the skill, the img2 harness, ran its 1,364-test suite, and executed its intake gates for real. Every command verified.

Point a frontier model at a photo of a mug and ask for a 3D model, and you will get one of two disappointments: a hosted API that hands back a static mesh you cannot edit, or a confident lump of generated geometry — wrong in the small details, impossible to rig, fused into a single inert blob. The distance between "looks like a mug" and "a mug you can actually use in a scene" is where most image-to-3D demos quietly end.
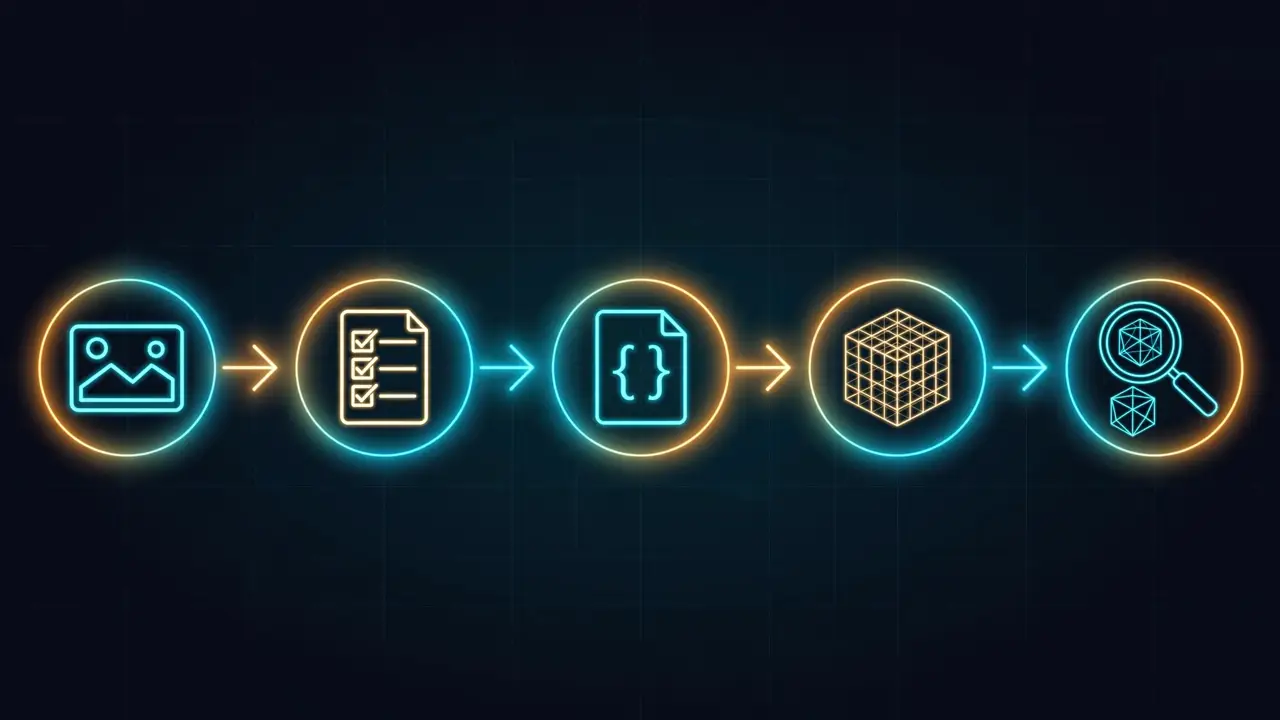
img2threejs (img2threejs/img2threejs) lives in that gap. It is an agent skill — a protocol plus scripts that your coding agent executes — that rebuilds the object in a reference photo as procedural Three.js code: primitives, procedural shaders, and generated geometry, assembled pass by pass through a staged, quality-gated pipeline with an AI-vision self-correction loop. The output is a THREE.Group factory with a runtime hierarchy of pivots, sockets, and colliders, ready to animate. No photogrammetry, no mesh extraction, no downloaded art packs — that is the project's explicit core promise, and it shapes every design decision downstream.
The numbers explain why it is blowing up right now: 17,325 stars, 1,449 forks, and 102 commits as of October 1, 2026, on a repository created July 15 — and roughly 1,300 of those stars arrived in the last week alone. Version 2.0.0 shipped September 5 with a plugin ecosystem, and the live demo gallery at img2threejs.io shows the results running in a browser: CS2 weapon skins, a BMX bike, Sony earbuds, a rigged low-poly humanoid. The license is Apache 2.0. In this tutorial you install the skill, the plugin harness, and the deterministic intake gates, run every one of them for real, and then hand the creative half to your coding agent exactly as the skill prescribes. Every command below was actually executed; the outputs shown are the outputs observed.
1. Why this is not another image-to-3D demo#
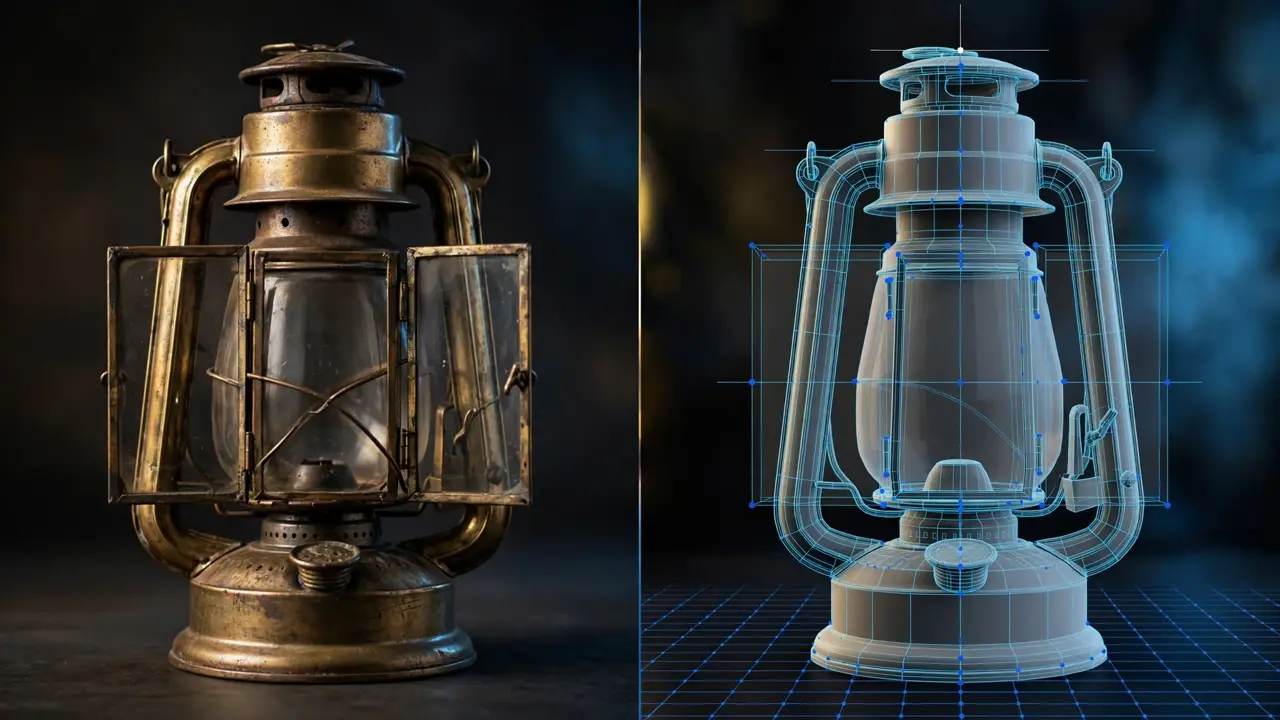
Conventional image-to-3D (TRELLIS, Tripo, photogrammetry pipelines) produces mesh soup: dense static geometry with baked textures. It renders fine in a turntable and falls apart the moment you want to open the lantern door, swap a material, or animate a joint — because there is no structure, only surface. Editing means re-running the generator or hand-sculpting in Blender.
img2threejs inverts the trade. Because the model is code — a TypeScript factory your agent writes — the result is editable, version-controllable, tiny compared to a mesh, and structured from the start: named components, material entries, pivots you can rotate, sockets you can attach things to. A door is a door because the spec says so, not because a texture suggests one.
The second difference is the token-efficiency design, and it is the reason the project resonates with agent-tooling people rather than just 3D people. All validation, gating, detail counting, and state tracking run as deterministic Python scripts (standard library only — no Pillow, no numpy, no Playwright). Model tokens are spent only on three things: visual judgment, authoring the spec, and writing code. The repo's own cost model (docs/TOKEN_COST.md) puts a full object reconstruction at roughly 80k–180k model tokens, with the render-review loop as the dominant cost (~5k–12k per cycle) — and it is explicit that these are engineering estimates from one reference build, not a measured benchmark. The gates are the savings mechanism: a strict-quality gate blocks code generation on an underspecified spec, and each avoided bad render saves roughly a full review cycle.
2. What you'll need#
- An agent host that executes skills — Claude Code, Codex, or OpenCode. The skill is agent-agnostic; wherever its docs say "agent vision", it uses whatever the host provides (native image reading, a browser MCP, or a screenshot you supply). The install and validation steps below need no model at all.
- git and Python 3.10+ — the forge scripts use the standard library only. Nothing to pip-install.
- Node.js with npx — only for the optional
img2plugin harness in Step 2. - One reference photo of a single object. Sharper is better; a plain background helps the intake gates. One clear view is enough to start — the pipeline records unseen areas as low-confidence rather than inventing them.
- No API key, no account, no GPU, no cost. The skill calls no model itself; your agent host supplies the intelligence, and the deterministic tooling runs on any machine. Budget the token estimate above (80k–180k per object) before pointing it at something complex.
3. Step 1 — Install the skill#
Installation is a clone into your agent's skills directory. The skill's contract file (SKILL.md) is the always-loaded router: it holds the order of operations and every hard rule as one line, with the full contract behind each rule living in the grimoire/ or docs/ file that rule names.
git clone https://github.com/img2threejs/img2threejs.git ~/.claude/skills/img2threejs
ls ~/.claude/skills/img2threejs
# CHANGELOG.md  CLAUDE.md  SKILL.md  docs/  forge/  grimoire/  integrations/  scripts/  skills/
If you run more than one host, the README recommends keeping a single checkout and pointing each host at it with a symlink, so the hosts cannot drift apart:
ln -s ~/.claude/skills/img2threejs ~/.codex/skills/img2threejs
ls -la ~/.codex/skills/img2threejs
# ... -> /home/you/.claude/skills/img2threejs
Verify the checkout is intact by confirming SKILL.md opens with the frontmatter (name: img2threejs, version: 2.0.0, Apache-2.0 license line). That file is what your agent will actually follow.
4. Step 2 — Install the img2 plugin harness#
Domain knowledge — CS2 weapon skins today, animated characters, image-to-GLB emission — lives in installed plugins, not in the base checkout. The img2 harness manages that registry. Install it straight from GitHub:
npx github:img2threejs/img2 install
# img2 home : /home/you/.img2
# harness   : https://github.com/img2threejs/img2
#   cloned    https://github.com/img2threejs/img2 -> /home/you/.img2/harness
#   launcher  /usr/local/bin/img2 -> /home/you/.img2/harness/bin/img2.mjs
# install: ok
(In a non-interactive shell, add --yes twice — once for npx, once for the installer: npx --yes github:img2threejs/img2 install --yes.) Then run the fail-loud static audit:
img2 doctor
# doctor: ok (0 plugin(s), 0 warning(s))
With zero plugins installed, the generic and character profiles are available. Add a domain plugin and the harness pins it by tag and SHA and links it into every host's skills directory:
img2 add img2threejs/plugin-cs2
# added cs2 0.1.2 (v0.1.2 @ bee5766)
The design choice worth noticing: a profile whose plugin is missing fails loud naming what is installed — it never silently downgrades to the generic pipeline. That fail-loud behavior runs through the whole project and is a large part of why developers trust it.
5. Step 3 — Open a reconstruction workspace#
Conversation context is disposable; the local state file is the authority. Every reconstruction starts by initializing a checklist, then gating every step through it. Create a project directory, point the initializer at your reference photo, and pick a profile (generic for objects, character for people and creatures):
mkdir mug-build && cd mug-build
python3 ~/.claude/skills/img2threejs/forge/state.py init \
  --state .img2threejs/state.json \
  --reference photo.png \
  --profile generic \
  --spec object-sculpt-spec.json
# STATE status=active step=image-analysis pass=none loop=0/3 total=0/6
# next command: Read grimoire/intake/image_analysis.md and analyze photo.png
# pending mandatory steps:
# - image-analysis
# - reference-suitability
# - reference-admission
# - local-spec-search
# ... (17 more)
At every start, resume, and correction iteration, the agent runs next.py first. It reports the ordered checklist, the exact next command, evidence status, and the bounded correction-loop counters — and it never replaces the spec and pass gates:
python3 ~/.claude/skills/img2threejs/forge/next.py --state .img2threejs/state.json
# LOCAL_STATE status=active step=image-analysis pass=none loop=0/3 total=0/6
# next command: Read grimoire/intake/image_analysis.md and analyze photo.png
Two rules govern this loop and you should internalize them before supervising a build: every completed step needs evidence (a non-applicable step is marked skipped only with a --reason — silent omission is forbidden), and a hard stop (exit code 3, or status=stopped) means the agent reports the reason and asks you for input instead of continuing from memory. Loop counts come from the recorded review history, not from the agent's recollection: 3 corrections per pass, 6 total.
6. Step 4 — Run the intake gates yourself#
Before any tokens are spent, the pipeline probes the reference image deterministically. You can run these gates by hand — useful both for understanding the system and for pre-screening photos. First, the technical probe:
python3 ~/.claude/skills/img2threejs/forge/stage1_intake/probe_image.py photo.png{
"path": "photo.png",
"type": "png",
"width": 256,
"height": 256,
"aspectRatio": 1.0,
"technicalSuitability": "conditional",
"warnings": [
"low resolution; small geometry/material details may be unreliable"
],
"note": "This is only technical image probing. Semantic object suitability still requires visual inspection."
}Then the admission gate — the check that stops the review loop from ever comparing a render against junk (empty masks, fragmented subjects, too-small crops, duplicate angles that add no information):
python3 ~/.claude/skills/img2threejs/forge/stage1_intake/check_reference_admission.py photo.png --json{
"admitted": true,
"reasons": [],
"provenance": {
"viewpoint": "reference",
"width": 256,
"height": 256,
"foregroundCoverage": 0.2765,
"largestComponentFraction": 1.0,
"pHash": 18347927152989088514,
"duplicateOfHash": null
}
}A reference that fails is rejected with a reason at intake — before any model tokens are spent — never silently used. The perceptual hash also dedupes: a second photo from effectively the same angle is flagged as adding no information.
As a final confidence check on the checkout itself, the repository ships a large deterministic test suite. We ran it in full:
python3 -m pytest forge/tests -q
# 1364 passed, 94 skipped, 3439 subtests passed in 305.41s
Over a thousand passing tests covering camera fitting, material physics, rig gates, visual-hull carving, and the workflow state machine is unusual rigor for a project this age, and it is the concrete reason the pipeline's many gates can be trusted to actually enforce something.
7. Step 5 — Invoke the skill in your coding agent#
Everything above was deterministic and model-free. From here, the agent drives — this is the honest boundary of the tutorial. Open Claude Code, Codex, or OpenCode in your project directory, attach or point to the object photo, and invoke the skill:
/img2threejs Rebuild this object as a Three.js model, keep the proportions, angles, and colours.That one line is enough: the skill classifies the subject, runs the detail inventory, and gates every pass on its own. When you already know what "correct" means for your subject, say so — each directive below maps onto a real gate or artifact in the pipeline, so it changes what gets enforced rather than just adding adjectives (quoted from the project's own README):
/img2threejs Rebuild the subject in this image as a procedural Three.js model.
Fidelity   Hold proportions and silhouette to the reference. Enumerate the identity-defining
           details first — bevels and rounding, panel seams, fasteners, engraved or painted
           linework, gloss vs matte zones, wear — and drop any detail you cannot place on a
           real component instead of faking it.
Materials  Derive the finish class and gradient stops from the reference pixels, not from
           memory. Flag any colour that will not survive tone-mapping.
Your job from this point is supervision, not sculpting: watch the next.py checklist advance, read the side-by-side comparisons at each pass, and answer when the pipeline hits a hard stop. For a multi-session reconstruction, the resume commands from the README are python3 forge/state.py init to create the state index first, then python3 forge/next.py --state .img2threejs/state.json to pick up exactly where the last session stopped.
8. Step 6 — Understand the staged pipeline (so you can supervise it)#
A build proceeds through eight ordered passes — blockout → structural → form → material → surface → lighting → interaction → optimization — and the order is load-bearing. Before any code is generated, the pipeline enumerates a detailInventory: the identity-defining small details (gloss, bevels, screws and rivets, engraved or painted linework, stains and wear). Every detail must map to a real component or material entry, and a strict-quality gate blocks generation until the inventory is complete. Drop any detail you cannot place on a real component instead of faking it — that sentence, repeated across the docs, is the project's whole quality philosophy in one line.
Each pass ends with a verification: the agent captures a render and compares it against the reference, and a pass fails if an identity-defining feature is wrong even when the global score looks fine. That per-feature strictness is what separates this from "vibe-coded 3D". The correction loop is bounded (3 refinements per pass, 6 total across the build); when it exhausts, you get a hard stop with a reason, not an infinite polish spiral.
Characters route through an anatomy-aware track — head-unit proportions, facial landmarks, pose — with per-region confidence reporting, and an opt-in projection path for maximum likeness. The docs are candid about the limit: a single image cannot guarantee exact likeness or reveal hidden sides, so the pipeline says so instead of faking confidence. Treat any single-photo human reconstruction as stylized unless you supply more views.
9. What you get at the end#
A successful build emits a TypeScript THREE.Group factory: the object rebuilt from primitives and procedural shaders, with the runtime hierarchy (pivots, sockets, colliders, action anchors) that makes it ready to animate rather than an inert lump. Because it is code, you can diff it, version it, tweak a material entry, or re-target a pivot — operations that are painful or impossible on extracted meshes.
The project's gallery is the fastest way to calibrate expectations: every demo runs live in the browser as generated code, with the reference image and the generated source inspectable side by side. Demos that are still works in progress are explicitly marked placeholder rather than final in the registry — the same honesty-about-limits instinct, applied to marketing.
10. When to use this vs the alternatives#
Use img2threejs when you need an editable, animatable, version-controlled 3D asset from a photo — game props, product configurators, interactive demos, action-ready objects with real pivots and sockets. The code-first output is the differentiator; nothing else in the image-to-3D space gives you a diffable artifact.
Use a hosted mesh generator (TRELLIS, Tripo3D) when you need a static visual fast and will never touch the geometry again. Note the repo itself acknowledges this route: the plugin-img2glb plugin emits image→GLB via a hosted TRELLIS space as an explicitly-selected terminal transform of an already-built model — never as a second way to build one.
Use photogrammetry when you can photograph the subject from many angles and need measured accuracy; img2threejs deliberately records unseen areas as low-confidence instead of inventing them, which is honest but means single-photo builds stay approximate on hidden sides.
Don't just prompt your coding agent directly. A raw "make me a 3D model of this" prompt has no intake gates, no detail inventory, no per-pass review, and no measured correction budget. You get one confident guess. img2threejs is what happens when you wrap that guess in a process that can say no.
Don't use it for likeness-critical human faces from a single photo, or when you need guaranteed geometric accuracy — the pipeline will tell you its per-region confidence, and you should believe it.
11. The takeaway#
The interesting thing about img2threejs is not really the 3D. It is the shape of the tool: a skill that spends model intelligence only where judgment is irreplaceable — reading a comparison sheet, authoring a spec, writing code — and pushes everything else into deterministic scripts with hard gates. That architecture is why it is token-efficient, why its 1,364-test suite can actually mean something, and why the output is a structured artifact instead of a guess.
If you take one practice from this tutorial into your own agent workflows, take the next.py pattern: a local state file as the checklist authority, evidence required for every completed step, bounded correction loops, and a hard stop instead of silent continuation. It works for 3D reconstruction. It would work for most things agents currently do from memory.
You now have the skill installed, the harness audited, the gates exercised, and the exact invocation your agent expects. Pick a well-lit object, run the intake, and let the pipeline argue with itself until the render matches.